
Analytics (1)
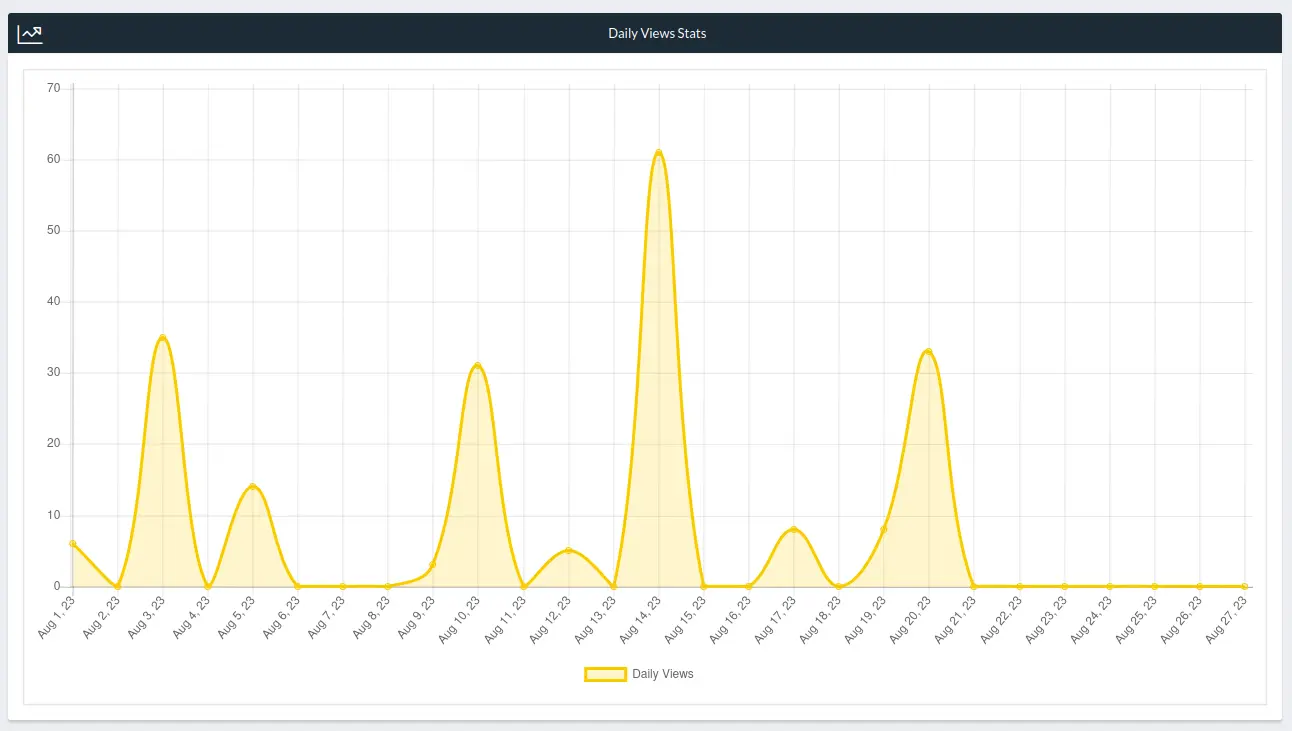
While the Reports tab on the Store Manager provides sales data on your products, Analytics shows the number of views you receive on your store and the origin of the views. It basically provides you with an idea how visitors find your store and your products.
An example is the number of clicks on a Facebook page that sends the visitor to your store on DushiMart to view a product you are promoting on Facebook. Another example is an article you wrote about a product or a coupon for a product.
Analytics will show you how many people clicked on the link in the article to view the product or coupon you wrote about in your article. Information you are able to view include:
The number of Daily Views your store receives:
The Top Referrer URL’s that send the viewers to your store and the most viewed products displayed in a pie graph: 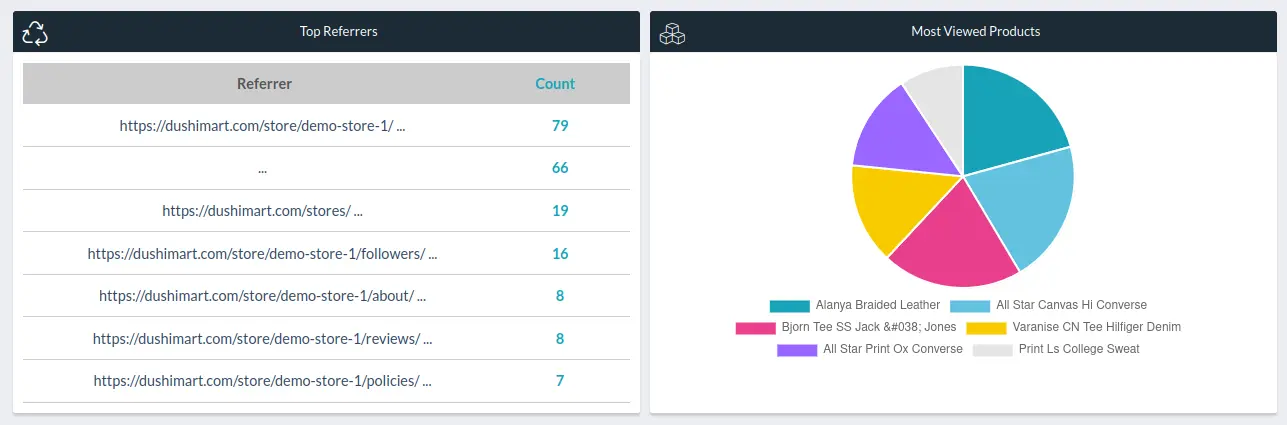
The number of views per product per day, per week, per month or any specified date range: 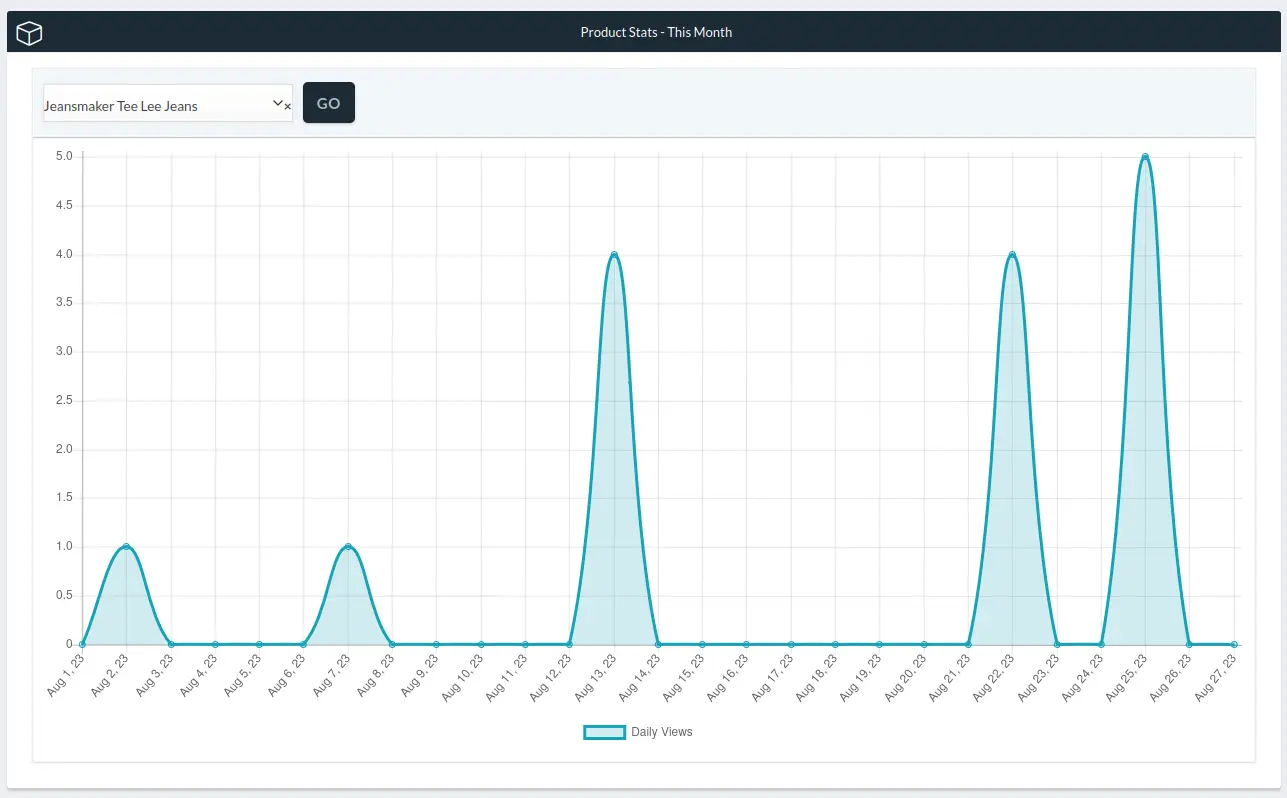
The number of views per product category per day, per week, per month or any specified date range:  analitica graficos grafieken
Begin Here (5)
The answer depends on your intent.
Do you wish to be a shopper, a vendor or both?
The best way to “test the waters” so to speak, is to create an account and make several transactions with one of the Demo Stores to see how the system works. The Curacao Demo Store is HERE, the Aruba Demo Store is HERE and the Bonaire Demo Store is HERE.
Of course since it is a demo store with demo products there are no commitments whatsoever involved. However, it will give you a real feel for DushiMart.
If you are interested in registering as a vendor, the best place to start is to go through the Help/FAQ’s to get an idea how the system works.
After you feel comfortable that DushiMart is for you, decide which of the three options you have for working with DushiMart:
- Pay a monthly membership fee. You set up your store yourself and manage it 100%. All monetary transactions occur directly between you and your customer, which is standard policy of DushiMart.
- Pay the monthly membership fee. DushiMart sets up your store for you for a fee. You provide DushiMart with all digital artwork and data needed to set up your store. You manage your store thereafter.
- No membership fee. You sign a separate agreement with DushiMart to market your product online for you. You pay DushiMart a commission for each sale. Commission depends on the scope of work and conditions agreed upon.
If you decide on option 1 or 2, go ahead and open a vendor account with a membership plan that fits your needs. Each membership plan comes with the first 30 days free of charge so you have the time to set up your store and learn to work with the system. If you wish to have assistance in setting up your store or a contract to help you manage your store, contact us. begin starten comienza empezar
If you are a registered vendor, you will have access to the Store Manager.
Log into your account. Next click on the “Store Manager” button or on “Store Manager” on the menu to the left of the screen.
Dutch Image Spanish Image 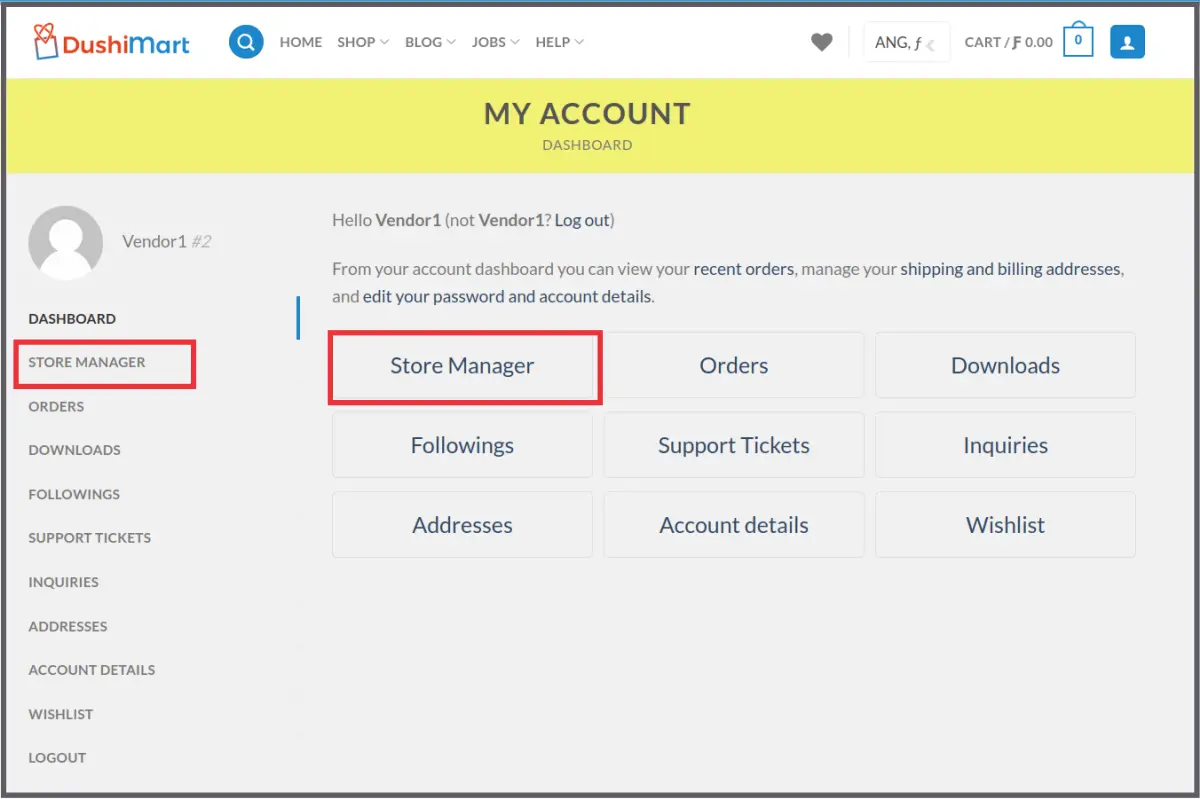 gerente de tienda winkel manager
There are three main areas. The Menu (1), the Heading (2) and the Content Area. (3)
Dutch Image Spanish Image 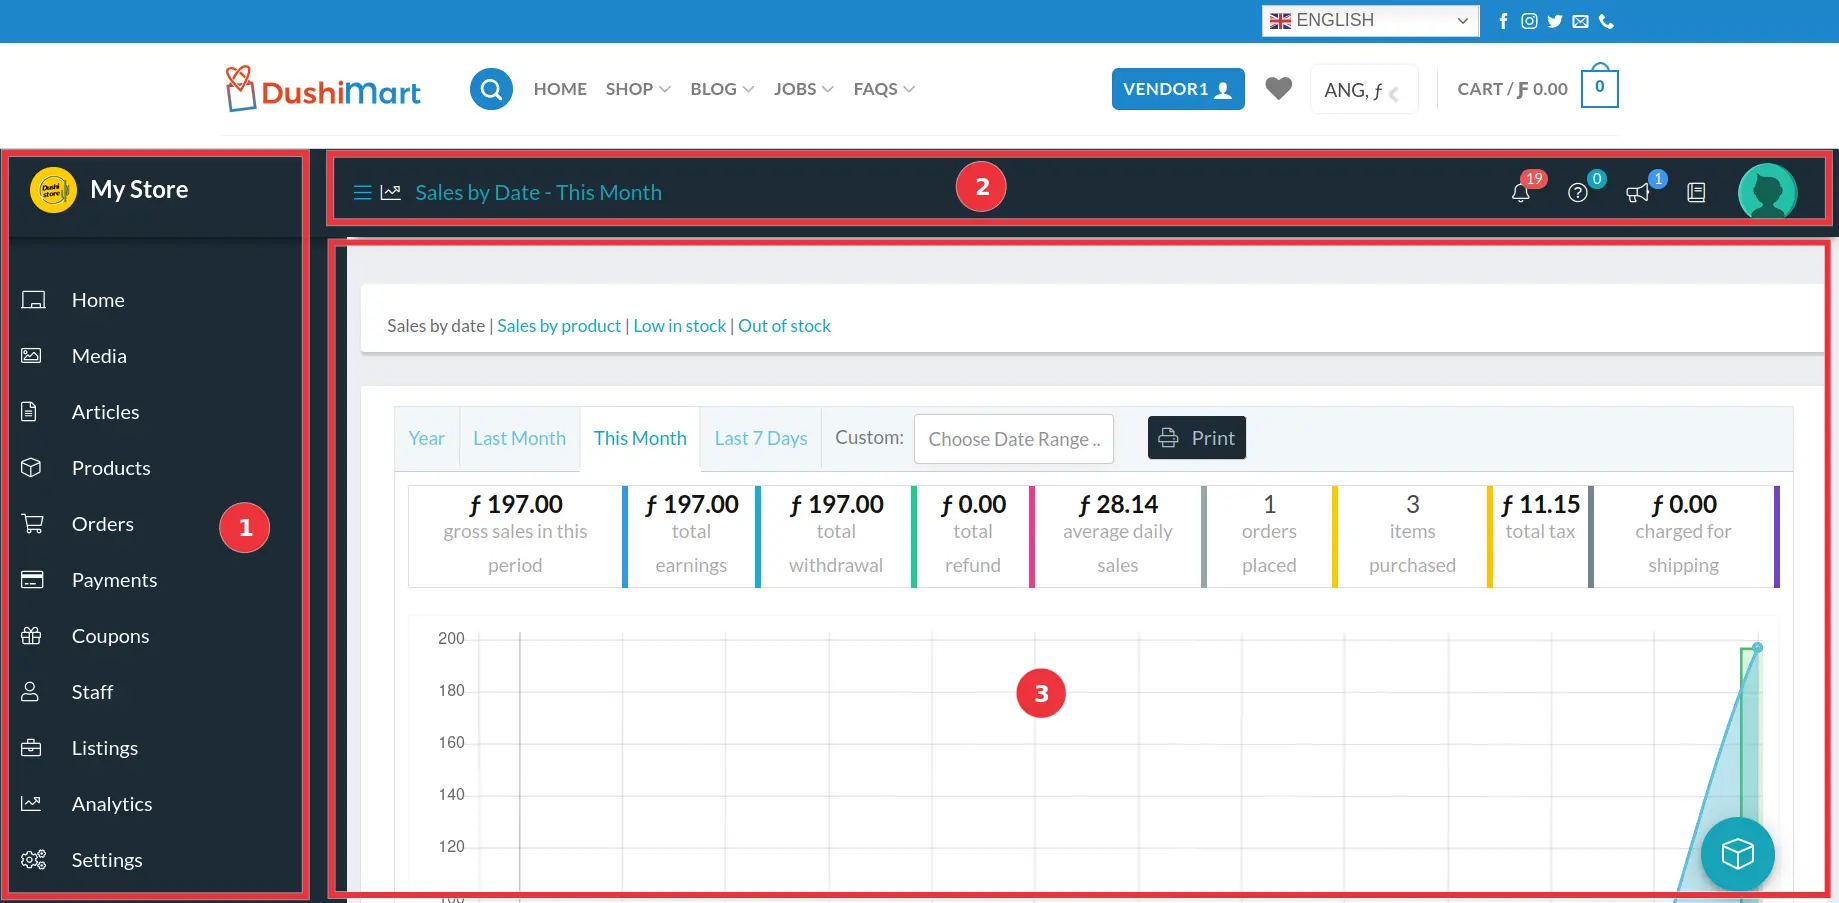 Depending on the Menu choice (1), the Content Area (3) will change.
The Heading has several icons of importance.

- Notification Board provides an overview of all notification important to the vendor
- Inquiry Board shows a list of customer inquiries. Vendors can use it to respond to questions posed by customers.
- Announcements to vendors made by DushiMart. Vendors will have the option to respond to the announcements or not, depending on the type of message.
- Knowledgebase is a repository of Instructions, “How To’s” and FAQ’s related to vendor issues. Many of these articles can also be accessed via FAQ on the main menu.
- Profile Manager. Define things like addresses, password, social media accounts etc.
The Notification Board looks like this:
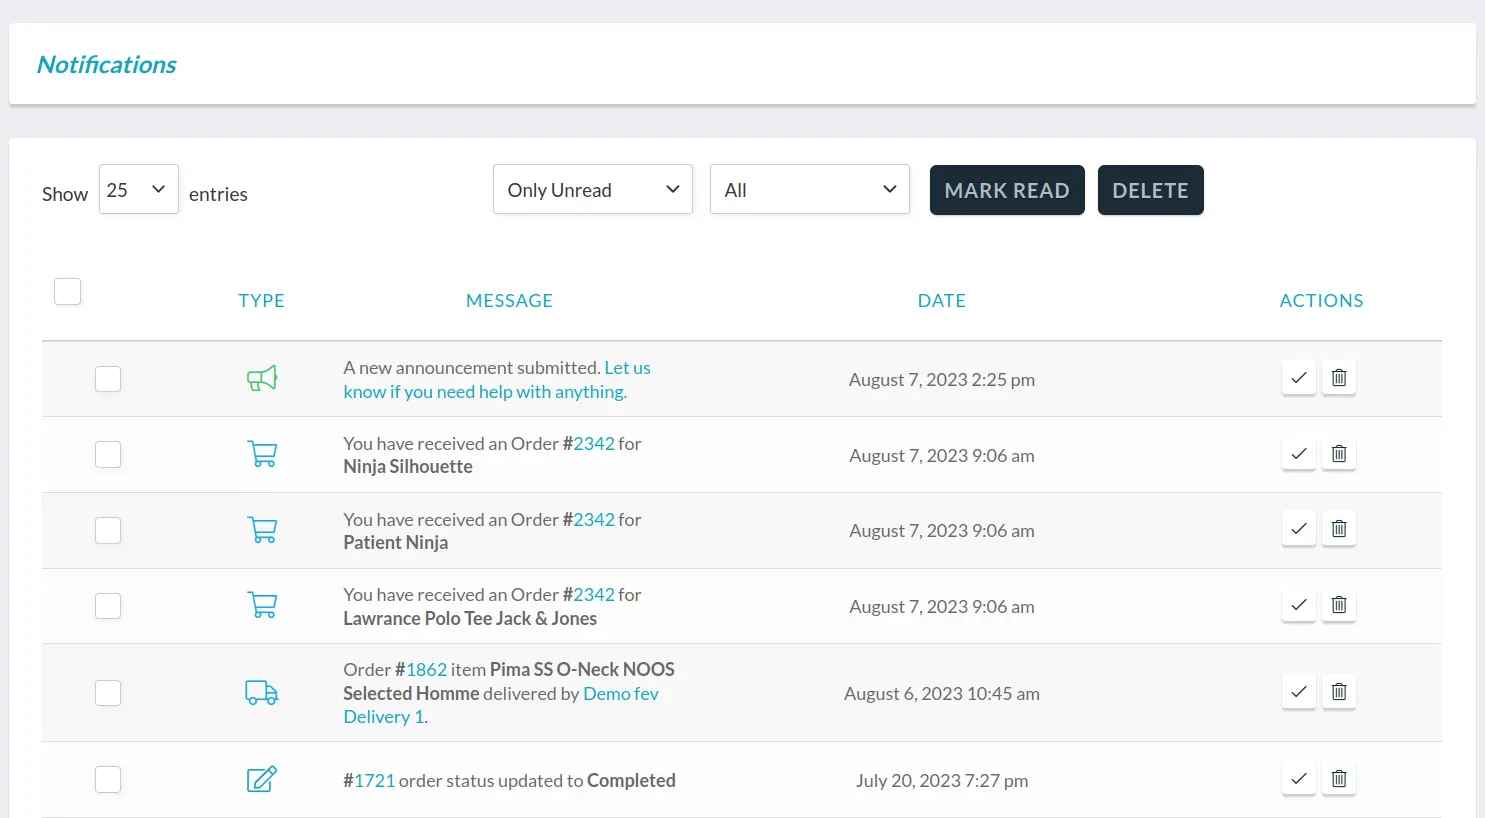
Types of Notifications include:
- Direct messages from users of DushiMart
- Store Announcements from DushiMart
- Product Reviews of customers
- Low Stock Product
- Changes is Status
- New Product
- New Category
- New Order
- New Inquiry
- New Support request
- New Staff
- New Customer
- New Follower
- New Seller
- New Membership
- Approved Membership
- Reminders Membership issues
- Shipment Tracking
- Shipment Received by Customer
- Seller Verification
- Store Review
- New Delivery Person
- Delivery Person Assigned to order
- Delivery Completed.
gerente tienda, winkel manager
Yes. You can cancel your membership anytime you want.
However, please take note that the partially used membership fee is not refunded. Hence the best time to cancel you membership is at the end of the membership period (every 30 days).
To cancel your membership, go to the Store Manager and click on Settings.
Next, click on either the Profile icon on the top right of the store manager or on Membership.
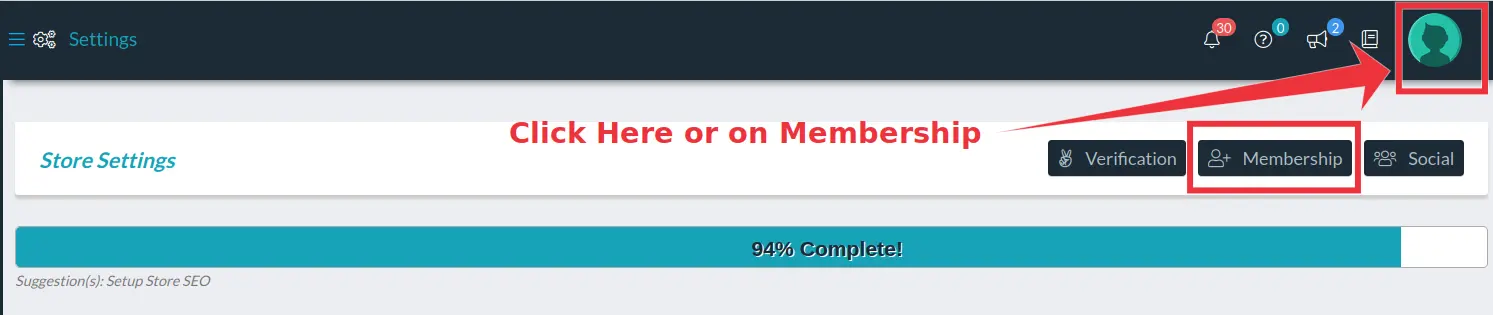
Next click on the Cancel button.
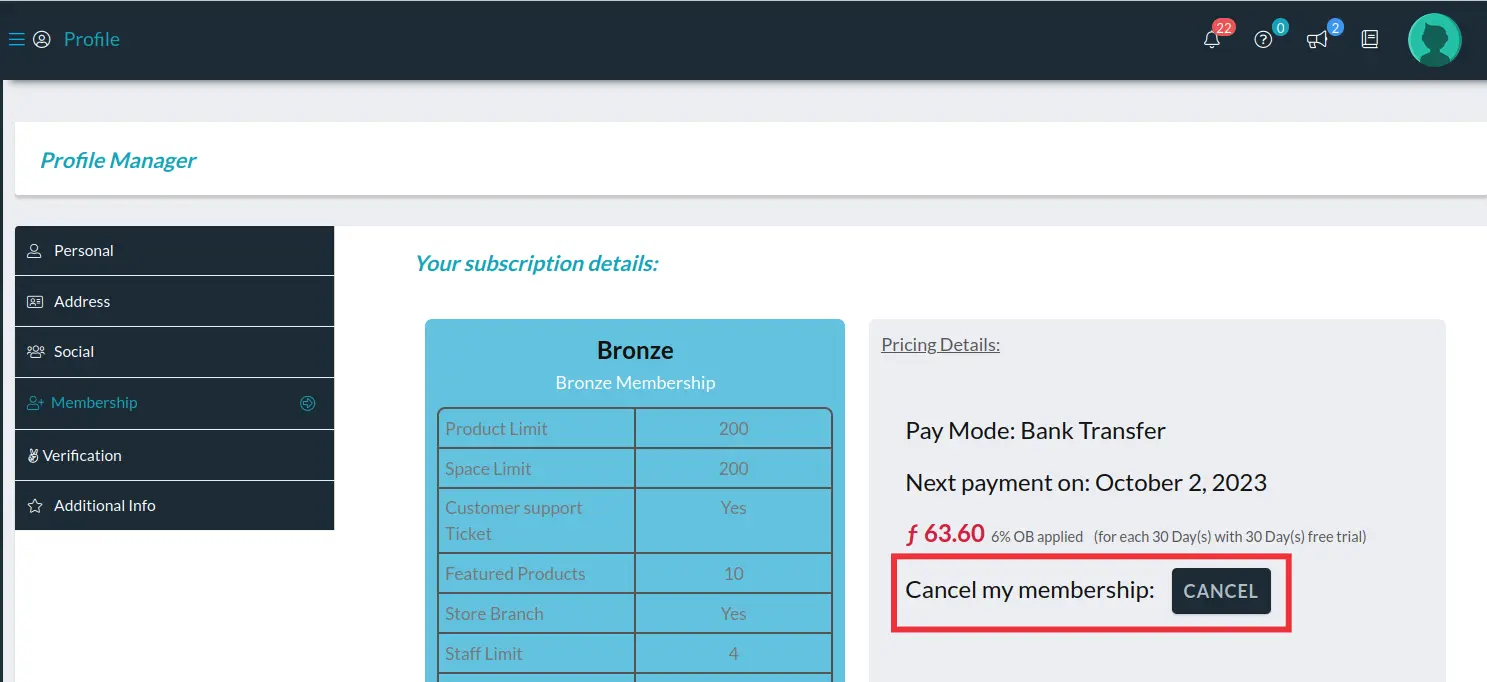
If you cancel your membership, your store will be be hidden until you decide to renew your membership. However if you do not do so within 6 months, all information in your store will be deleted. Cancelar annuleren lidmaatschap membresia terminar anular
GOLO is the acronym for Go Local.
A GOLO membership is for vendors who produce their own products and who sell their products directly to end consumers.
This entitles them to a 50% discount on the membership fees.
The purpose of this initiative it so provide local producers a platform that will help them reach potential customers that they otherwise would not have the means for.
If you fit this profile and are interested in learning more, click HERE.
Capabilities (2)
DushiMart allows you as a vendor to add employees and associates as staff members. Examples are administrative personnel, inventory management personnel etc.
The vendor assigns each staff member access to every area of the online store depending on their functions and responsibilities. The number of staff members per store depends on the membership plan the vendor subscribed to. For information on the number of staff members allowed per membership plan, check out the membership plan schedule here.
To define a new staff member go to the Store Manager.
Click on Staff (1). This will open a window of all staff members currently defined.
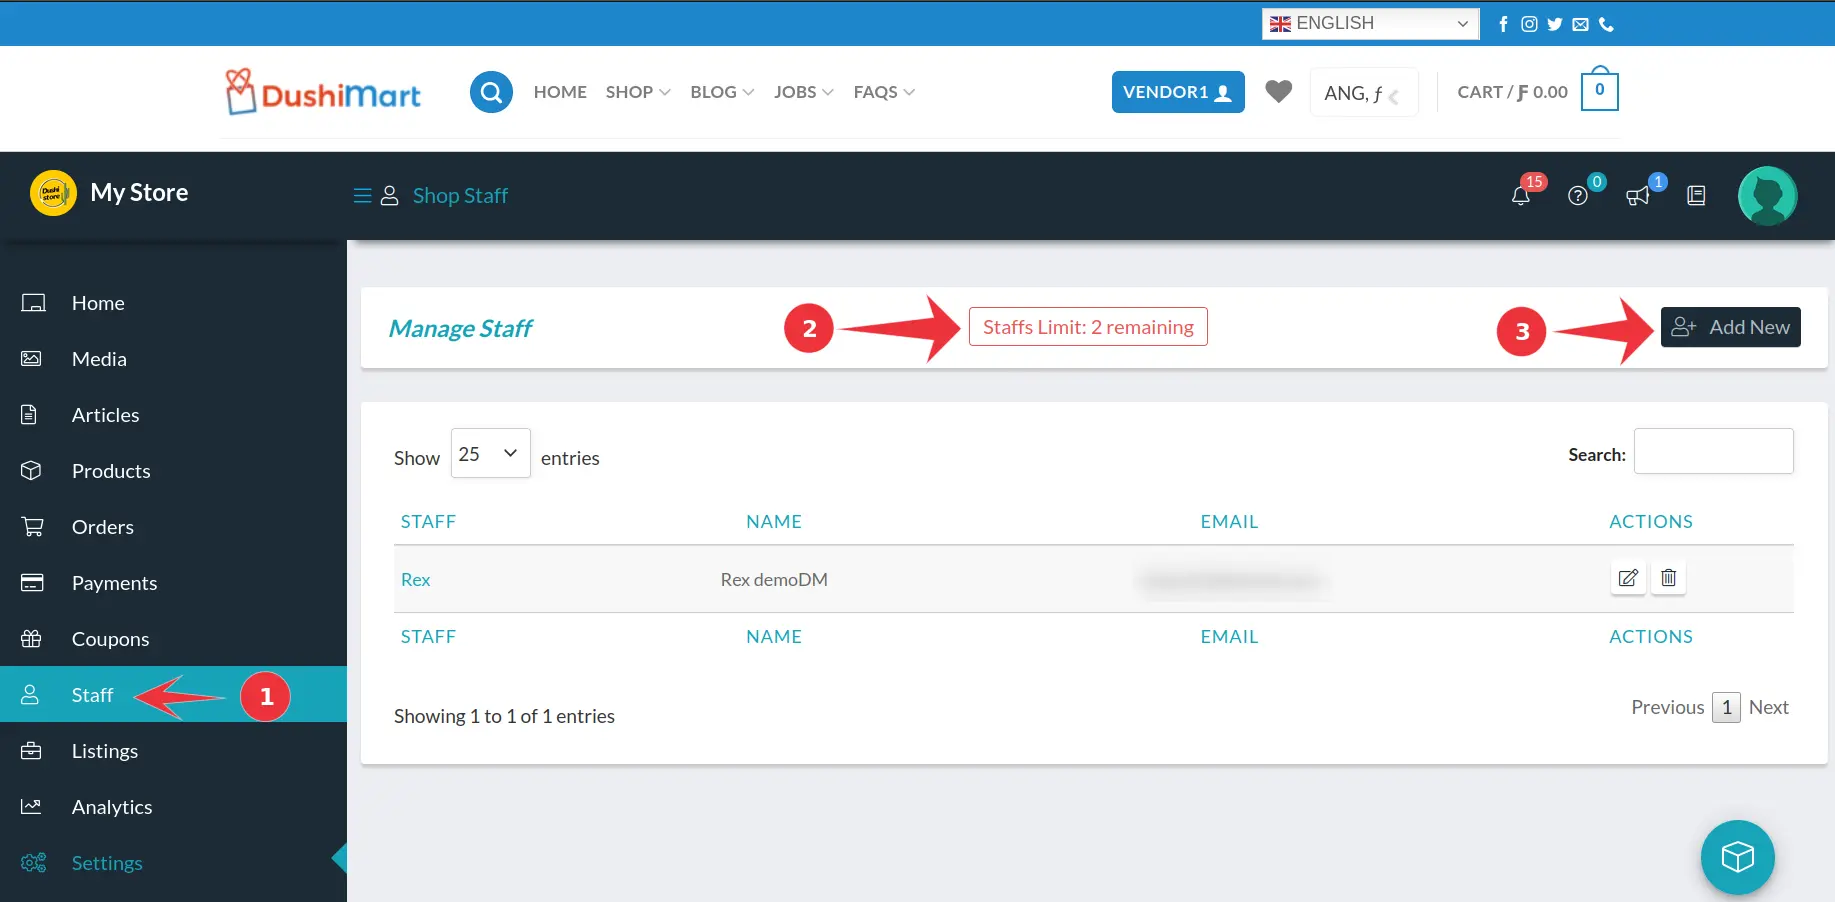
Depending on the membership plan you are subscribed to you will see at the top of the screen the number of remaining staff members you can define. (2) Click on Add New (3). This will open the window to define the new staff member.
Dutch Image Spanish Image 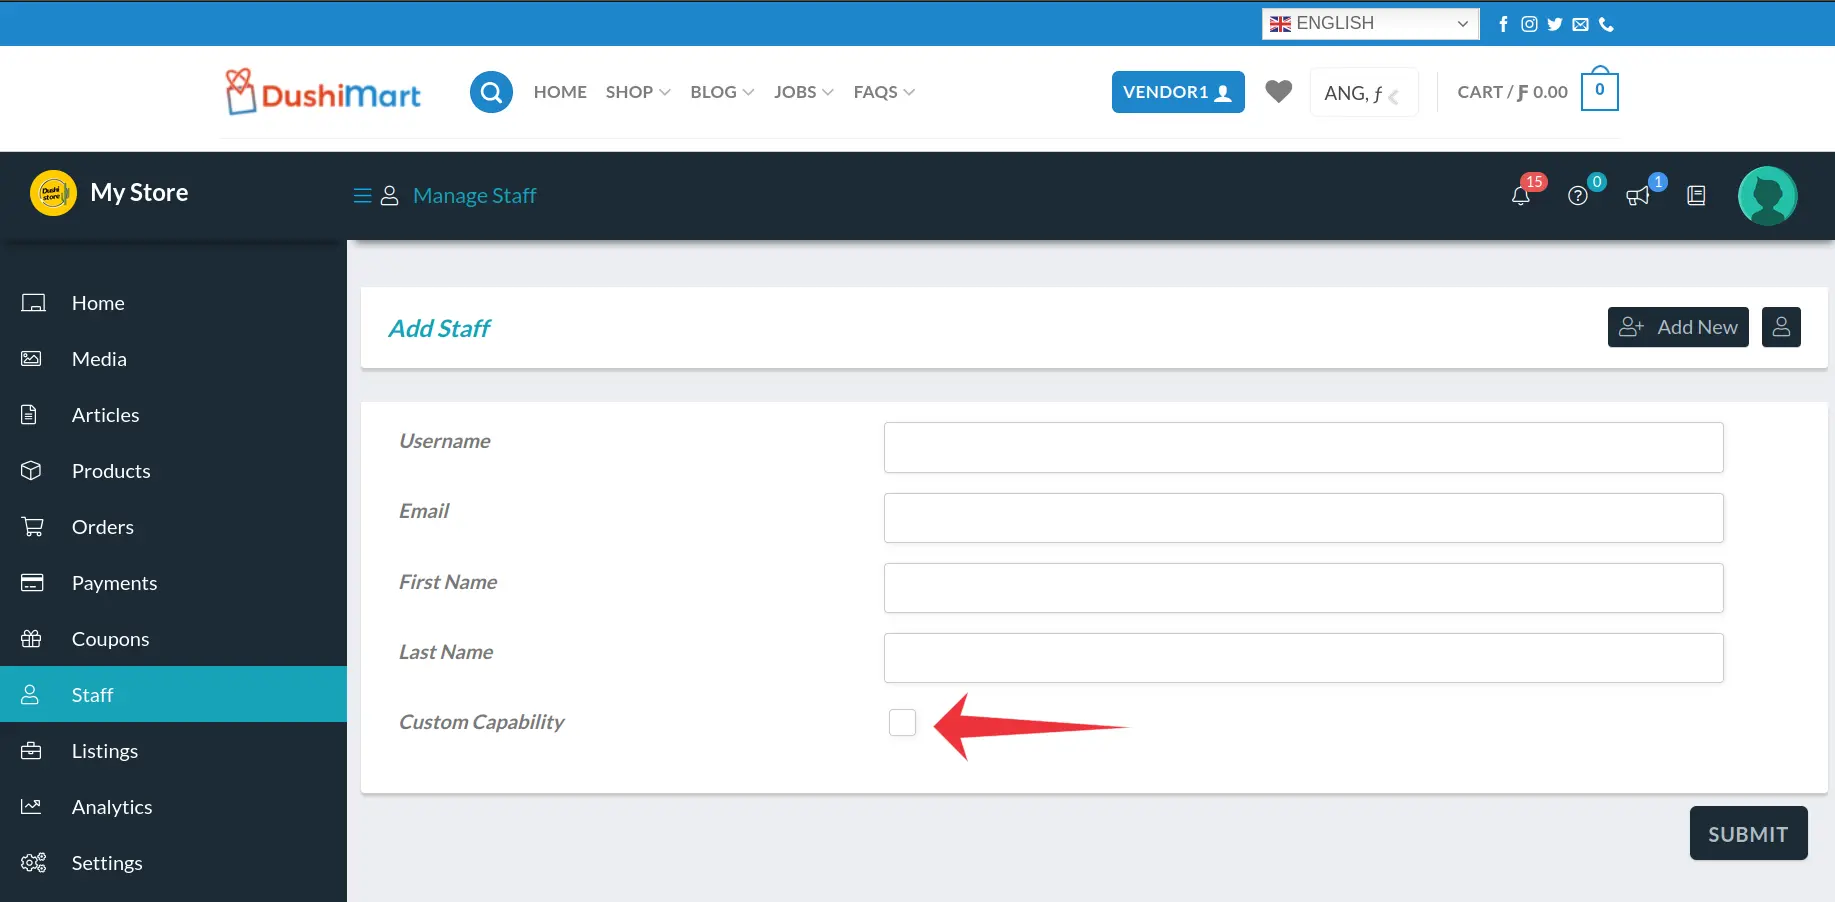 Fill out the information for the new staff member and click on Custom Capability to define what the staff member has access to. For more information on staff member capabilities, click HERE. acceso, capacidades, mogelijkheden, personal, personeel, toegang
Staff members are assigned capabilities depending on their function and tasks.
Vendors must first define their staff members using the Store Manager. For instructions on how to do this, click here.
To assign capabilities to staff members, select the staff member and click on the Manage Staff Icon.
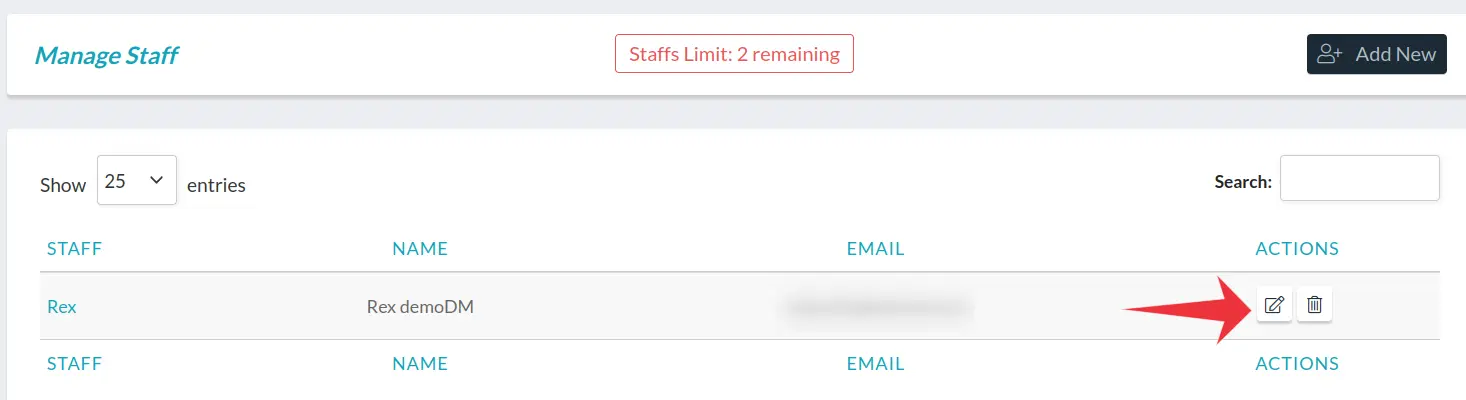
Next click on the checkbox Custom Capability.
This will open a window with all capabilities as depicted in the video clip hereunder. Each capability can be triggered on or off.
capacidades, manejar personal, mogelijkheden, personeel beheer
Coupons (1)
Vendors can make their own coupons that customers can use to purchase their products at a discount.
These coupons will be visible to shoppers on the vendor store if the vendor chooses this option (7).
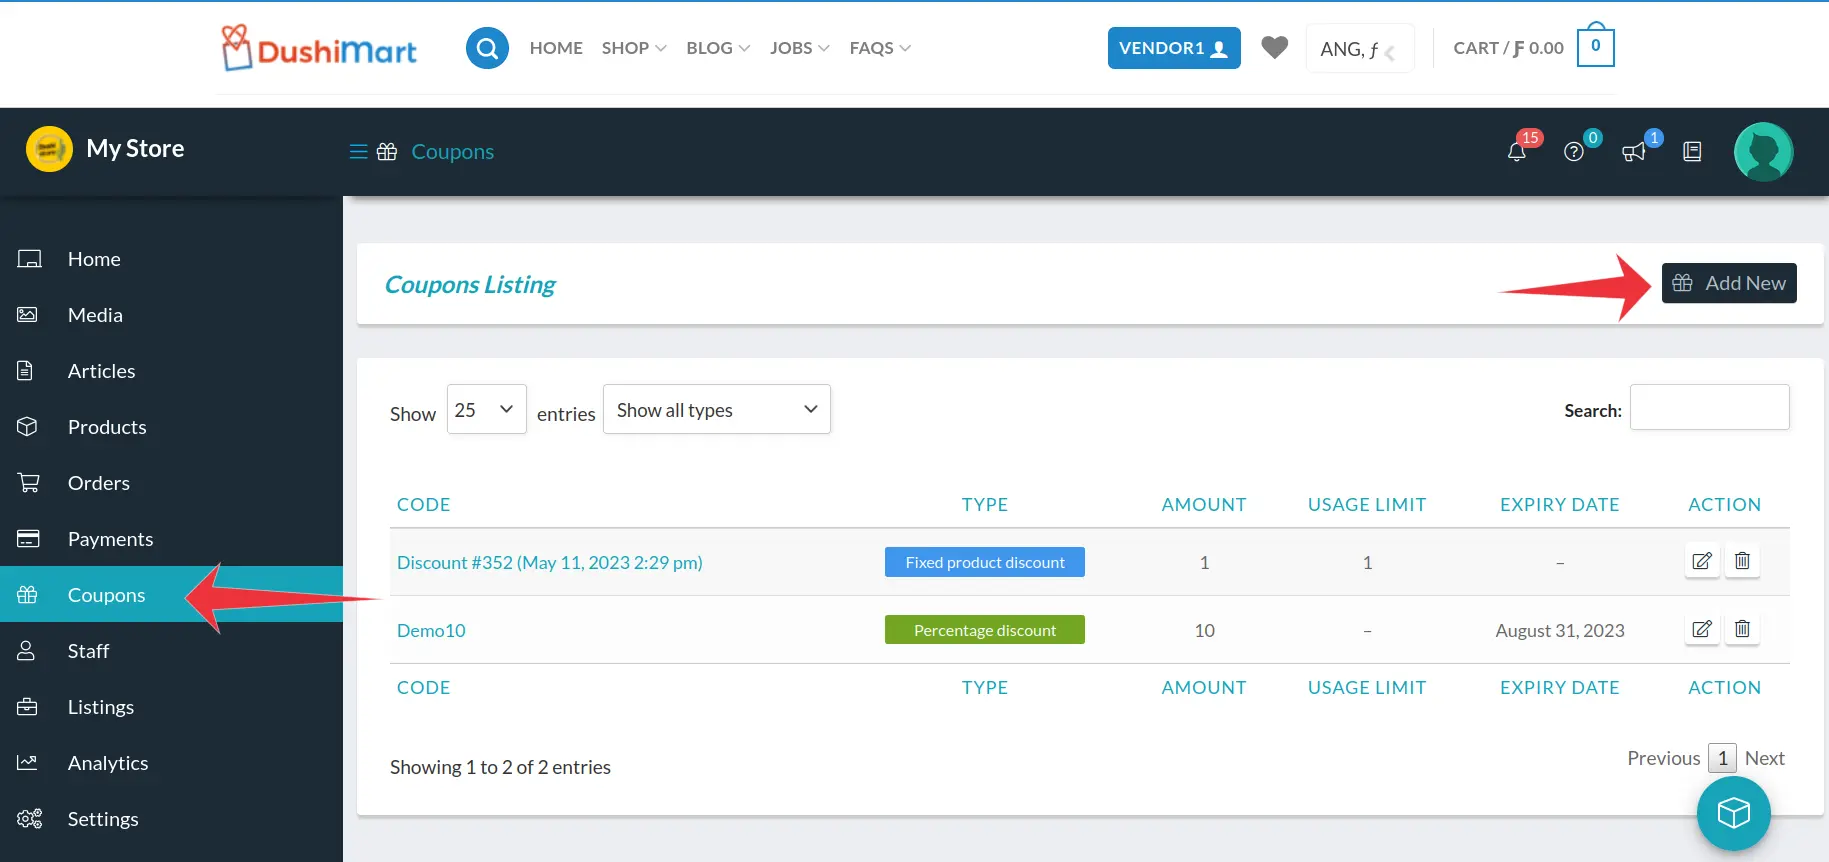
To make a coupon, click on Coupons and click on Add New
Enter all details of the coupon.
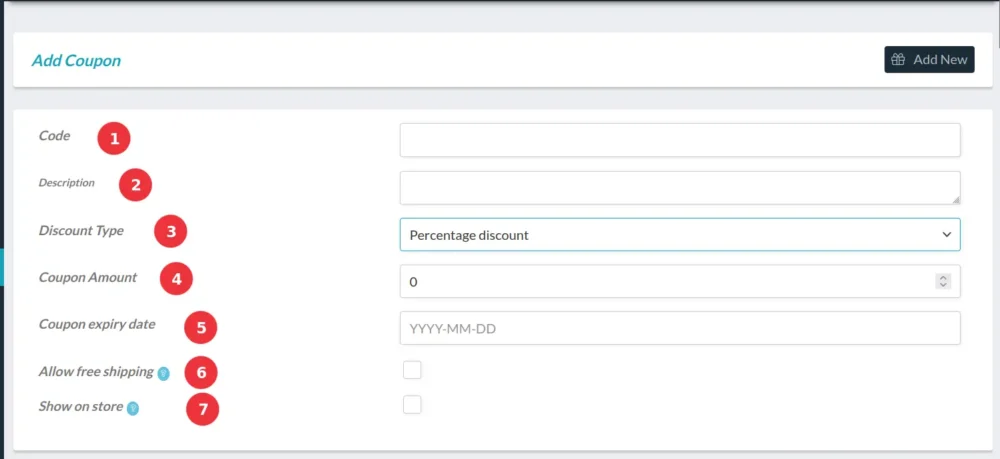
(1) Enter the coupon code. This code will be the code the shoppers see and use to redeem the coupon when checking out.
(2) Enter the Code description.
(3) Select the Discount Type for the coupon. Options are a percentage discount or a fixed amount discount.
(4) Enter the Coupon amount.
(5) Enter the expiry date. After this date the coupon will expire.
(6) If free shipping is allowed with this coupon click on the checkbox.
(7) To display the coupon on the store page, click on the checkbox.
Next, the coupon restrictions must be defined. Click on Restriction.
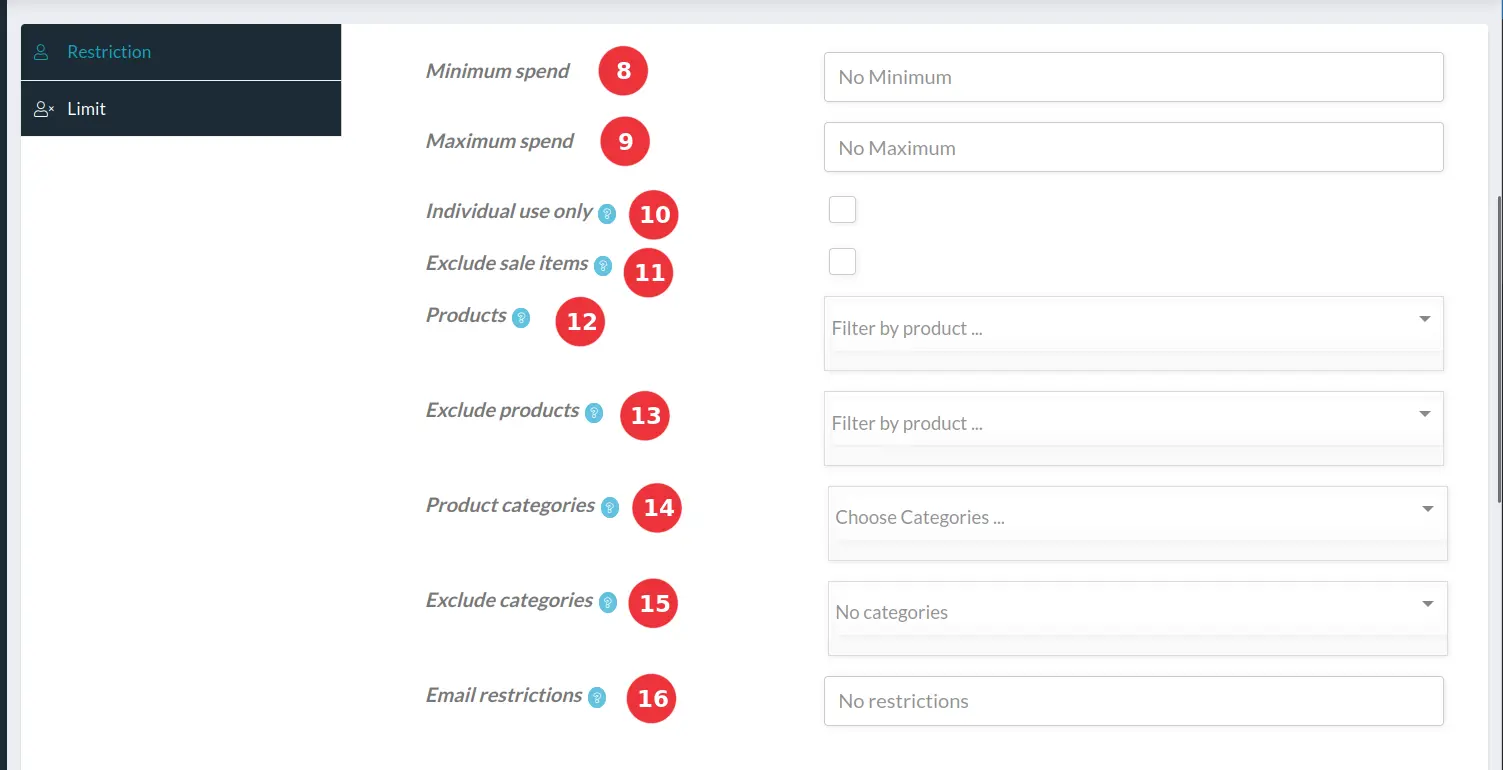
(8) If the coupon is valid only if a certain amount is spent, enter the amount here. Else leave it empty.
(9) If the coupon is not valid above a certain amount, enter the amount here. Else leave it empty.
(10) If the coupon cannot be used together with other coupons, click the checkbox.
(11) if the coupon cannot be used for products on sale, click the checkbox.
(12) If the coupon is valid for specific products, select them here.
(13) If the coupon cannot be used for certain products, select them here.
(14) If the coupon is valid only for certain categories of products, select the categories here.
(15) If the coupon is invalid for certain categories of products, select them here.
(16) If the coupon cannot be used by certain shoppers, enter their emails here.
Next, the Coupon Limits must be defined. Click on Limit.
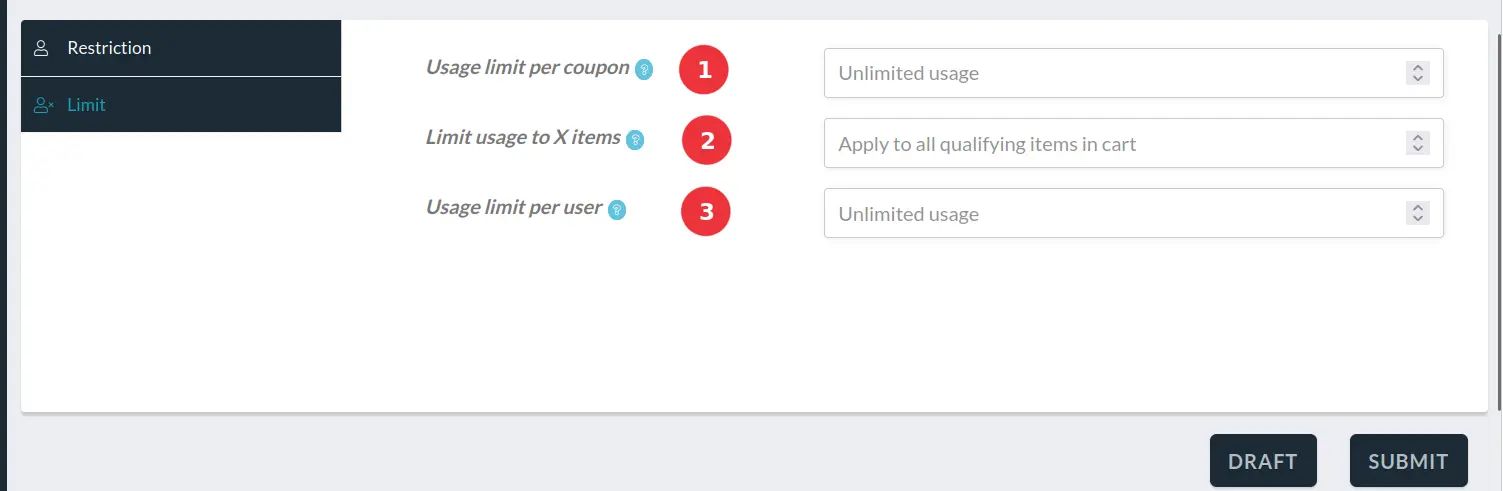
(1) If the coupon can be used a maximum number of times then enter the maximum number here. Once this number is reached, the coupon will not be applicable anymore. For example if the number is 100 then the first 100 customers will be able to use the coupon.
(2) If the coupon is valid for only a maximum number of products in the cart, enter it here. For example if the number is 10 and the cart has 12 items, the coupon will be valid for the first 10 items only.
(3) Enter the number of times a customer can use the coupon. When done, click on SUMBIT to save it and make it live so that it is visible to the public. To prevent the coupon from going live (being made public), click on DRAFT. cupón, coupones, kortingsbonnen
Customers (4)
Yes you can.
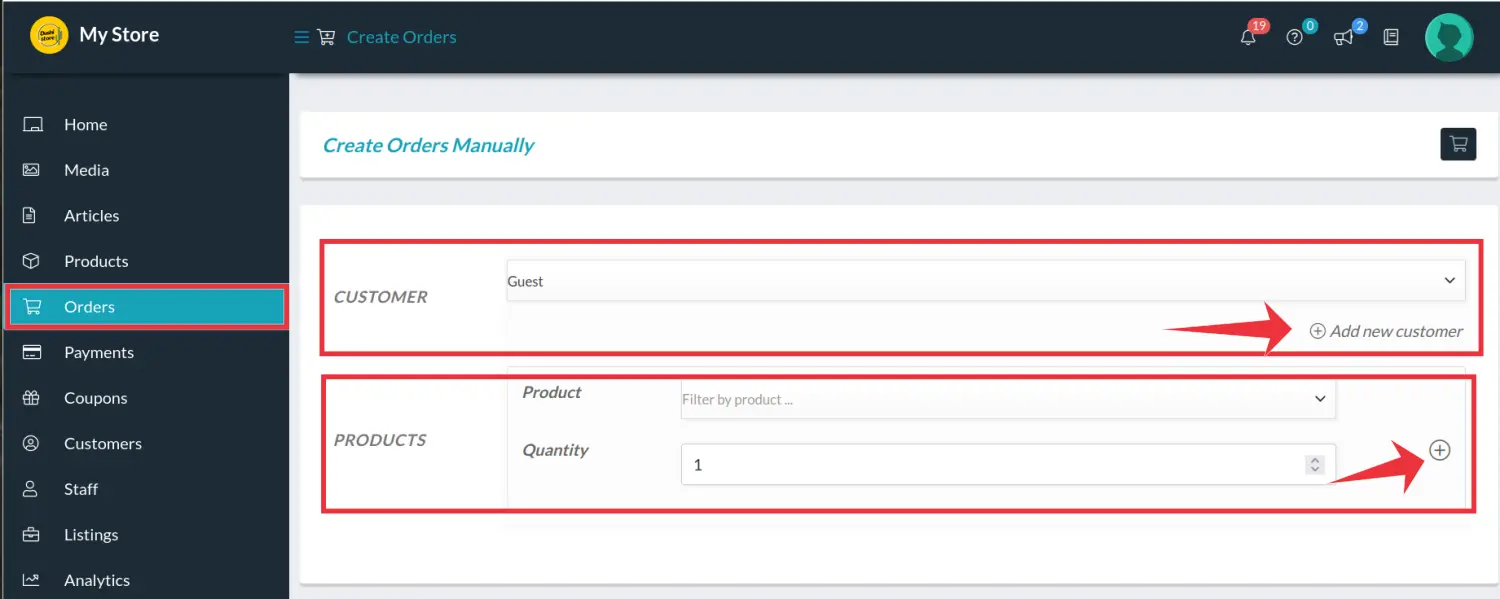
Go to the Store Manager and click on Orders. Click on Add New.
Enter the customer or if the customer is new, click on “Add new customer“. Next enter the products and their quantities. To add more products, click on the + icon.
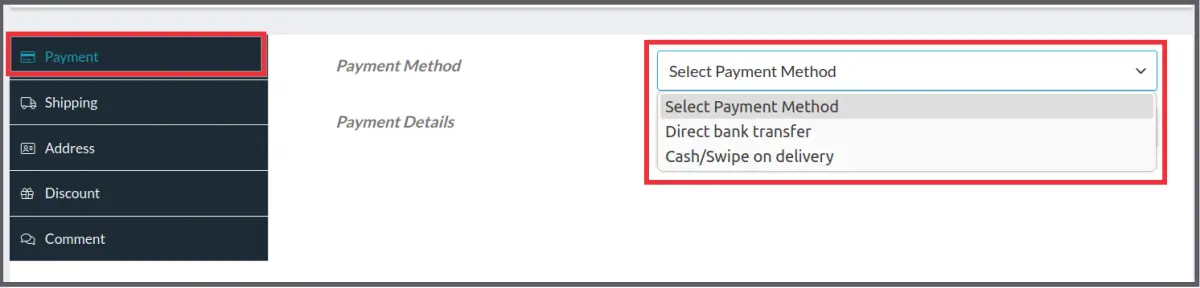
Next select the payment method for the offline order.
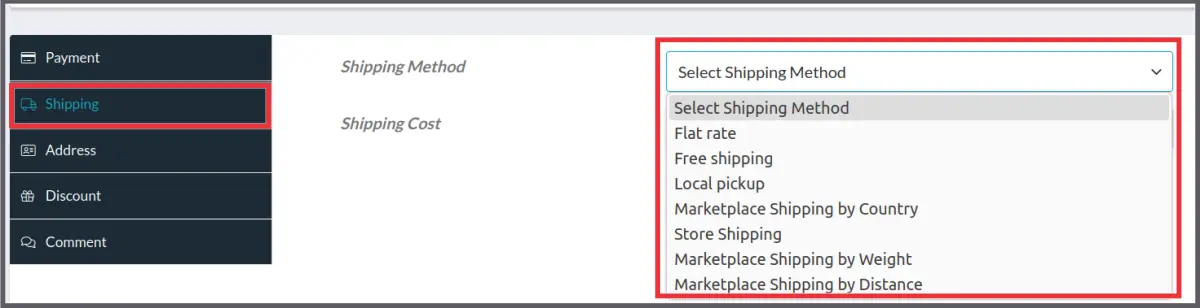
Next select the shipping method.
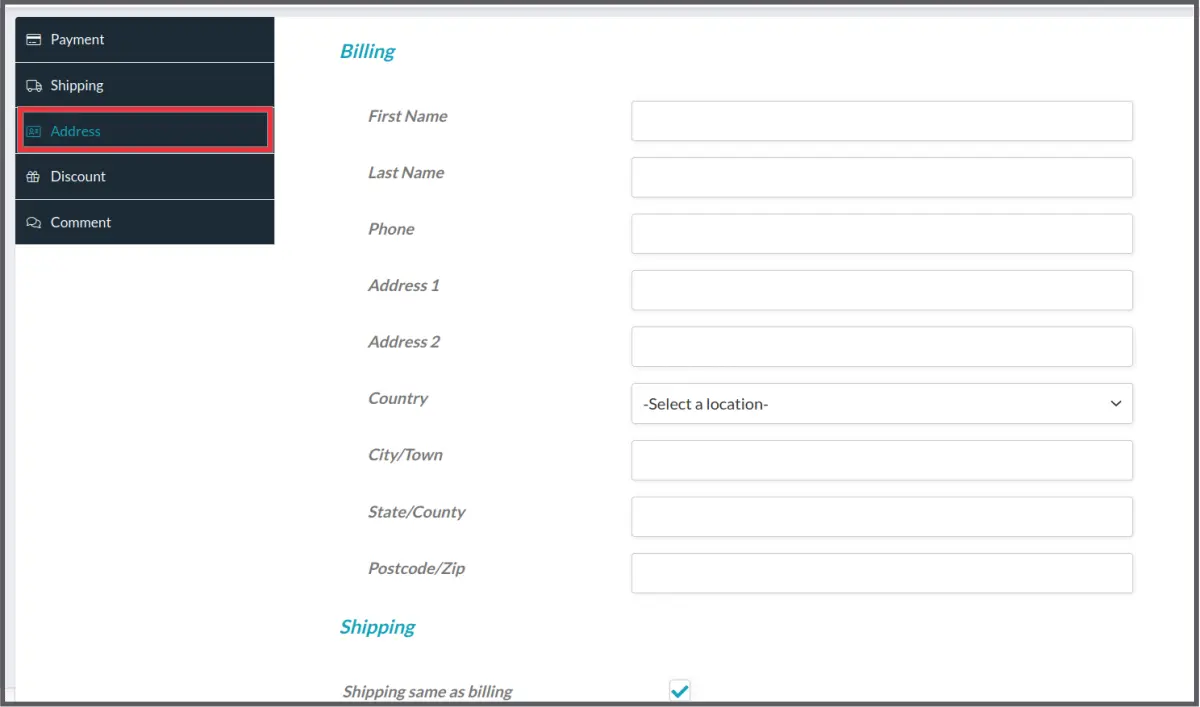
Enter the billing and shipping address if that was not entered when the customer was created or selected.
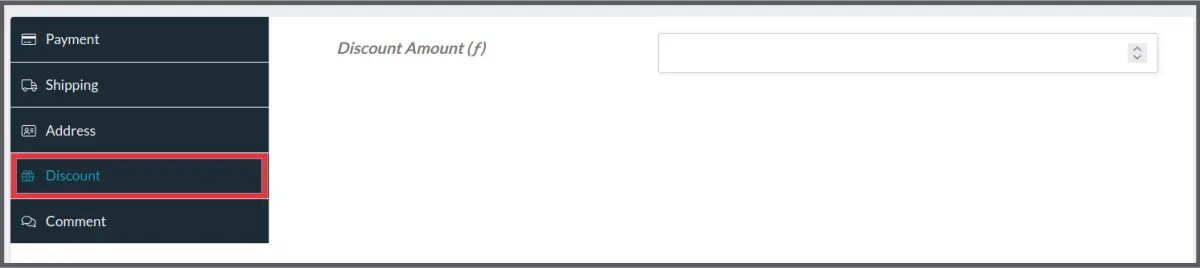
If applicable, enter a discount for the order.
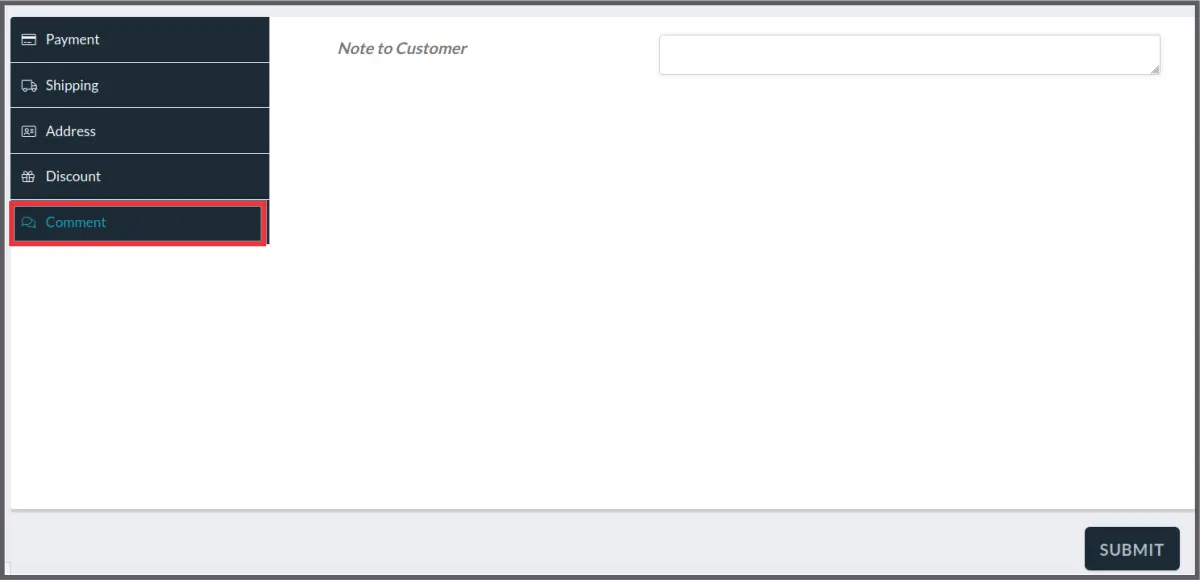
Enter any comments for the order and click Submit to complete the order.
 offline bestelling orden manual
Support tickets are issued to customers after they raise a question related to a product they have purchased.
This allows for direct communication between the customer and the vendor.
The customer selects the order and clicks on Support to open the support ticket.

The customer chooses the Category for the query.

The customer chooses the Priority level, and the product of the order.
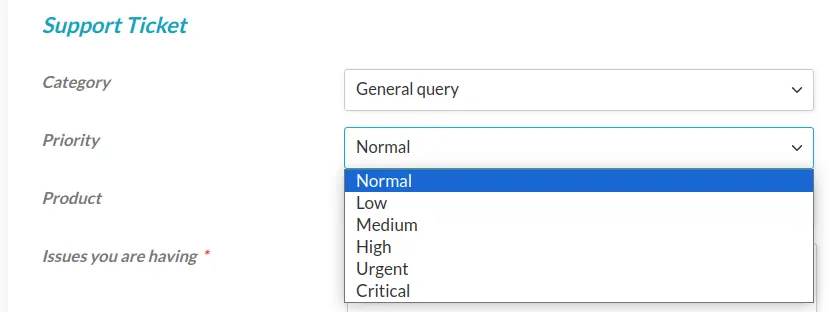
They fill out the Issue your are having and then click on Submit. Customers can view their tickets by clicking on Support Tickets on their dashboard and then on View.

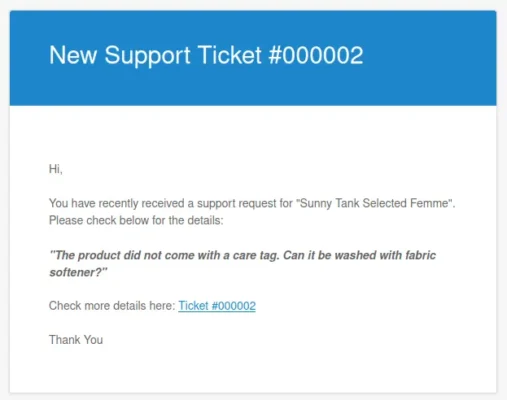
Both the customer and the vendor receive notification of the support ticket via email.
The vendor opens their Shop Manager and clicks on Support to see the ticket.
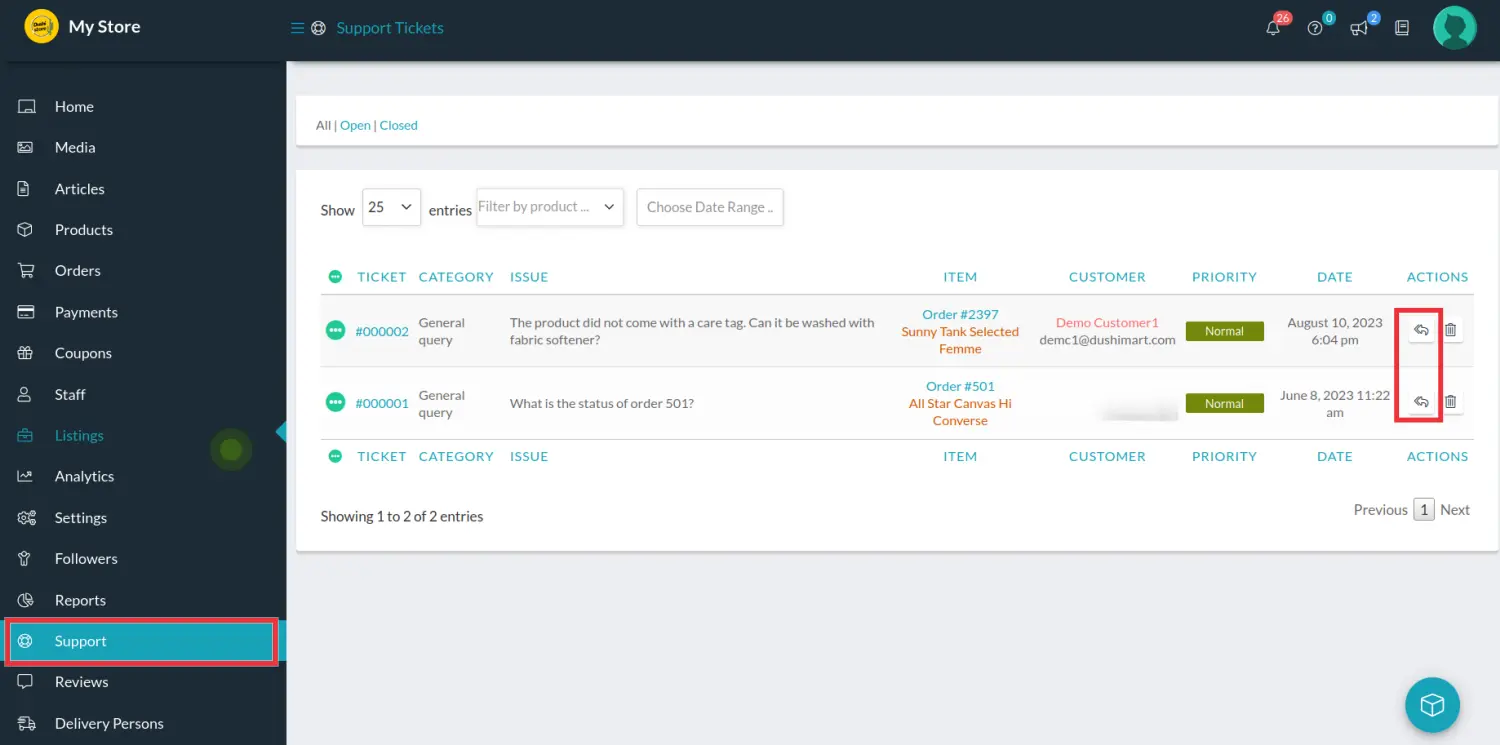
To reply to the ticket, click on the Return Arrow icon under Actions. This opens the Ticket window where the vendor can provide their response to the ticket.

Upon conclusion of the support ticket, the vendor and the customer can close the ticket.
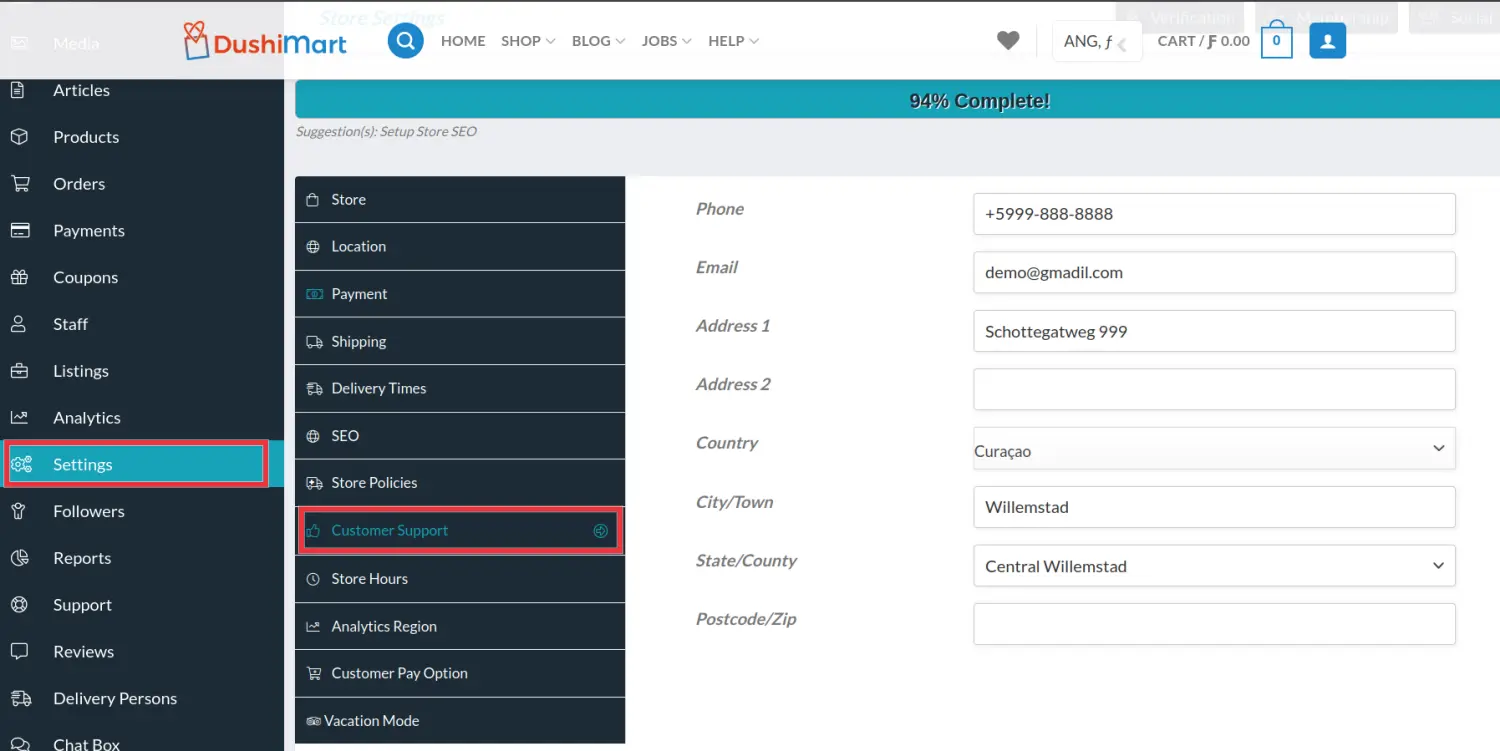
Customers can also contact vendor support via telephone and email for matters not related to a purchase.
This information is provided to the customer via the information entered in the settings of the vendor store.
Open the Store manager, click on Settings and then Customer Support. Enter all relevant information.
 apoyo cliente klantenservice ondersteuningsticket soporte
Yes you can.
Vendors can add as many customers they want and manage them at any given time.
To add a new customer go to the Store Manager, click on Customers and “Add New“.

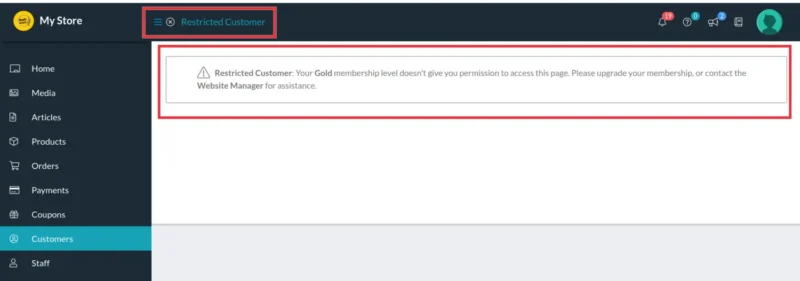
Customers created by the vendor can be managed by clicking on the Eye Icon under the Actions column.
To edit the customer details, click on the Pen and Paper icon under the Actions column.
Customers who make a purchase from a vendor store will be displayed on the list of customers. However, vendor will be restricted from managing customers that were not created by vendors.
Vendor will always have access to the purchase history of customers by clicking on the “Last Order” number or by accessing the Orders tab on the main menu. That will open a list of all purchases the customer made at the vendor store.
 clientes cliente clientas klanten klant
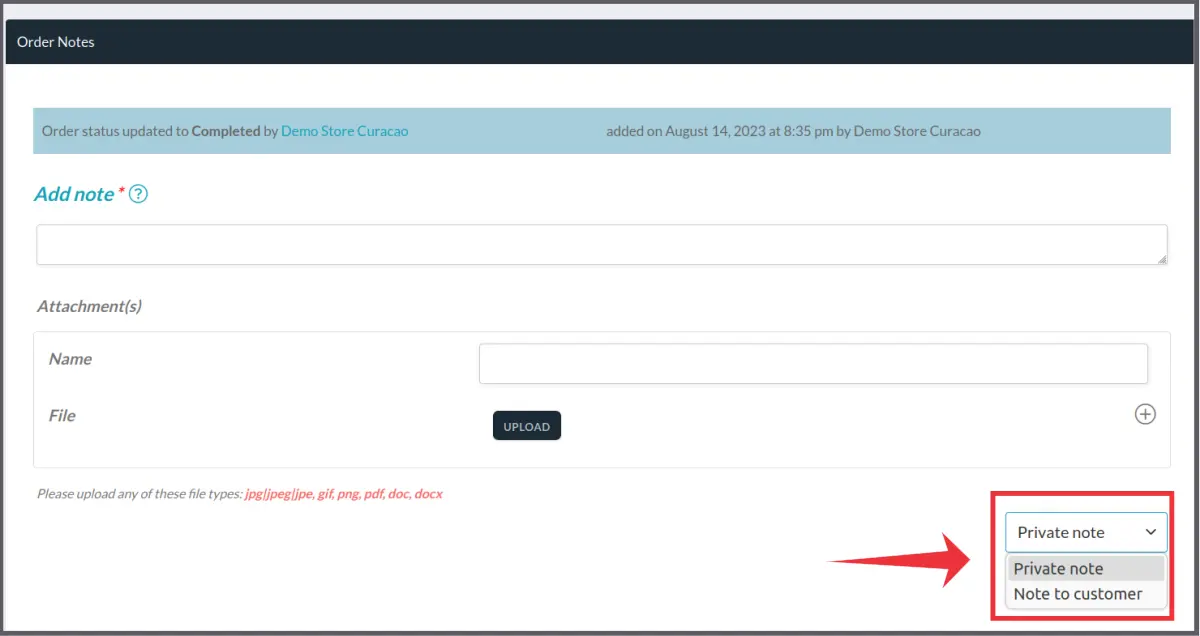
You can send notes to customers about their order by doing the following.
Open the order in question.
Go to the bottom of the order until you see “Order Notes” .
Under “Add note” enter your message to the customer and select if the note is private for internal use or if it is to be sent to the customer.
bestelling klant opmerking nota al cliente orden pedido
Delivery (2)
Vendors who offer delivery can assign delivery persons to orders.
First, they must define the delivery person to their store and activate the delivery feature for their store. This is done the following way:
In the Store Manager, click on Delivery Persons on the menu. This will open the “Manage Delivery Persons” window.
Click on Add New.
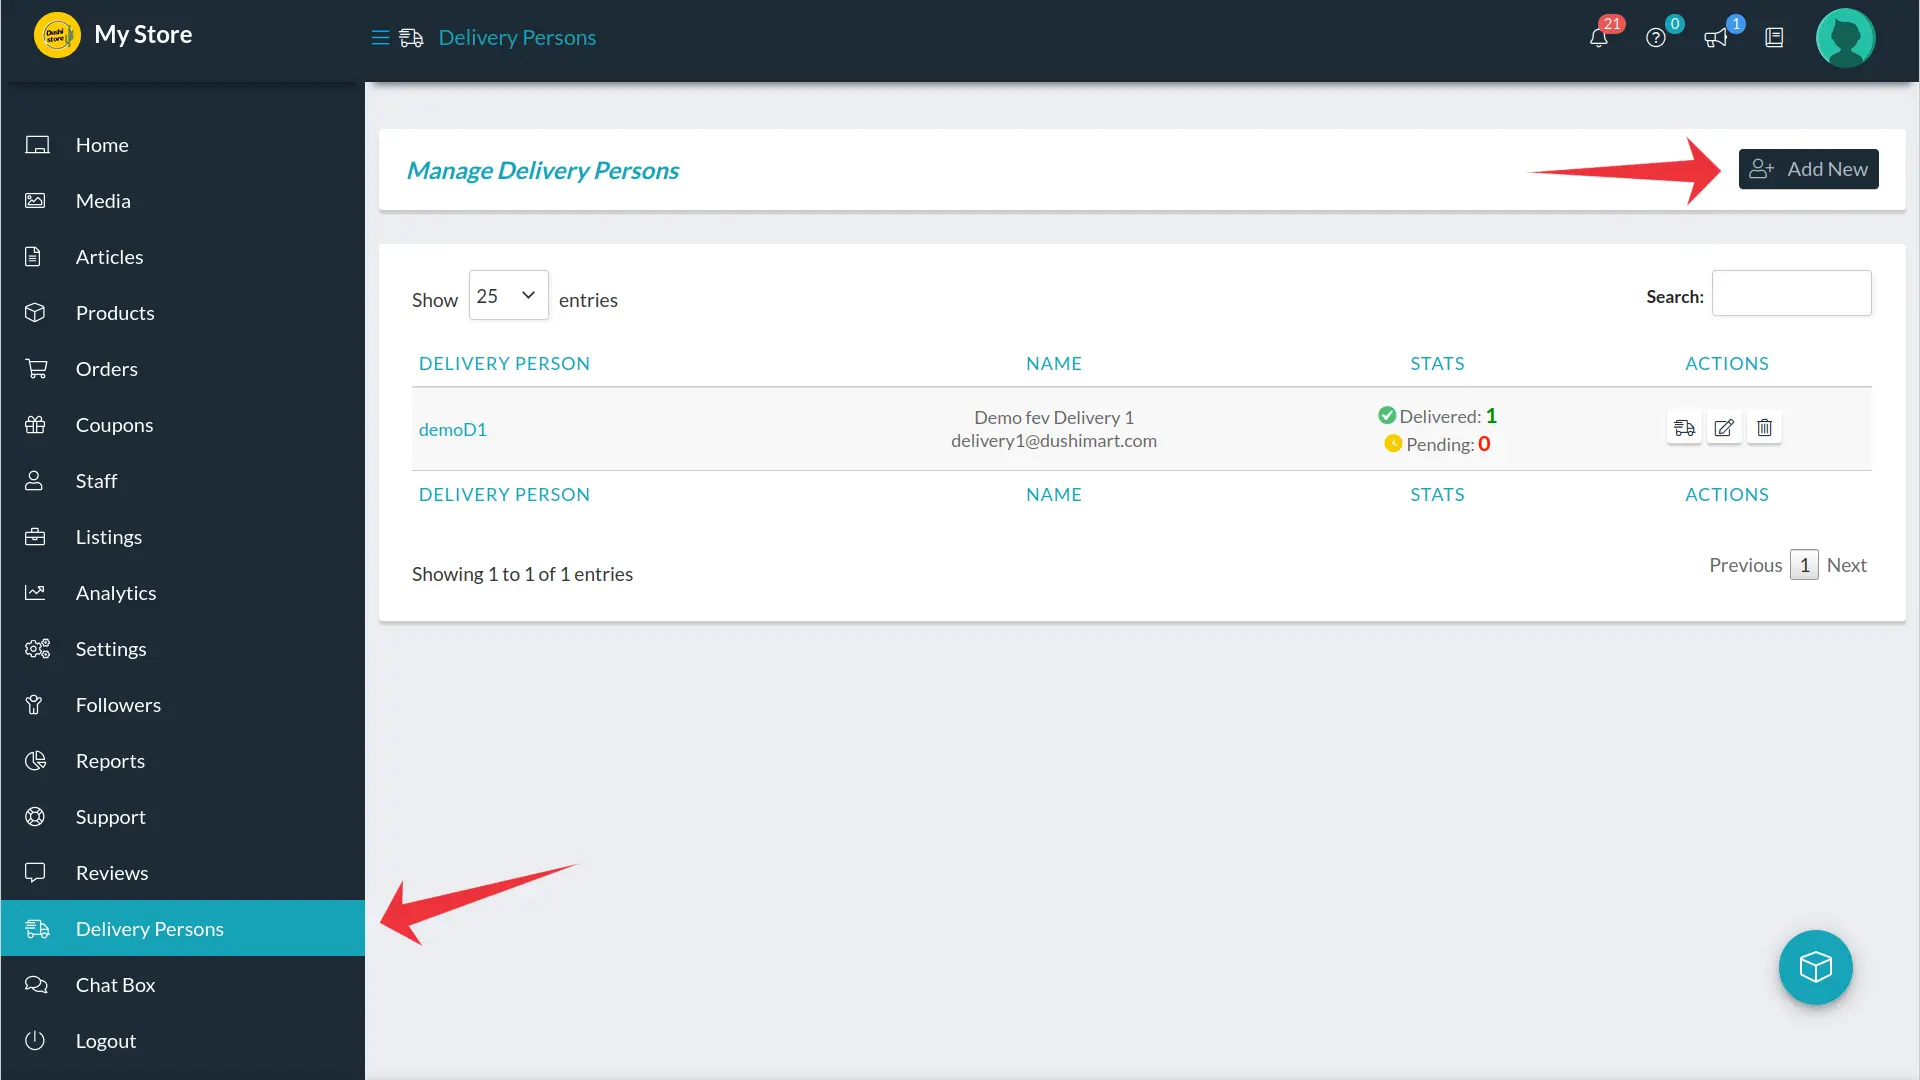
Enter the delivery person data and click on SUBMIT.
Dutch Image Spanish Image 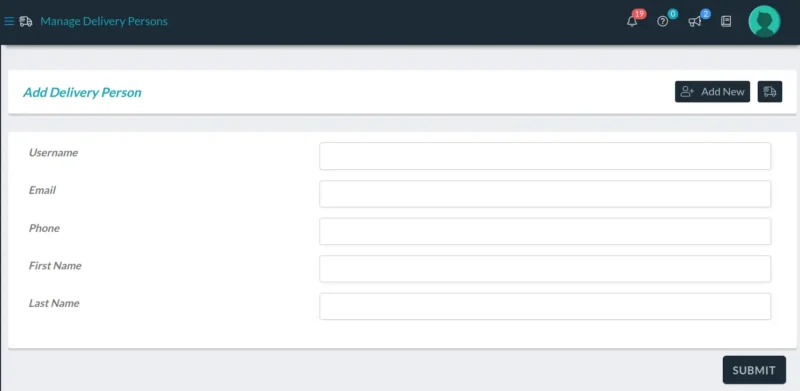 The Manage Delivery Persons window (as seen above). will allow vendors to see actions related to delivery persons.
The STATS column displays how many deliveries were made per delivery person and the number of deliveries that are pending.
The ACTIONS column displays three icons. The first icon (a truck) displays delivery specification, the center icon (pen and paper) is to manage the delivery person and the third icon (trash bin) is to delete the delivery person.
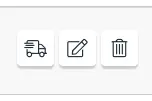
Click on truck icon to see the Delivery Stats for the order in question.
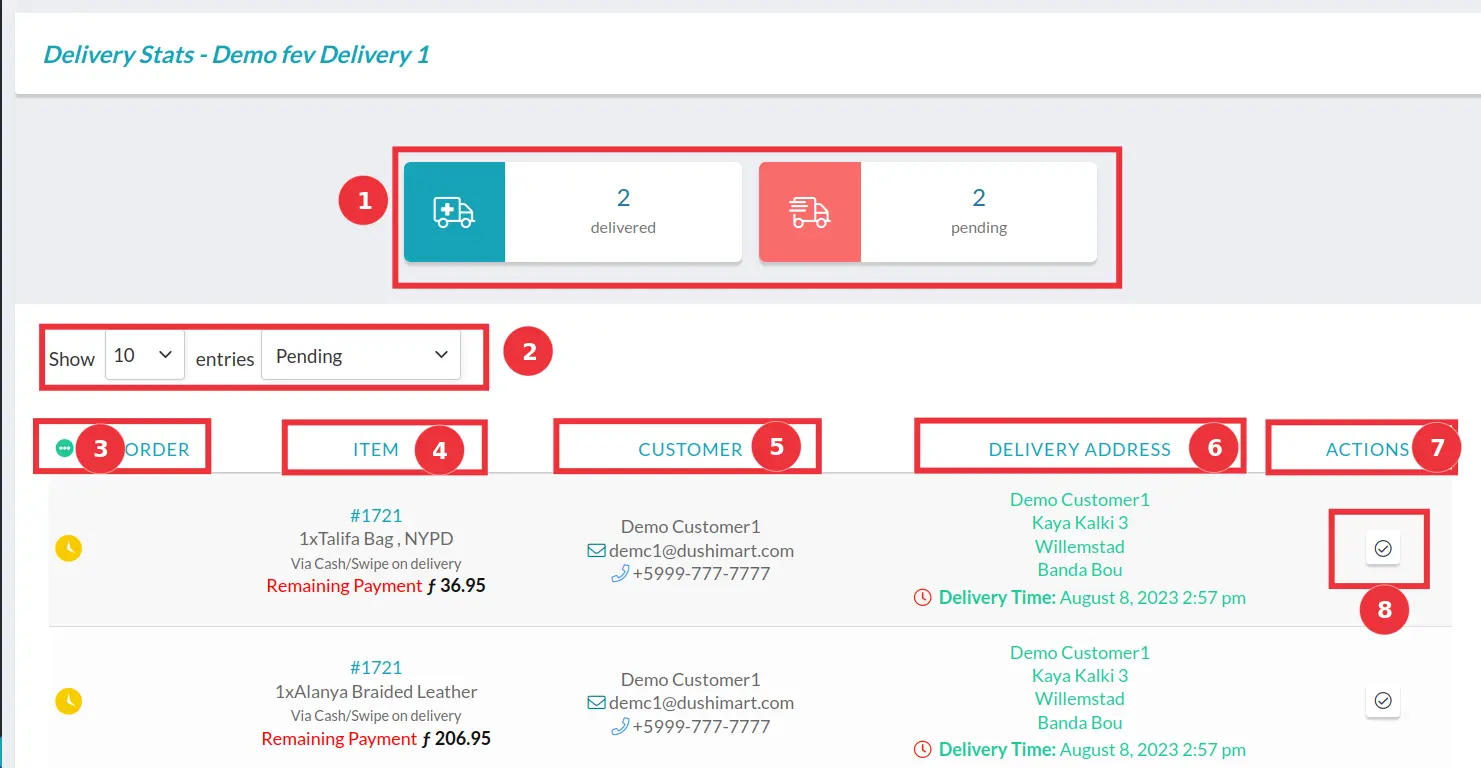
The normal sequence of a delivery. First the customer places an order that must be delivered. In this case we will use order #2397 as an example. The following image displays what the customer sees upon completion of the order.
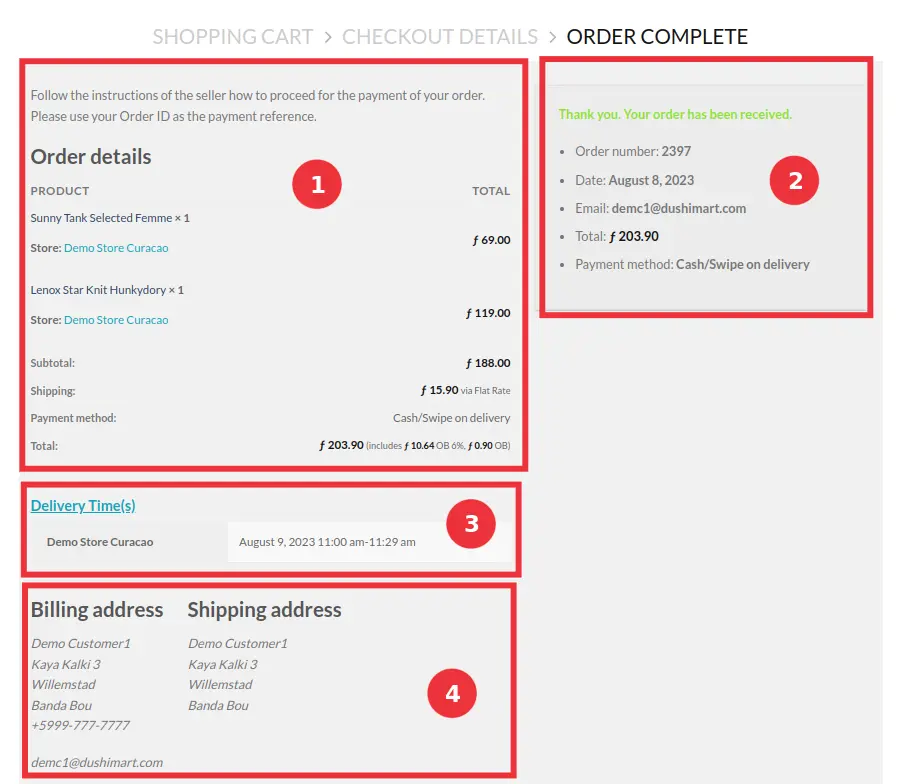
(1) displays the order details,
(2) the order summary,
(3) the preferred delivery date and time selected by the customer as defined by the vendor, and
(4) the billing and shipping address.
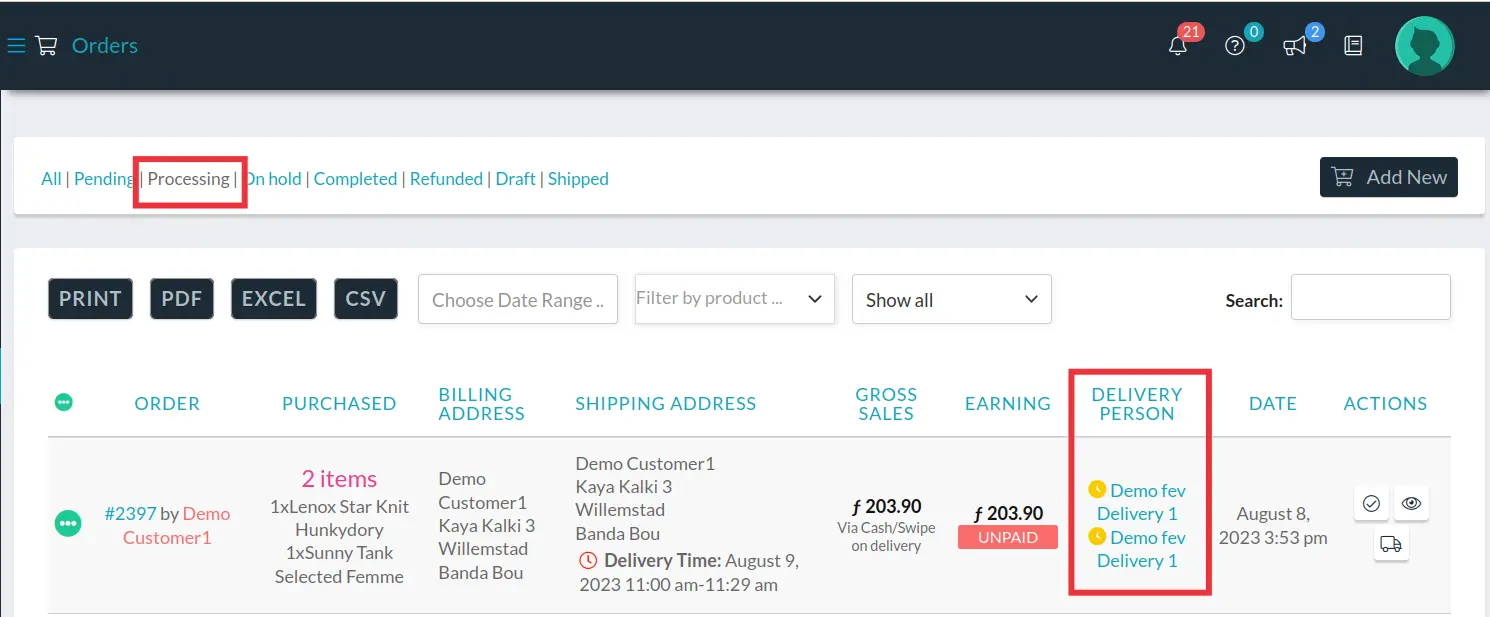
The vendor and the customer receive an email and notification of the order. The order can also be seen on the list of orders in the store manager.
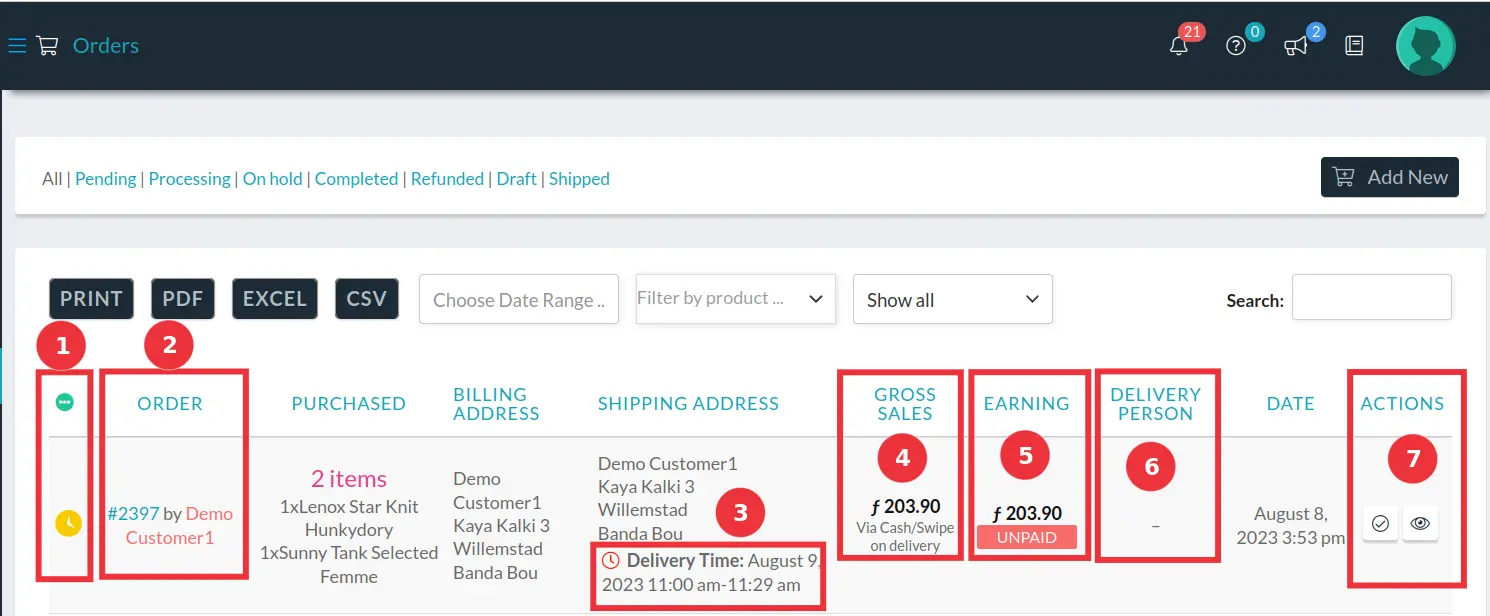
(1) The yellow clock indicates that the order is pending. When the status changes to “Processing” it will turn green.
(2) Order # 2397 is noted
(3) Delivery time day and time
(4) Total amount of the order and form of payment
(5) Total earnings for the store vendor. (same as Gross Sales because DushiMart does not charge a commission on the sale)
(6) The delivery person is empty because one hasn’t been assigned to the order yet.
(7) Actions allowed on the order are “Mark as complete” and “View Details“.
To view the order, vendor must click on the notification or the email. This opens the order.
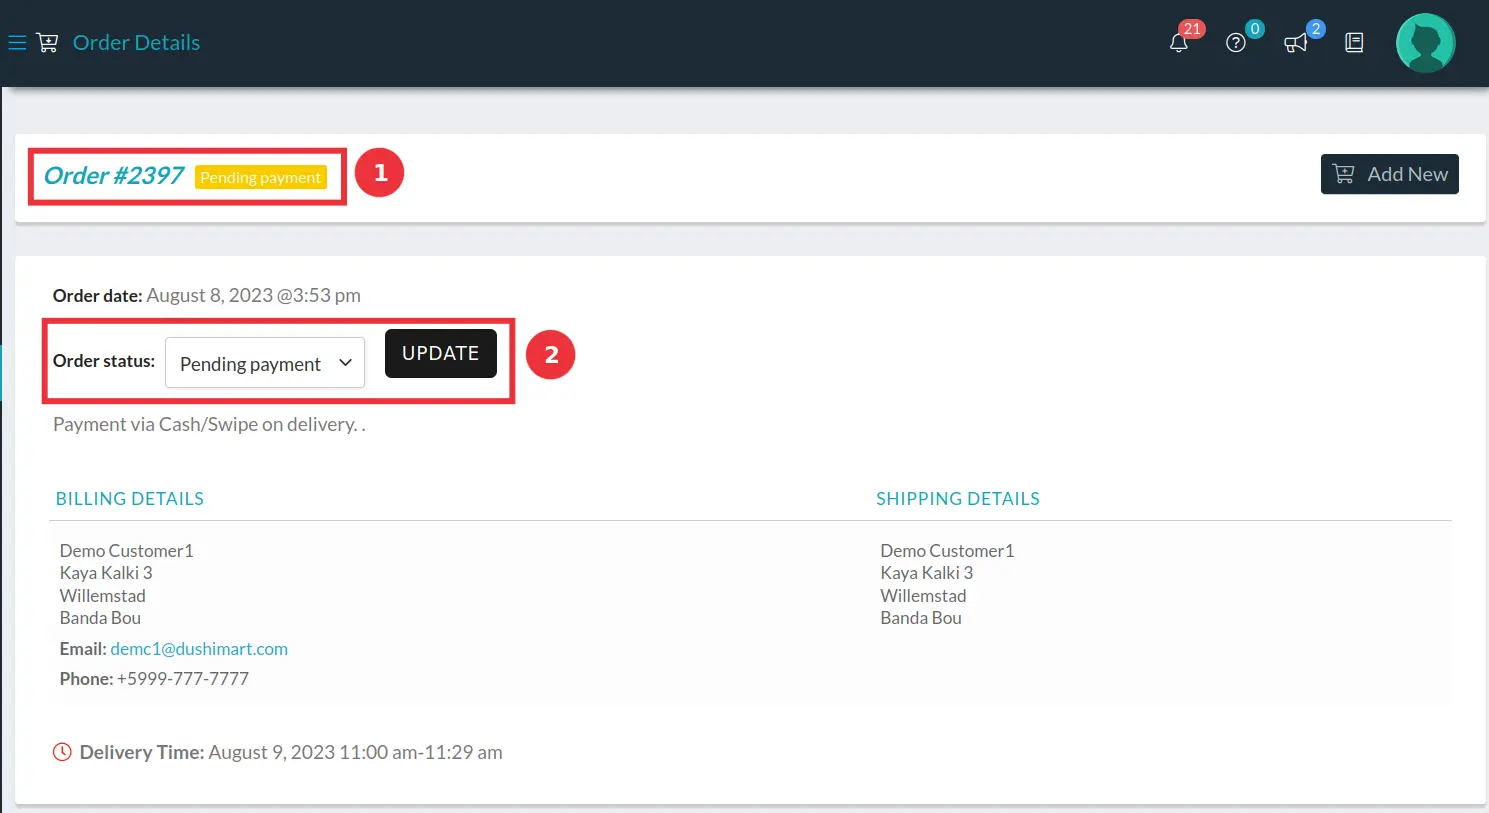
(1) The status of the order is “Pending Payment” as it should be.
(2) The status must be updated to Processing. This allows for the allocation of a delivery person to the order.
Once updated the order status icon will turn green (2) and the Actions area will display a truck icon (4).
Clicking it allows you to allocate a delivery person to the order . 
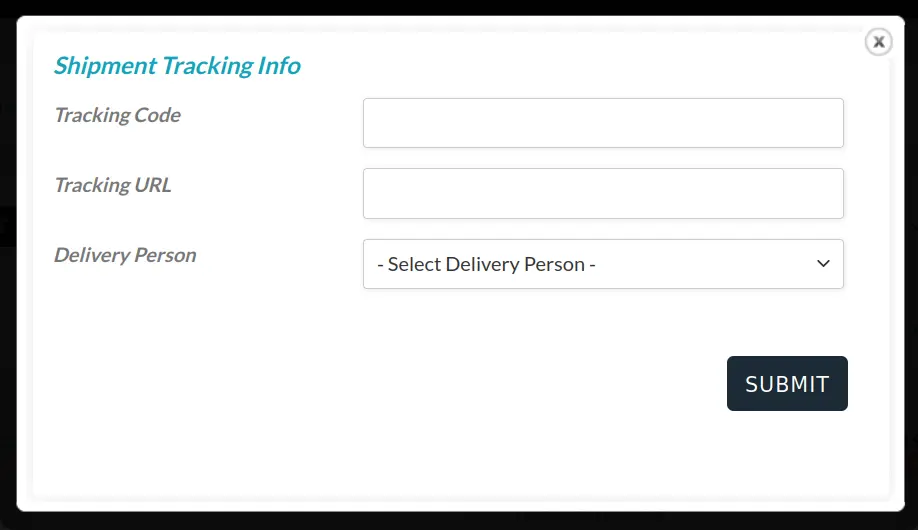
The Tracking Code and Tracking URL are entered if there is one for the order. Next the delivery person is selected from the list and the changes saved by clicking SUBMIT.
The delivery person will receive notification of the order via email and the Notification Board (bell icon). The delivery persons will also be displayed for the order. Clearly two pending items can be seen.
The Manage Delivery Persons window now displays the the pending deliveries of the delivery person.
Dutch Image Spanish Image  Clicking on the truck icon will mark the order as shipped.
The delivery person receives an email and notification when an order is assigned to him/her. The delivery person will log into their account and click on Delivery Dashboard.
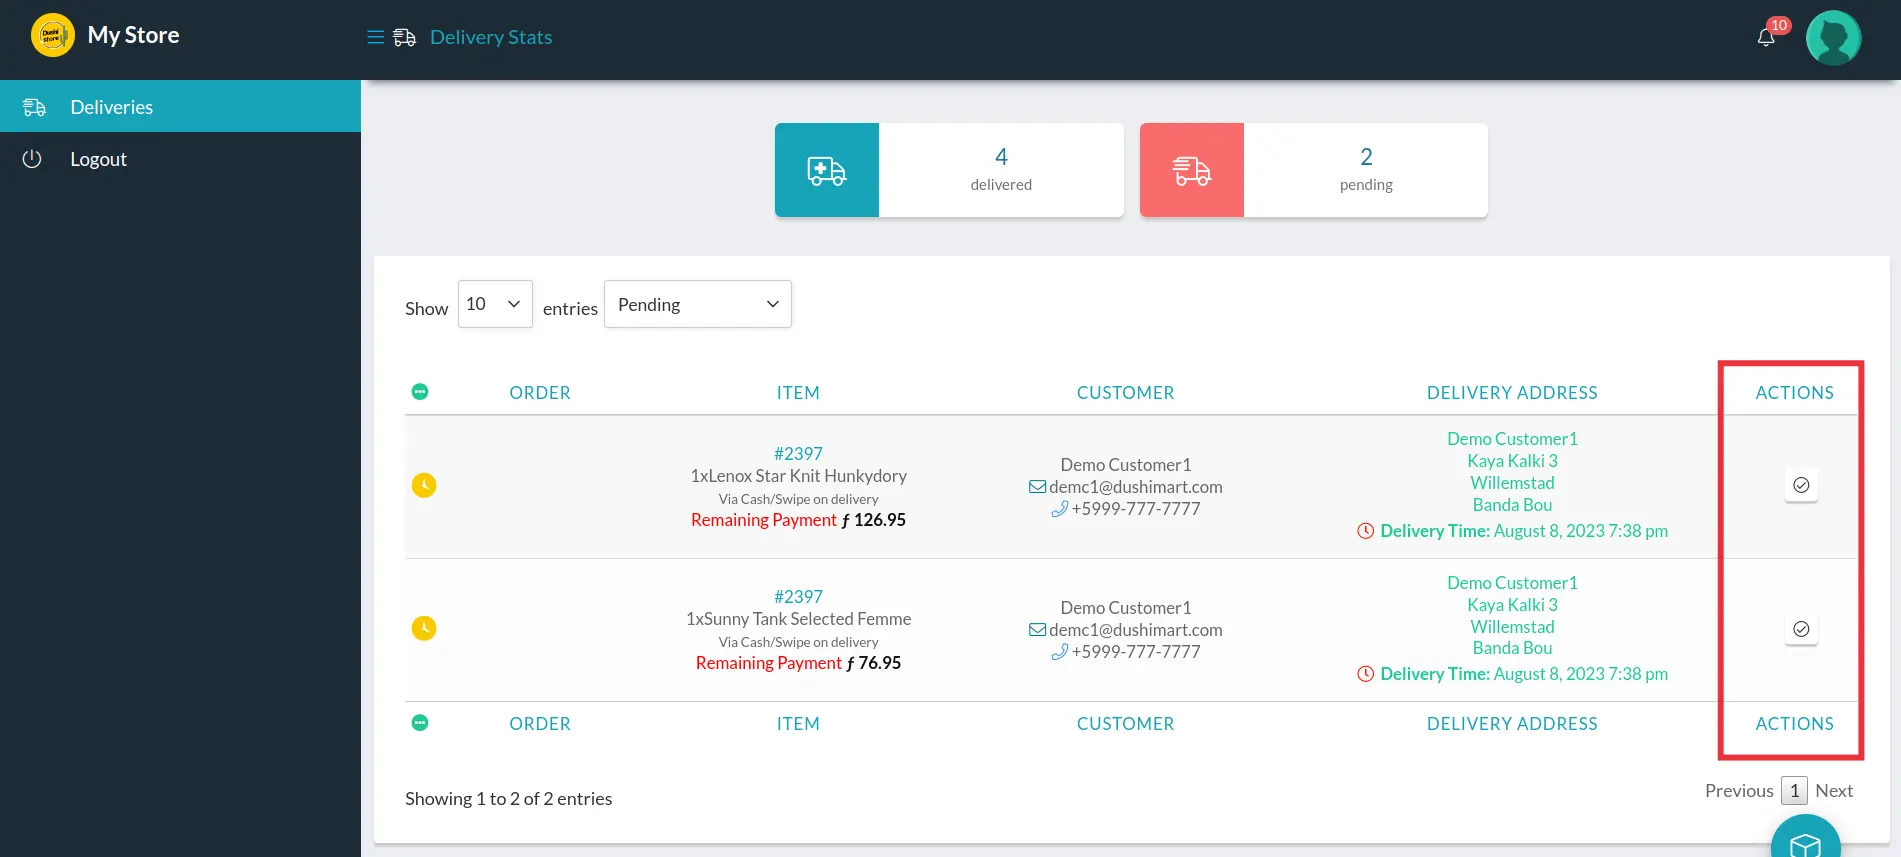
Dutch Image Spanish Image 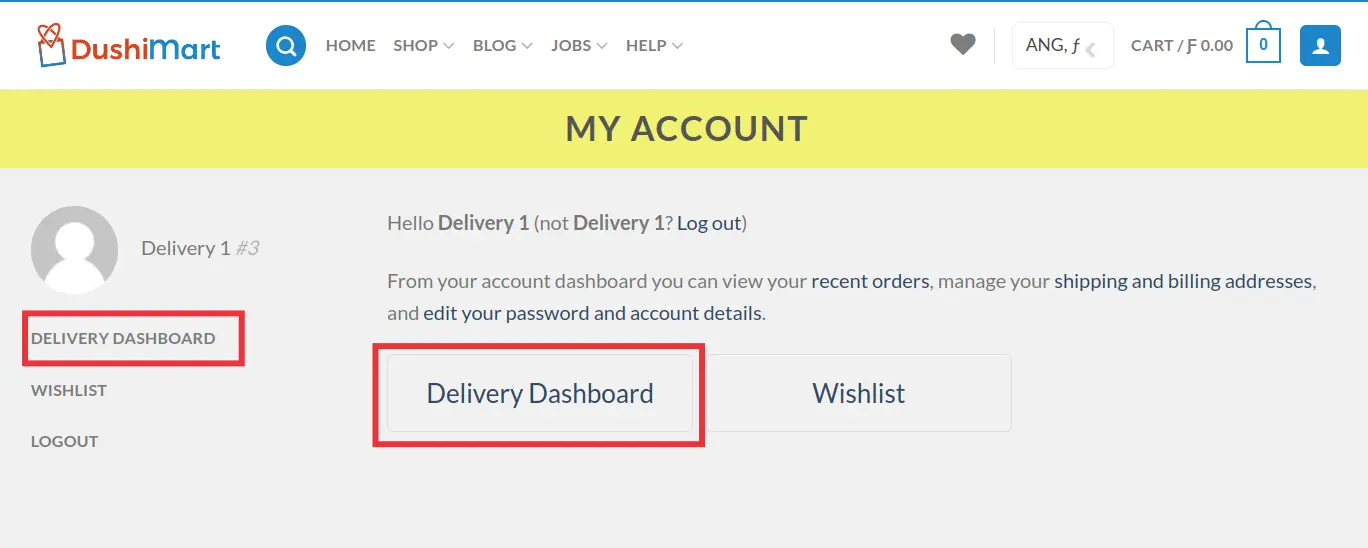 The delivery details window will display.
The check-mark under actions is clicked to mark the order as delivered.
First, set up Shipping in the Store Manager. For details click Here.
In the Store Manager, click on Settings and then on Delivery Times.
Click on the checkbox “Enable Delivery Time” to activate the delivery feature for your store. Fill out the settings and click SAVE.

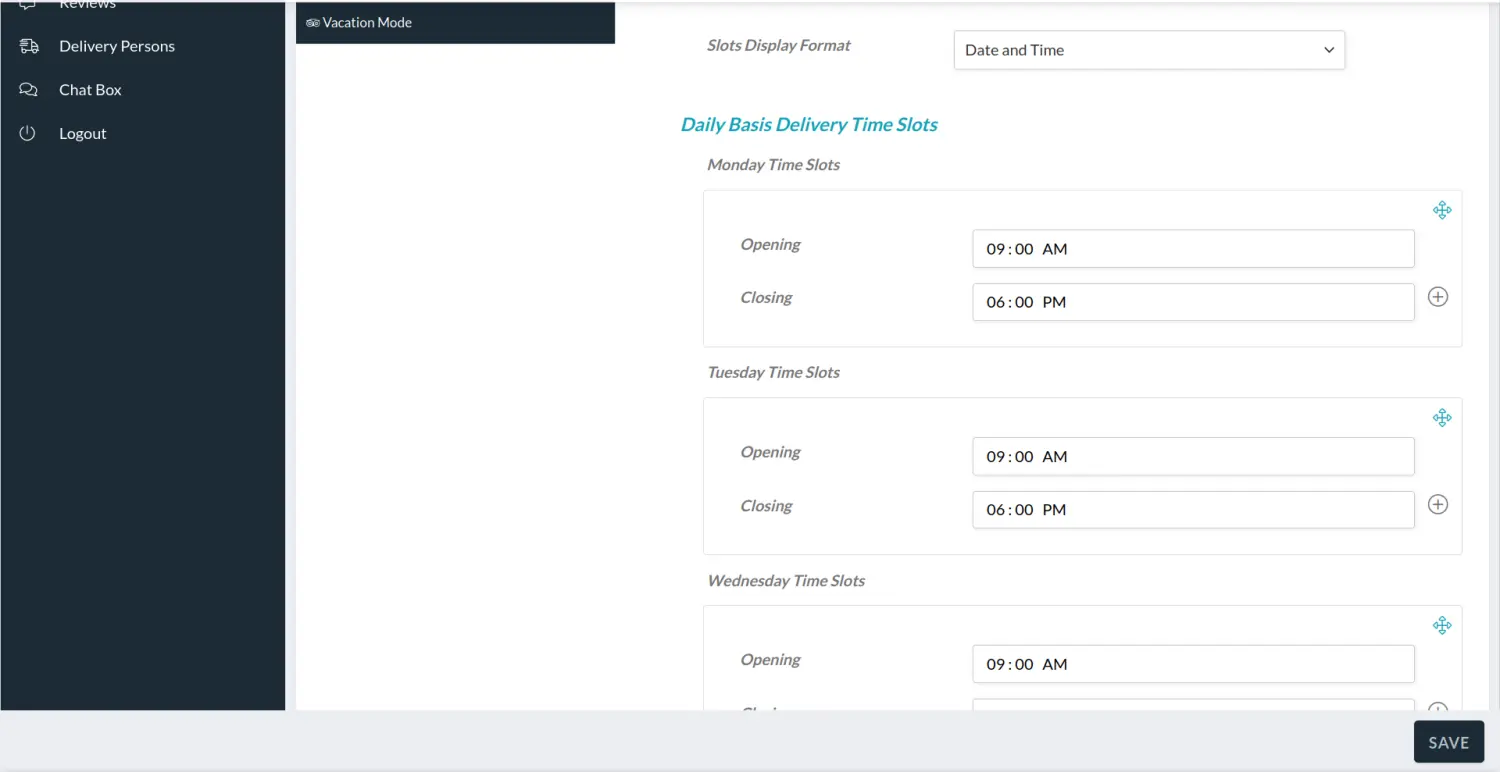
When customers place orders and choose for them to be delivered, they will be presented with a window to choose the desired delivery day and time. leveringen, entregas
Images (4)
The number of products you can sell in your store depends on your membership plan.
It also is loosely dependent on the amount of space allocated in the membership plan. Typically, a maximum of 1MB of space is allocated per product, however that depends greatly on the number of images associated with each product and the optimization of the images.
For more on Image optimization click HERE. espacio, ruimte, storage, imágenes, optimaliseren, mejoramiento, almacenaje
You can add product images while creating a new product or while editing one.
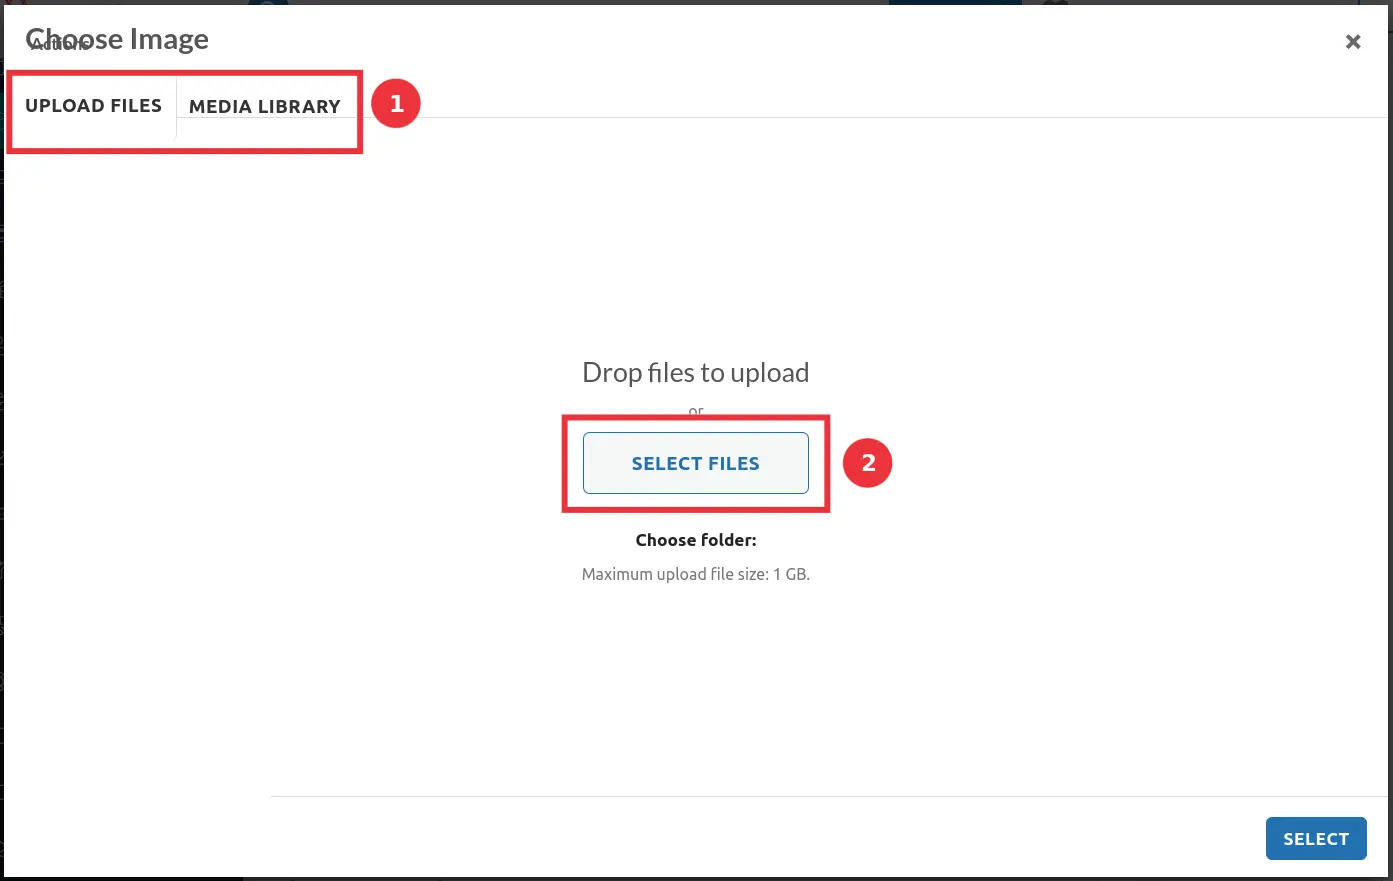
Click on any of the Image holders. (9) (10). This will engage the Media Manager.
Click on Upload Files (1)
Click on Select Files (2) to select the files to upload to your DushiMart file folder.
 foto’s uploaden, subir fotos, subir imágenes, upload afbeeldingen
Yes you can. However please take note that it is best to make all necessary modification prior to uploading media files.
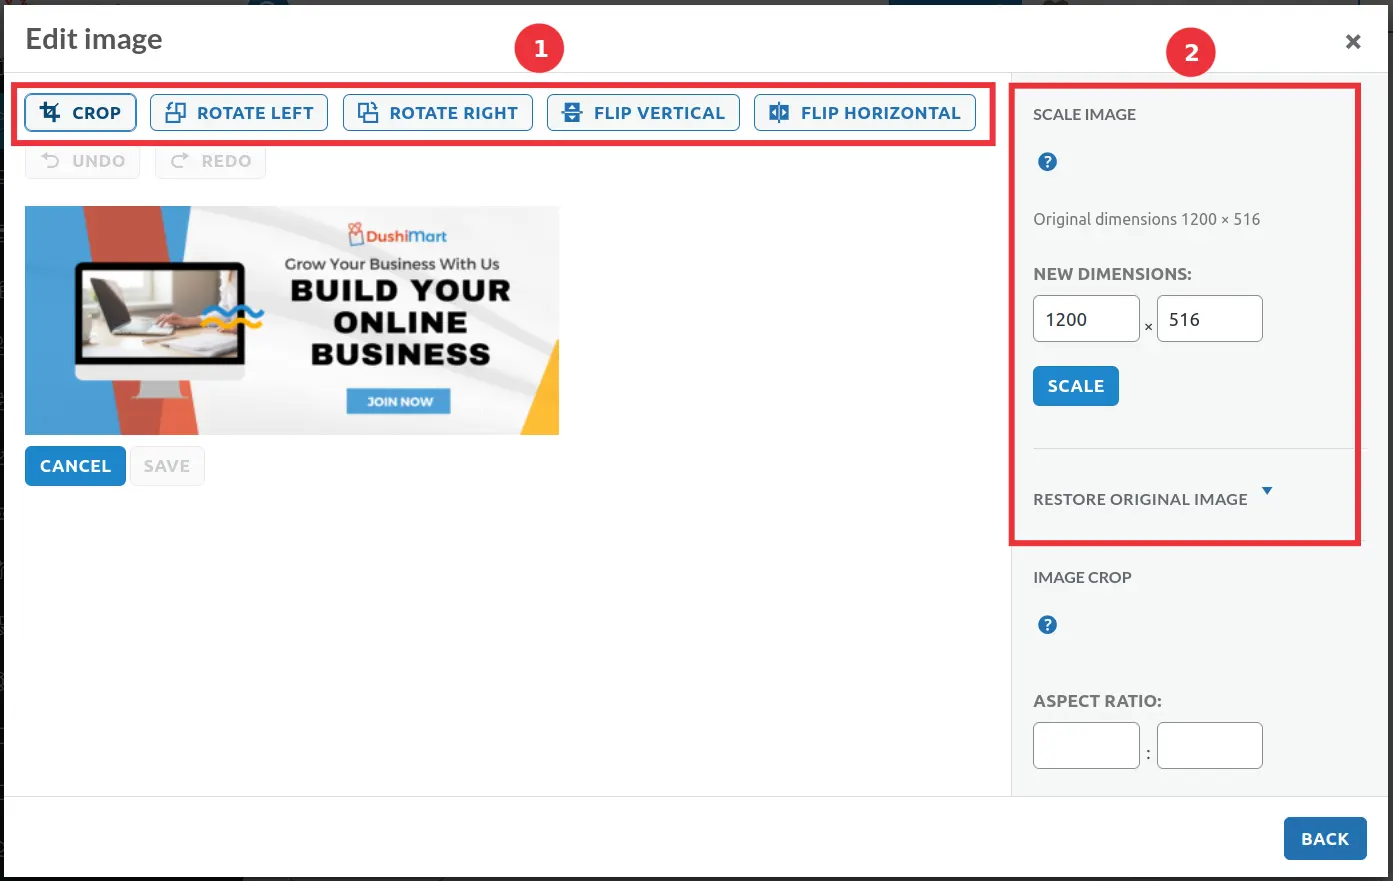
Once uploaded, images can be cropped, rotated flipped vertically and horizontally. However, most important is that the images can be scaled to another size.
Click on Products on the Store Manager menu.
Click on edit (3) to open the product in edit mode.
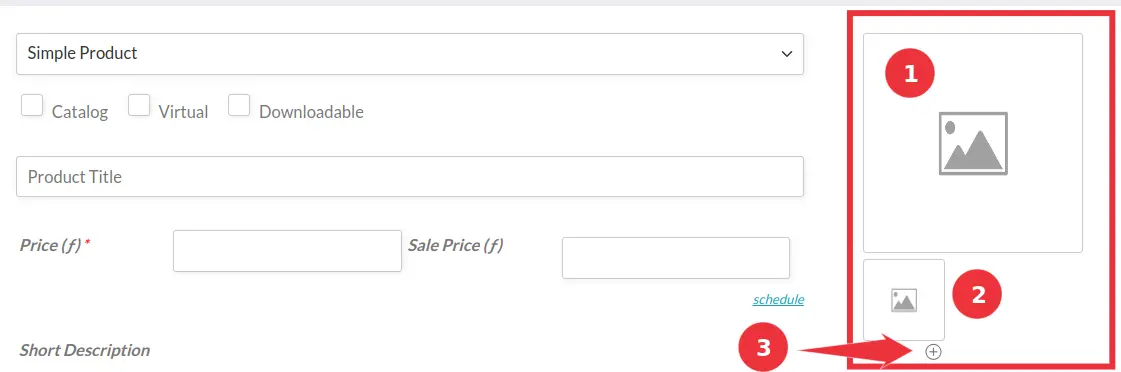
Next click on the Featured Product image holder. (1) This will open the Media Manager. Note: Alternatively, the secondary image place holder (2) can also be clicked, or click on the + (3) to add more images)
Next click on Media Library. (1)
Select the image you want to modify. (2)
Click on Edit Image (3).
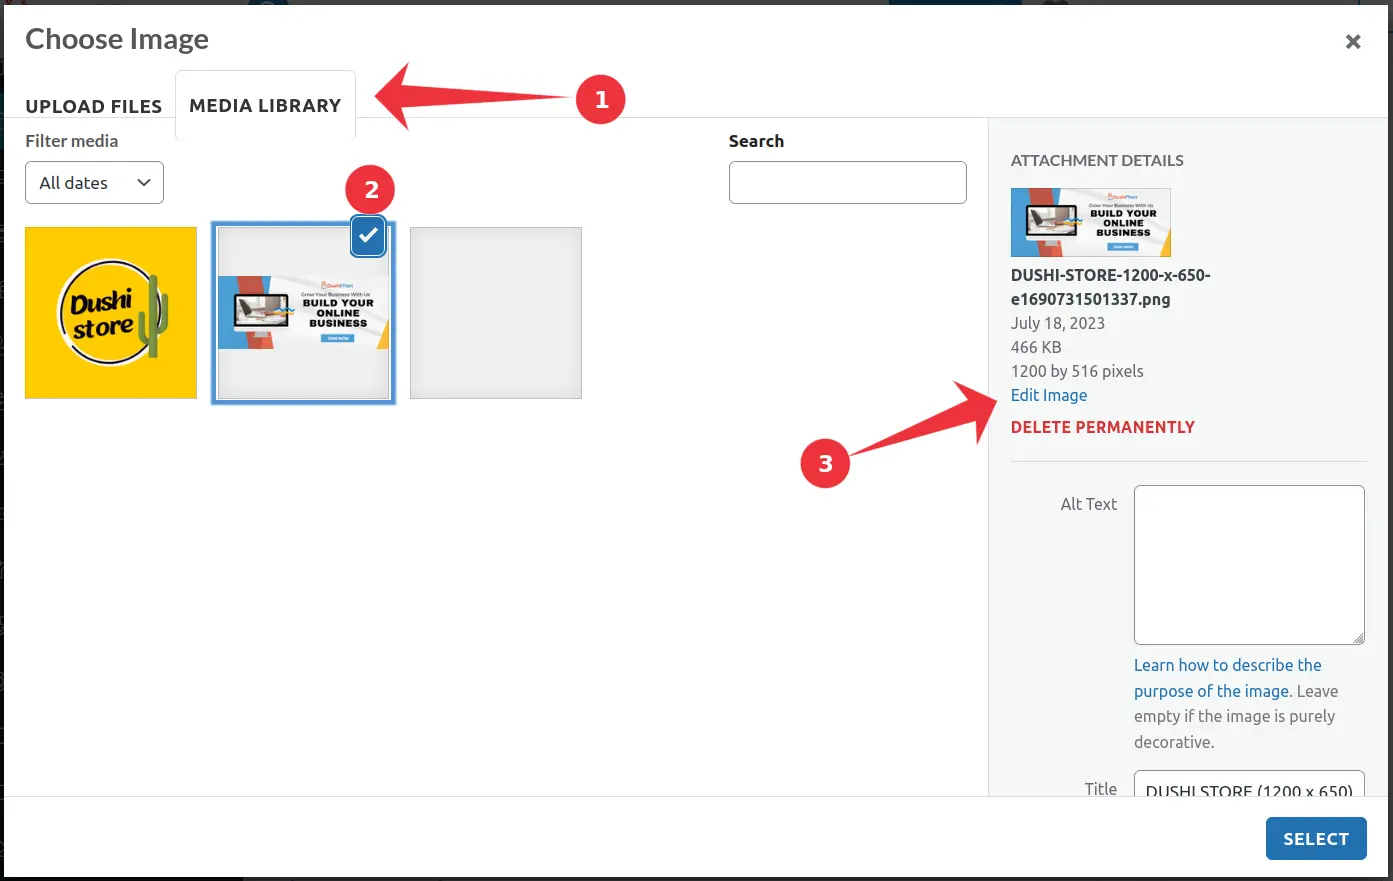
Choose from different image editing tools on the top bar (1)
To scale the image, enter the new dimensions and click SCALE. (2)
foto’s optimaliseren, optimaliseren, optimizar fotos, imagines
The Ideal size for images depend on the type of image:
- Product Image typically should be a minimum of 1000 X 1000 px
- Store banners width 1300 px X height 500 px. For mobile devices 650 px X 250 px
- Store Logos should be 250 X 250 px.
- Blog posts images 1000 X 650 px.
Live Chat (1)
Live Chat is used to allow direct communication between visitors of DushiMart in real time.
The Live Chat feature can be activated and deactivated per staff member by the store vendor. This is done by using the Manage Staff feature in the Store Manager.
The Live chat can also be used Offline. When Live Chat is in Offline mode, visitors and members of DushiMart can leave a message for the vendor. These messages can be read by clicking on “Offline Messages“. (Read more about this feature at the bottom is this page).
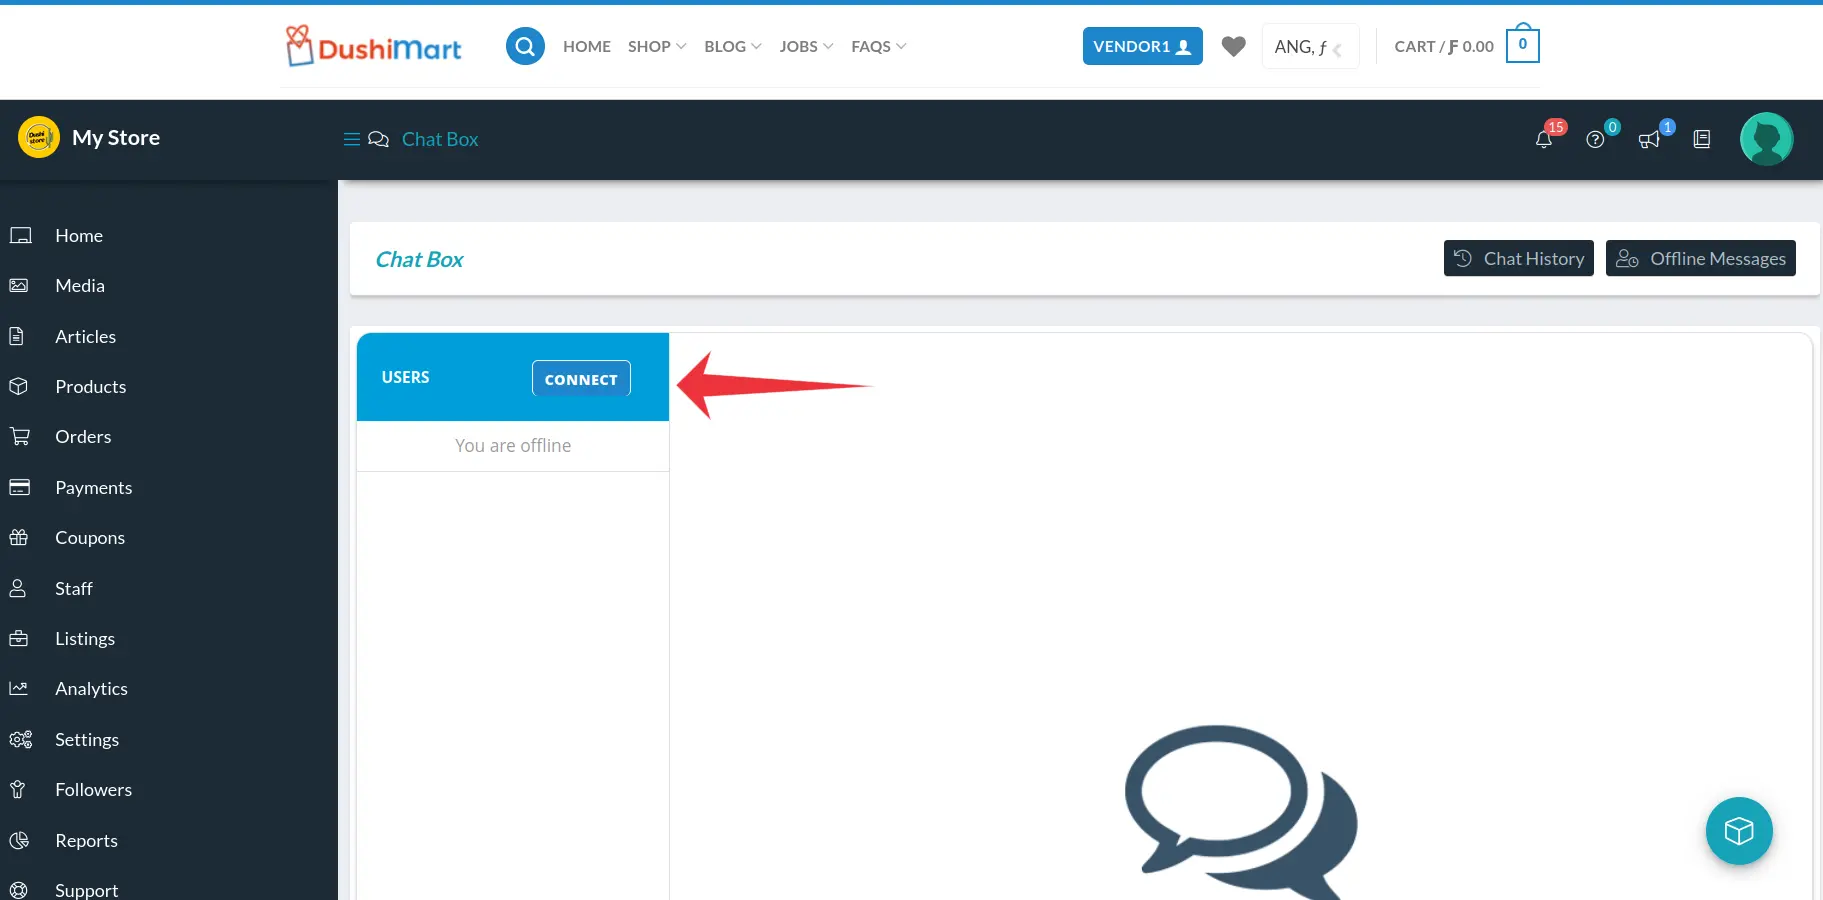
When the Live Chat feature is activated, “Chat Now” will appear on the Store Manager Menu. Click it. This will open a new window in the Browser for the chat module. To remain in Live Chat mode, do not close this window. Closing the window will put it in Offline mode.
Next, click the button “Connect” if you see the message “Your are offline” under the connect box. This will activate the live chat.
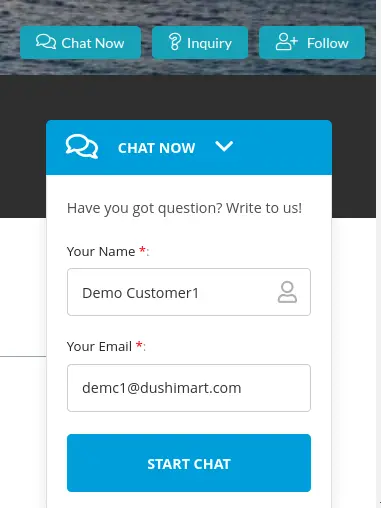
Members of DushiMart can activate the Live Chat by clicking on the “Chat Now” button on the Vendor Store Banner or the Single Product Page.

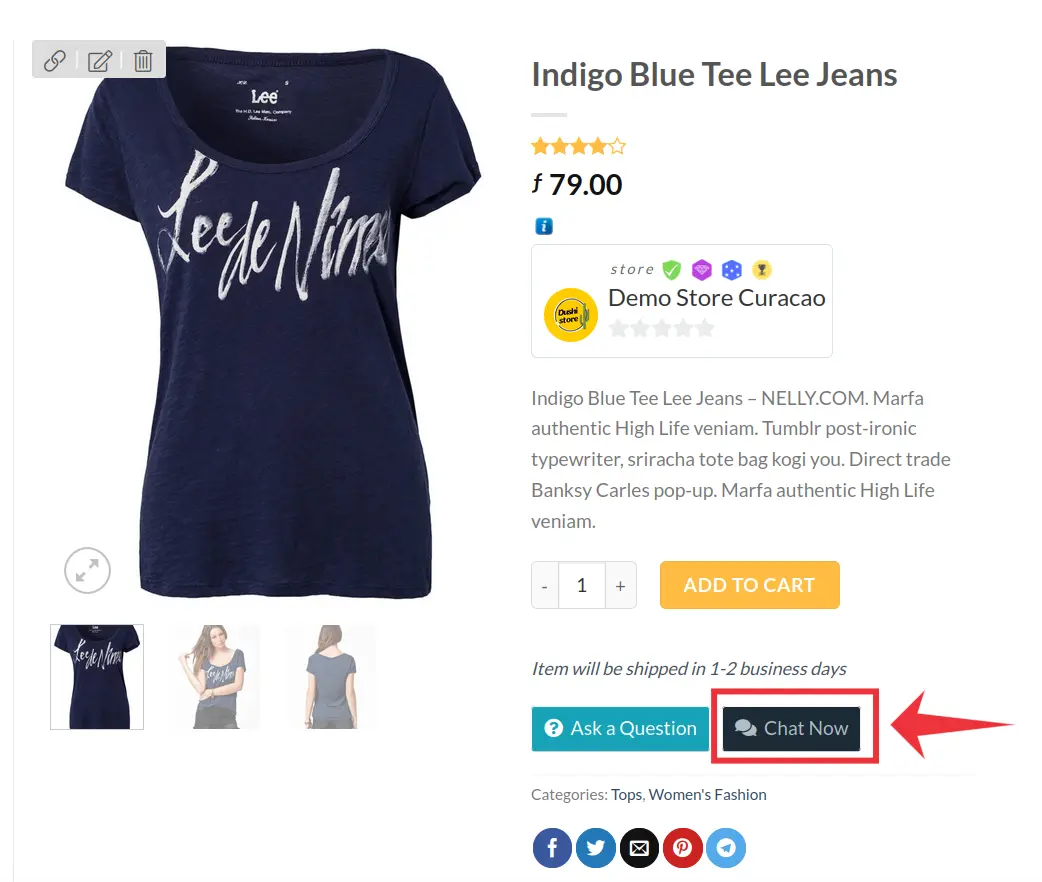
The “Chat Now” window will open. The member’s name and email will display. They must click on “Start Chat” to begin the live chat with the store vendor staff member(s).
The vendor “Chat Box” window will display the information related to the visitor. It consist of the following areas: the name of the visitor(s) (1), the contents of the chat (2), their connection data (3), the Chat History (4) and the Offline Messages (5).
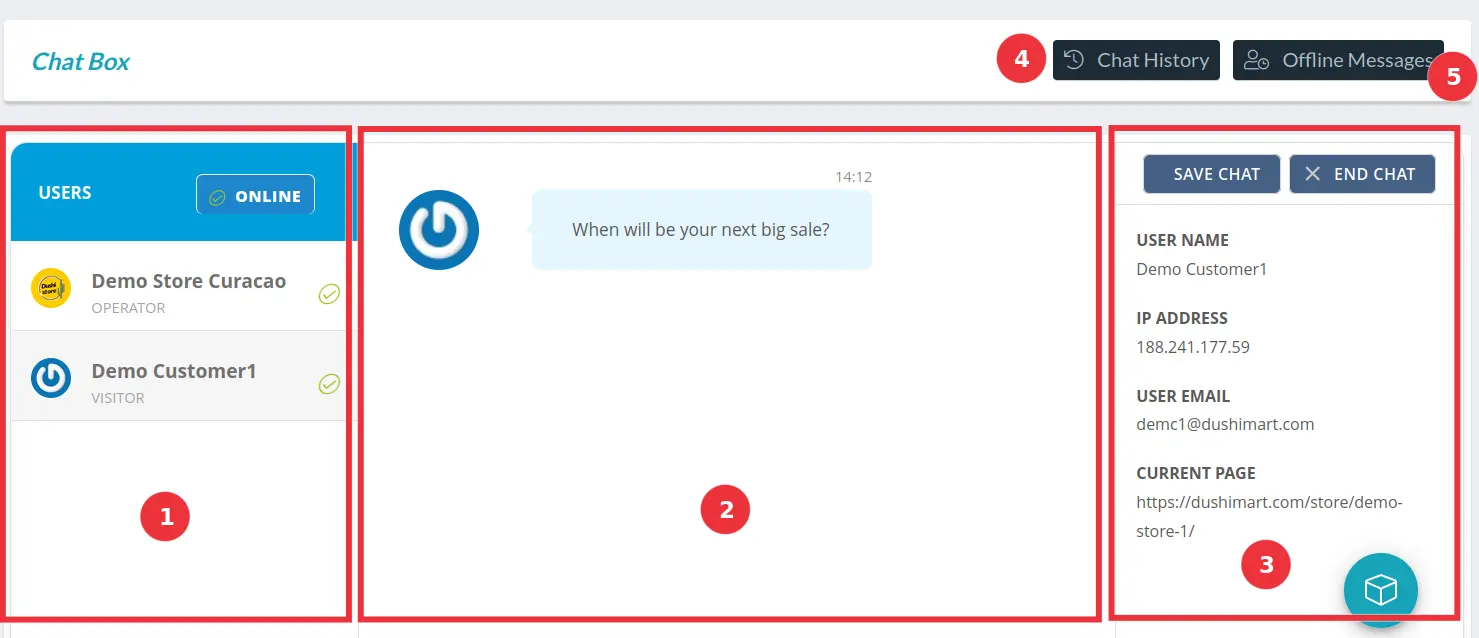 To save chat, click on the “Save Chat” button. To end the chat, click on “End Chat“.
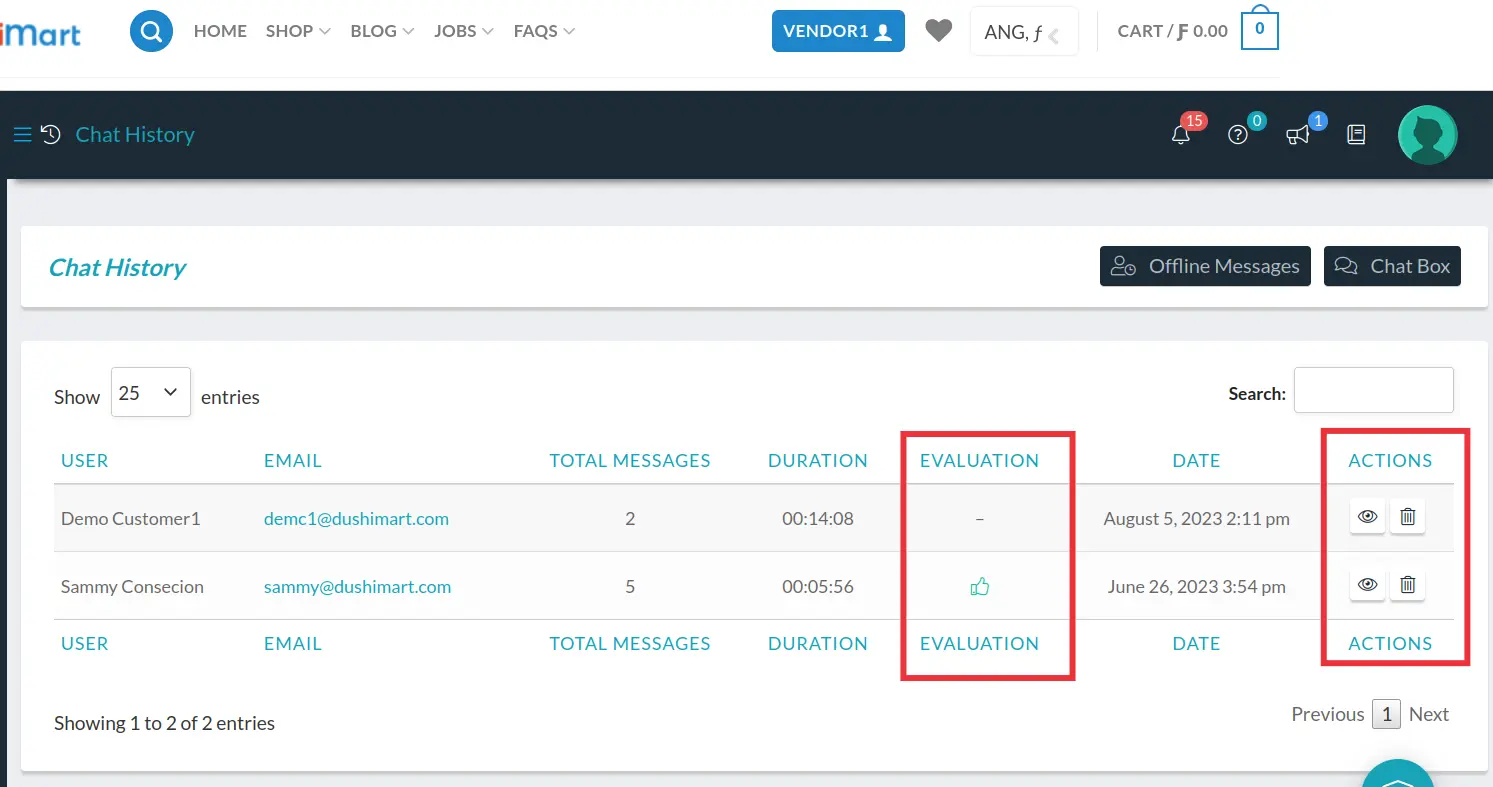
At the end of each chat session, visitors have the option to rate the chat and to choose the option to receive a copy of the chat via e-mail.

If the chat is offline, visitors can still communicate with the vendor via offline messages.
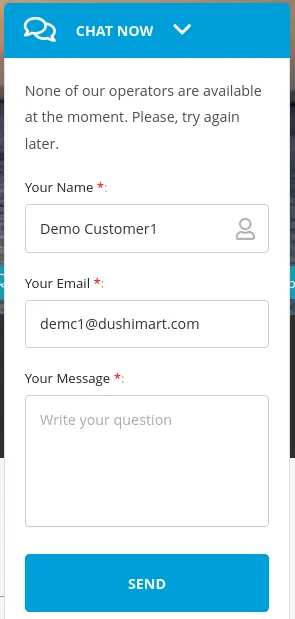 
Vendors are able to read offline messages by clicking on the “Offline Messages” button. (5) (see above)
To display saved chats, click on “Chat History”. (4)
 charlar, chat en vivo, chatten, desconectada, desconectado
Orders (4)
Sometimes and order must be edited. This is possible as long as the order hasn’t been paid by the customer. When an order is paid, the status must be updated to “Processing“.
Once the order has been paid, it cannot be edited unless the status is changed to “Pending Payment” or “On Hold“
When a customer places a Cash On Delivery (COD) order, the status is updated to “Pending Payment“.
If the customer chooses Bank Transfer as the payment method, the initial order status is “On Hold“.
To edit an order, the status must first be changed to “Pending Payment” or “On Hold“.
At the bottom of the screen to the right, click on “Edit Order“. The order can now be changed.
You may additionally apply a discount to the order by clicking “Apply Discount“.
Also you can inform the customer of the changes made to the order by using the “Note to Customer” field.
aplicar descuento, bestelling bewerken, beteling, editar orden, korting toepassen, pago pendiente, nota al cliente, aantekening
Yes you can.
Go to the Store Manager and click on Orders. Click on Add New.
Enter the customer or if the customer is new, click on “Add new customer“. Next enter the products and their quantities. To add more products, click on the + icon.
Next select the payment method for the offline order.
Next select the shipping method.
Enter the billing and shipping address if that was not entered when the customer was created or selected.
If applicable, enter a discount for the order.
Enter any comments for the order and click Submit to complete the order.
offline bestelling orden manual

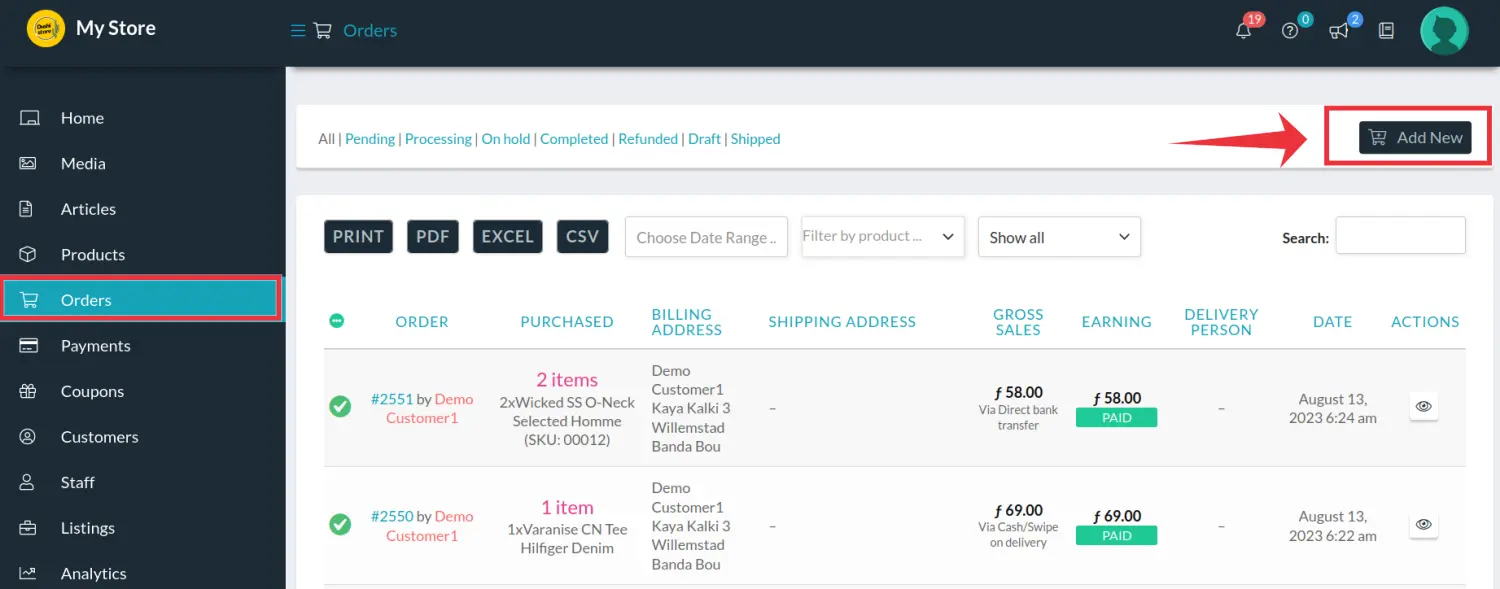
- To see and manage your orders, go to your store manager, click on Orders (1).
- To select the Order Status (2), click on;
- “Pending” for a list of pending orders.
- “Processing” for orders that are being processed
- “On Hold” is the default status for all new orders. This gives the vendor the chance to verify the order prior to changing the order status to “Processing”
- “Completed” for orders that have been completed
- “Refunded” for orders that have been refunded
- “Draft” for orders that are in the process of being made and
- “Shipped” for orders that were shipped
- Vendors can manually add a new order. Click on “Add New” (3) to do so.
- Vendors can modify what orders to show (4) by choosing the Date Range, the product ordered, or the payment status of the order.
- To view the order click on the Eye Icon (5) or the order number. To mark the order as completed, click on the Check Mark icon.
- To export the list of orders (6), click on PRINT, PDF, EXCEL or CSV.
bestelling pedido, pendiente, in behandeling, Procesando, verwerking, en espera, in afwachting, restitueren, reintegrado
All payments occur offline.
Customers make payments directly to vendors via bank transfers, swipe / debit card (store pickup and delivery) or by COD (cash or swipe or both).
For bank transfers, vendors must specify their banking information in their store settings.
Go to the Store Manager. Click on Settings and then Customer Pay Option. Enter the banking information the customer needs to pay you.

The payment details will display on the order complete form.
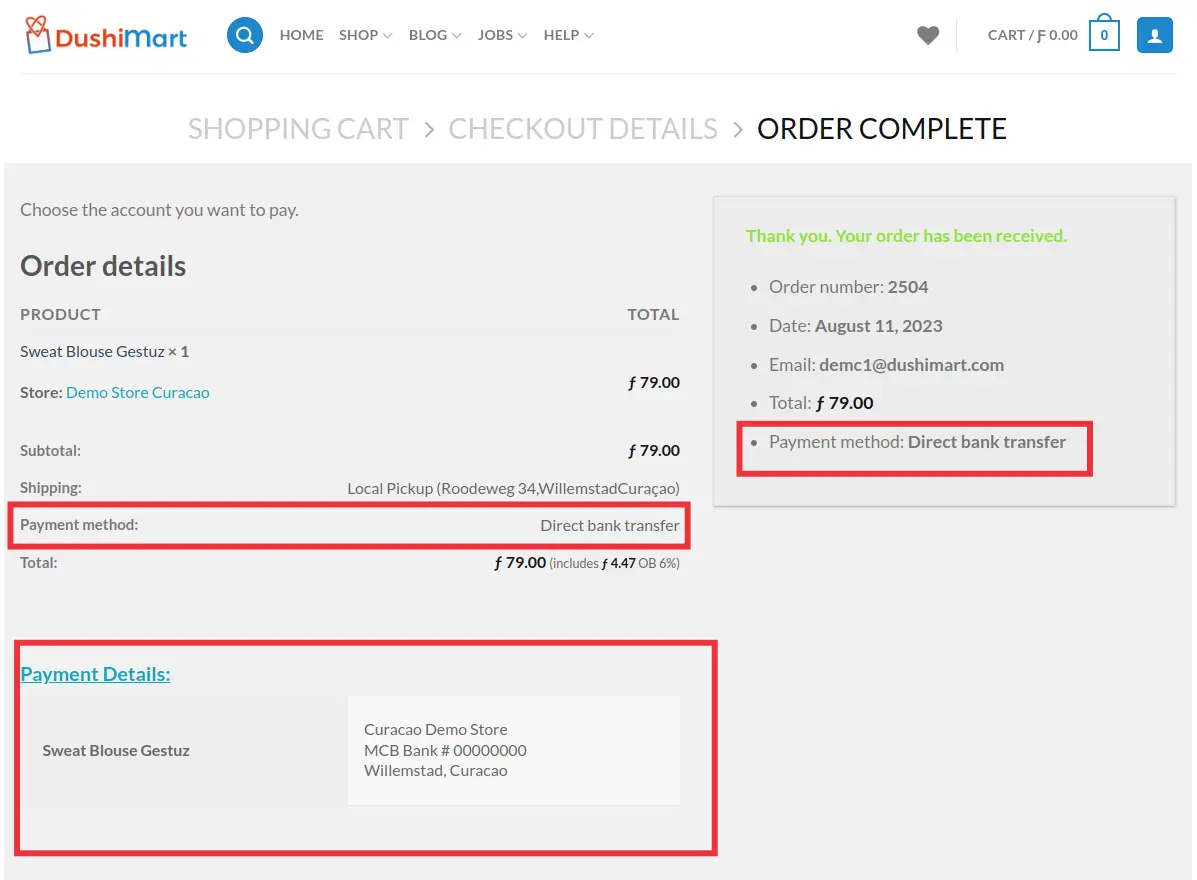
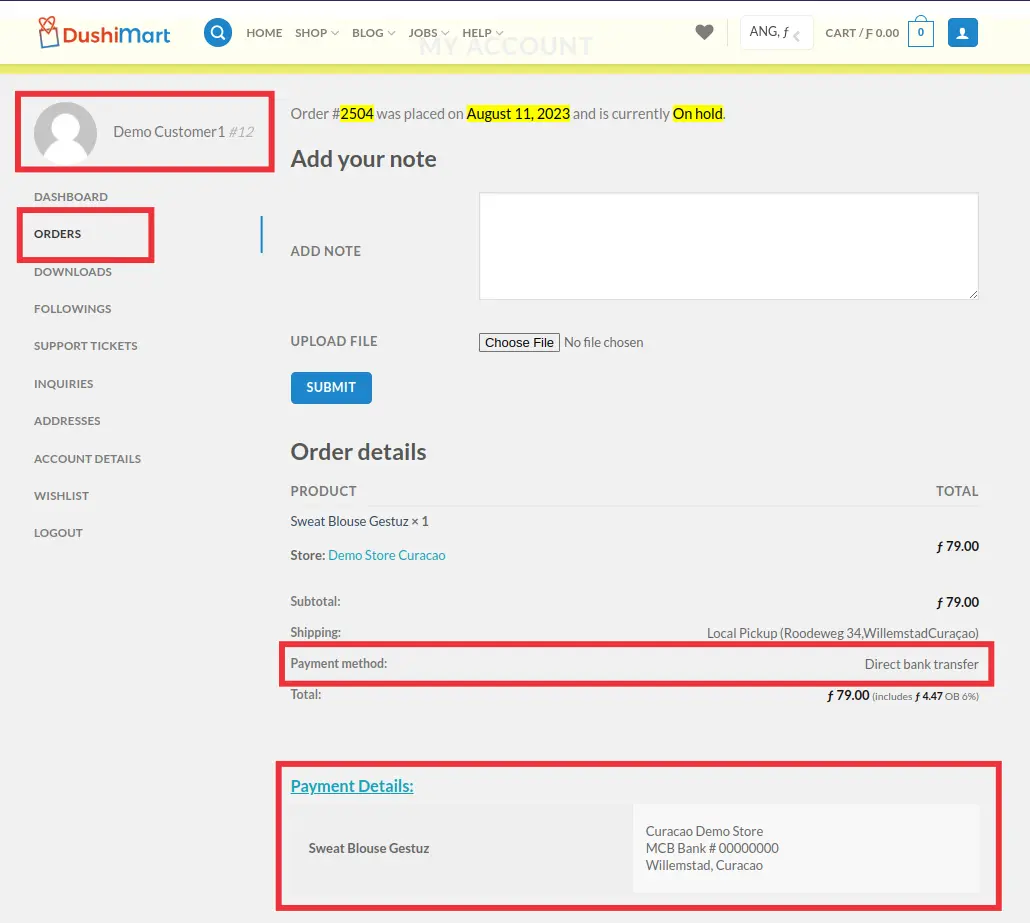
Customers can view the payment details of their orders from their Customer Dashboard.
 betaaloptie pago overschrijving transferencia bancaria
Personnel (2)
DushiMart allows you as a vendor to add employees and associates as staff members. Examples are administrative personnel, inventory management personnel etc.
The vendor assigns each staff member access to every area of the online store depending on their functions and responsibilities. The number of staff members per store depends on the membership plan the vendor subscribed to. For information on the number of staff members allowed per membership plan, check out the membership plan schedule here.
To define a new staff member go to the Store Manager.
Click on Staff (1). This will open a window of all staff members currently defined.
Depending on the membership plan you are subscribed to you will see at the top of the screen the number of remaining staff members you can define. (2) Click on Add New (3). This will open the window to define the new staff member.
Dutch Image Spanish Image Fill out the information for the new staff member and click on Custom Capability to define what the staff member has access to. For more information on staff member capabilities, click HERE. acceso, capacidades, mogelijkheden, personal, personeel, toegang
Staff members are assigned capabilities depending on their function and tasks.
Vendors must first define their staff members using the Store Manager. For instructions on how to do this, click here.
To assign capabilities to staff members, select the staff member and click on the Manage Staff Icon.
Next click on the checkbox Custom Capability.
This will open a window with all capabilities as depicted in the video clip hereunder. Each capability can be triggered on or off.
capacidades, manejar personal, mogelijkheden, personeel beheer
Products (19)
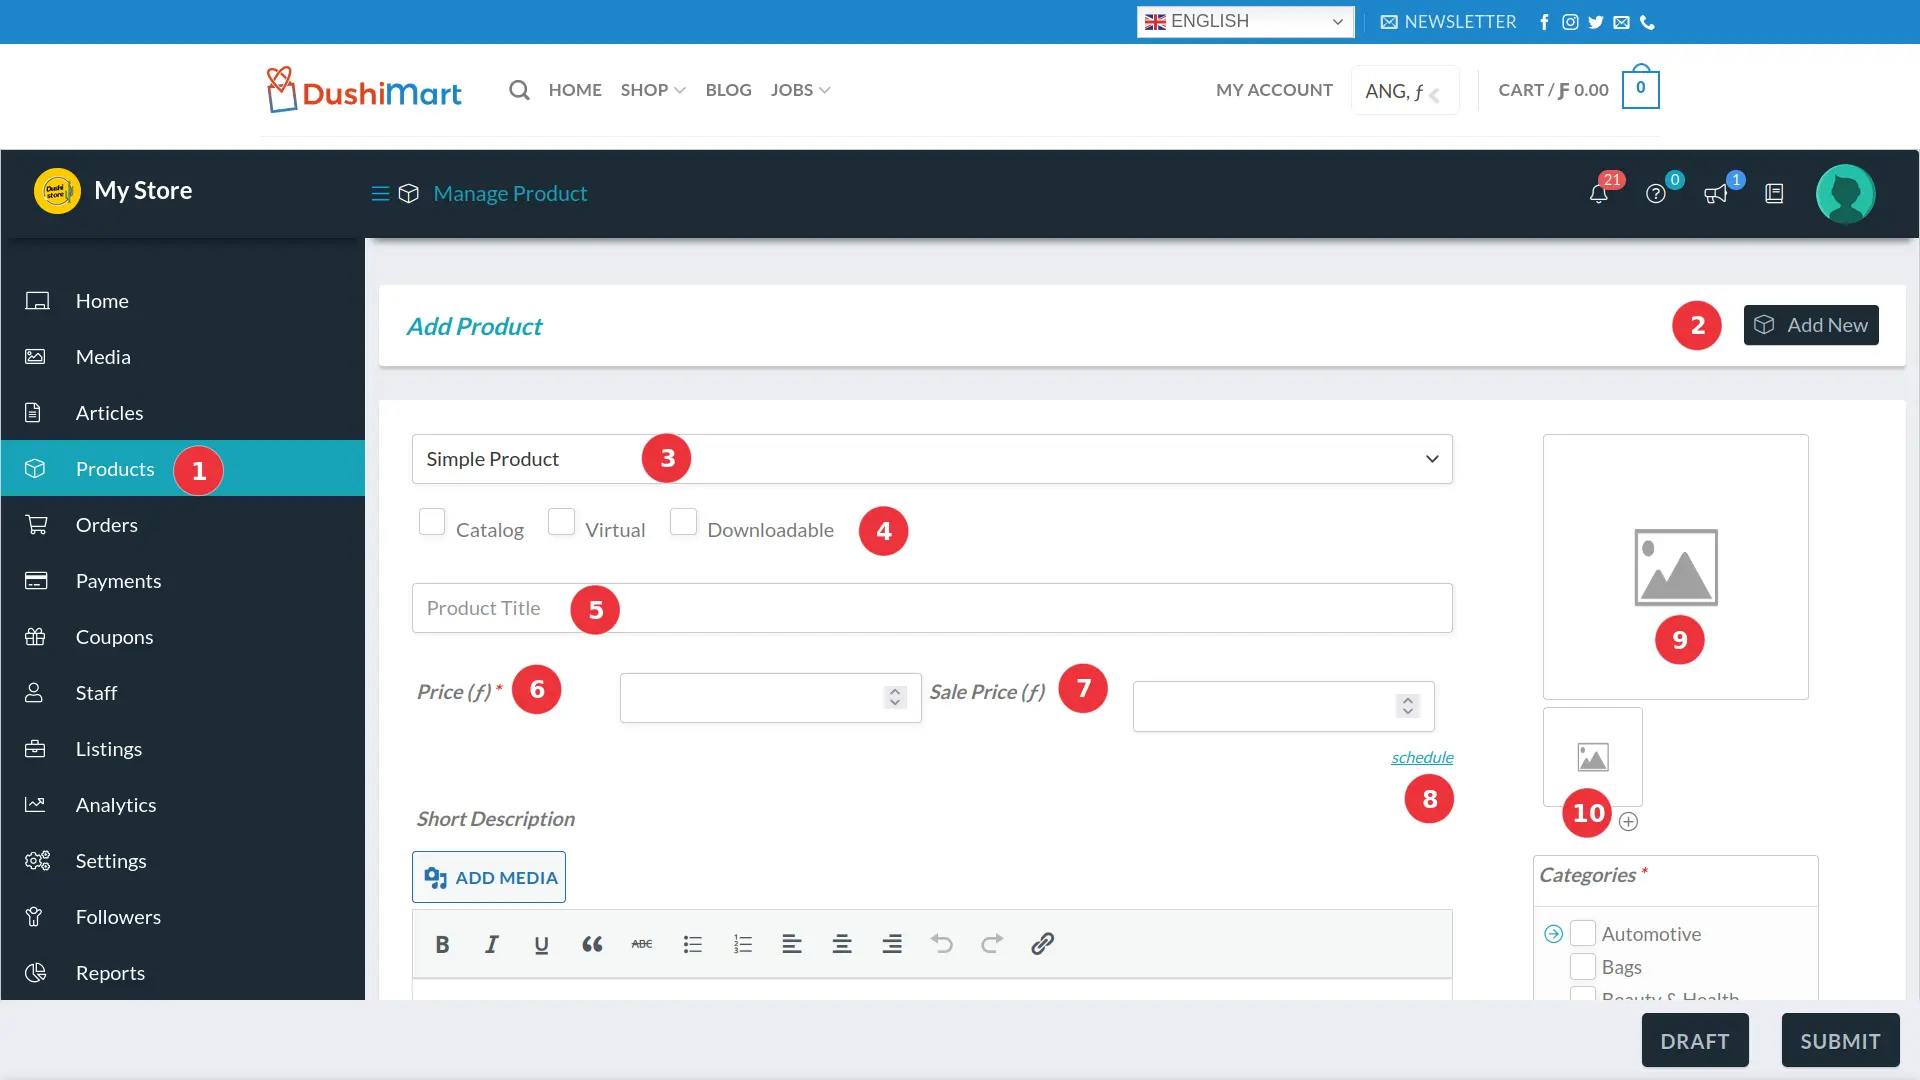
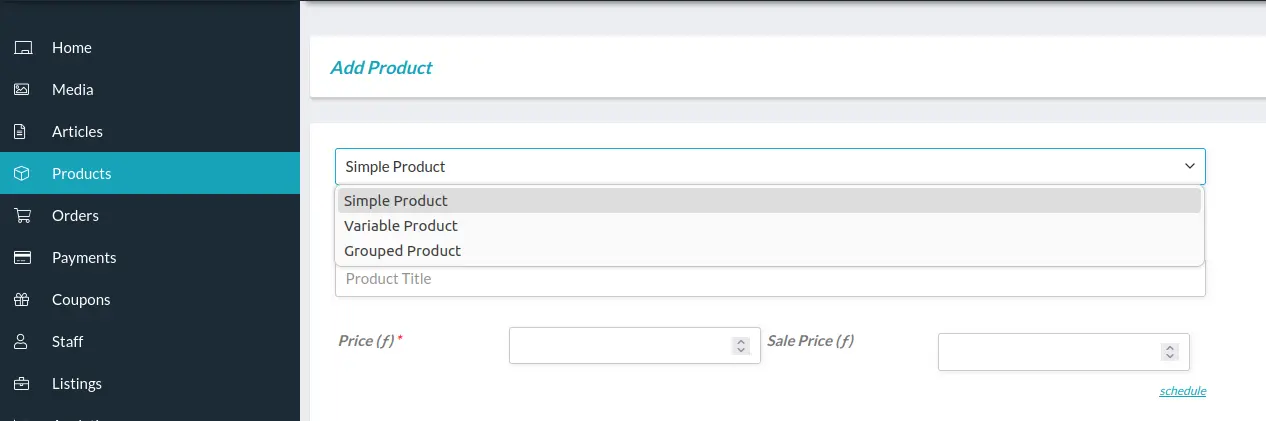
To add a new product, go to the Store Dashboard and click on Products. (1)
At the top of the screen to the right, click on “Add New” (2).
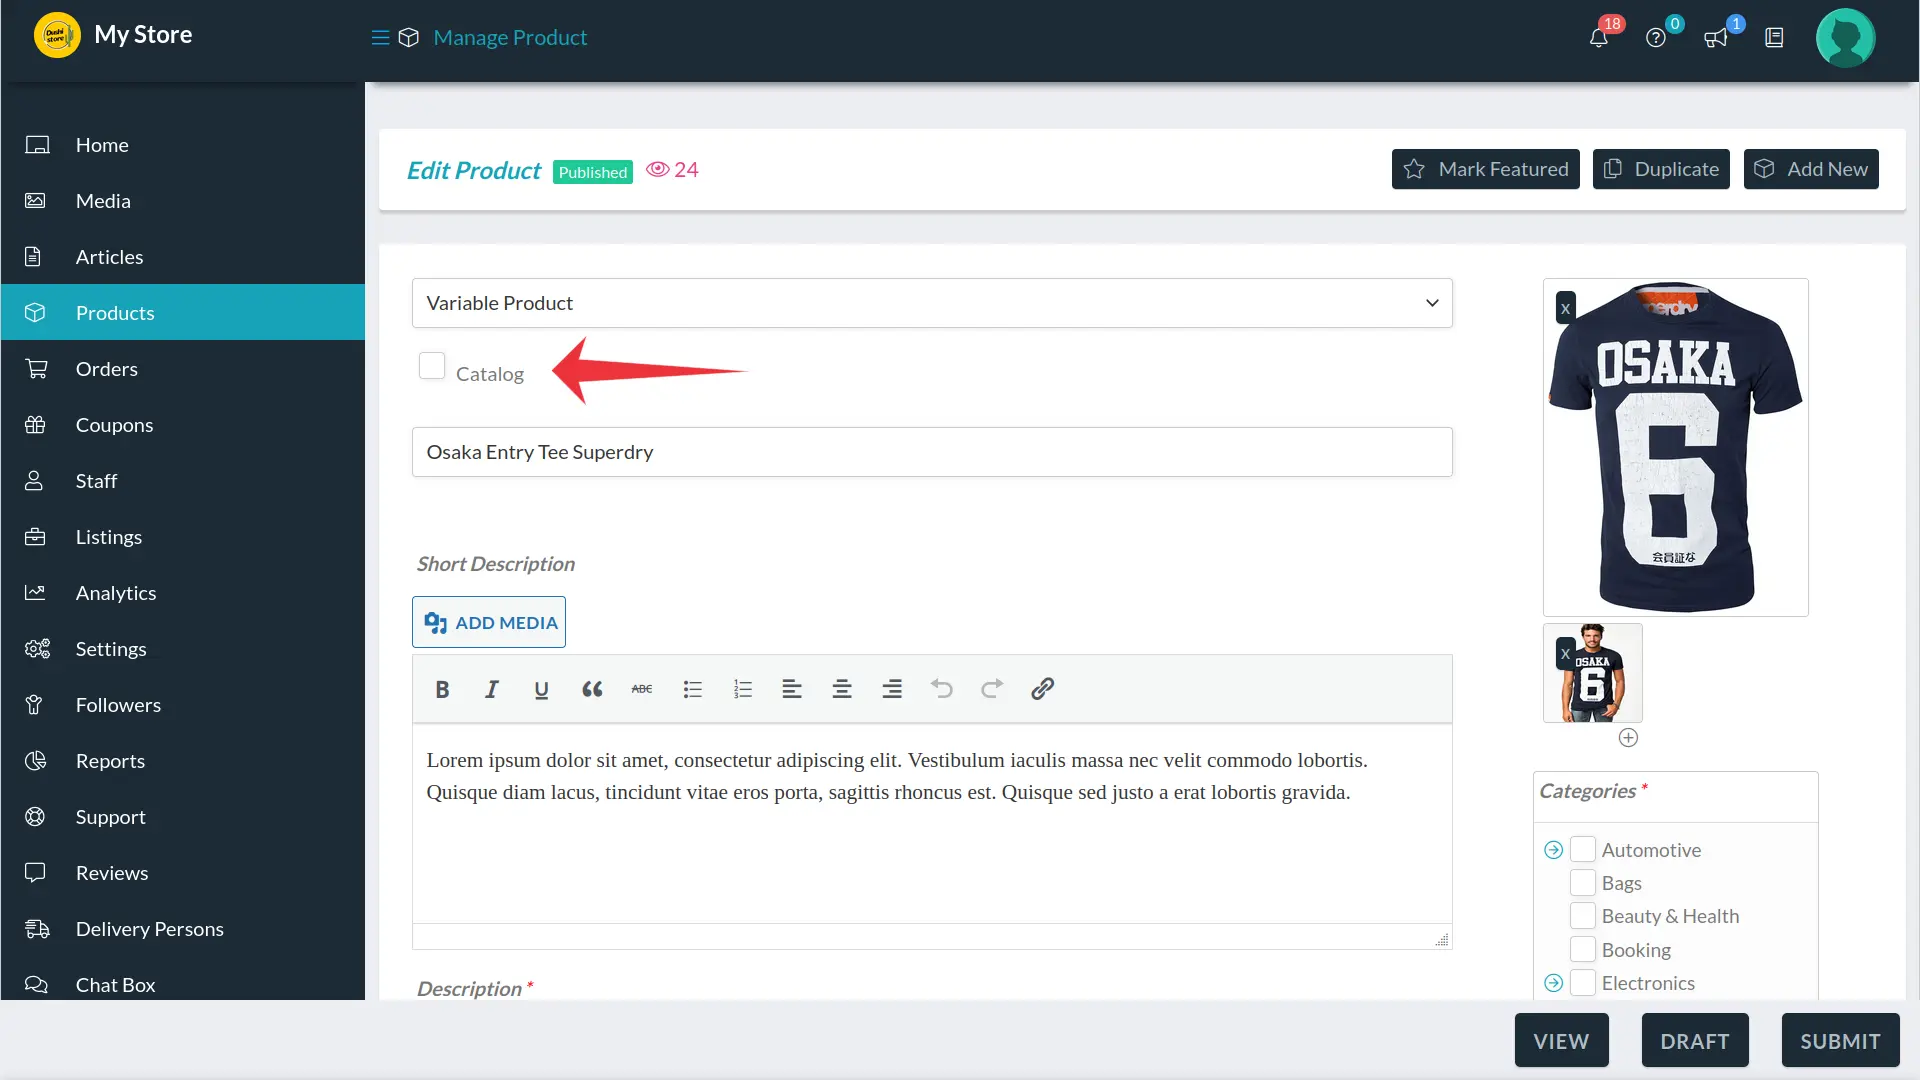
Select the type of product you want to create (3) (4). For a detail description of the different types of products click here.
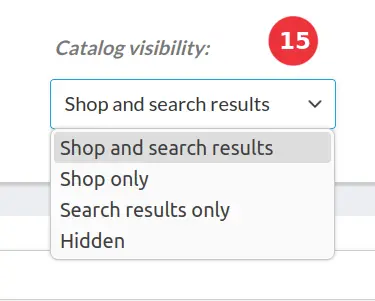
If Catalog is selected (4), the “Add to Cart” and product price can be hidden as illustrated below.
Enter a Product Title (5).
Enter the product Price (6). Please take note that the law requires that prices be entered including taxes.
If the product is on sale, enter the Sale Price (7).
If the sale price is triggered by a date, click on Schedule (8) and enter the beginning and ending date of the sale.
Click on the Product Featured Image holder (9) and select or upload the image that will represent the main image for the product. To attach additional product images, click on the image place holder below the Featured Image place holder (10).
To add more images, click on the + icon.
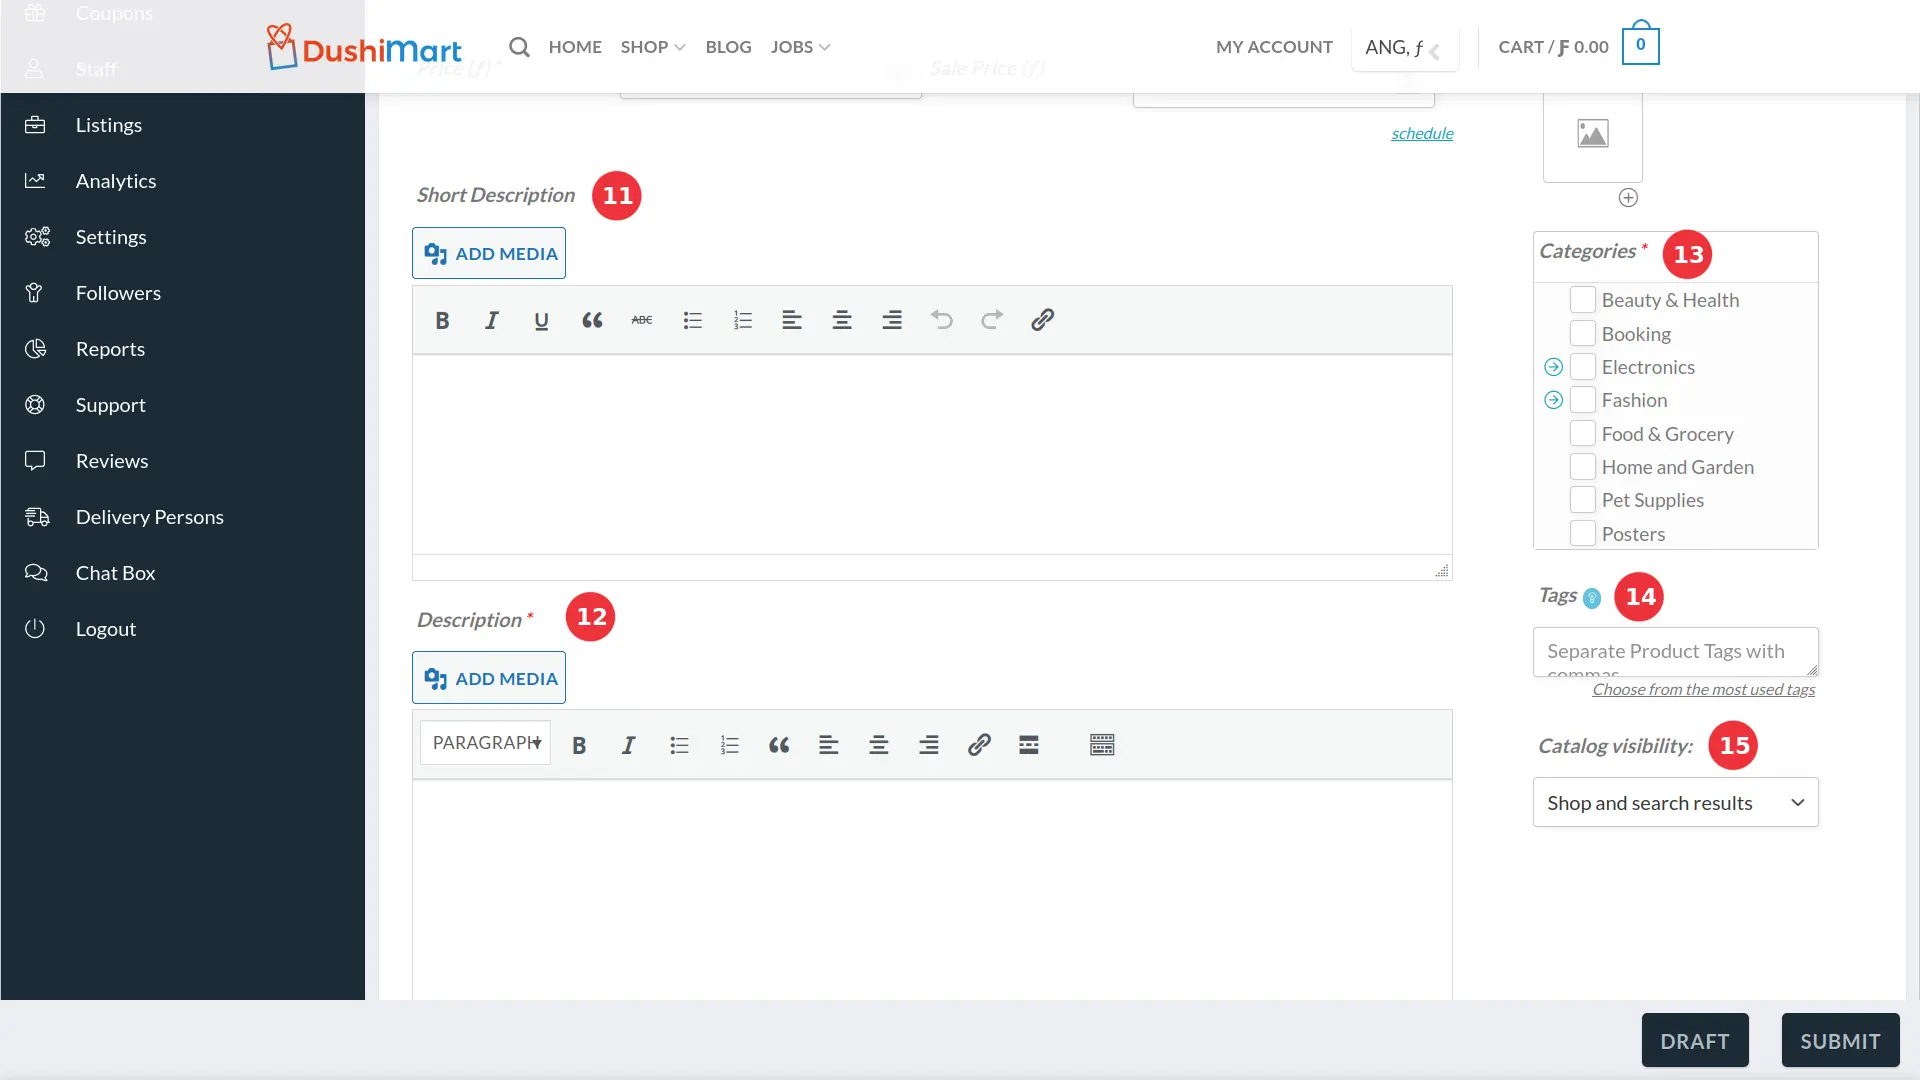
Next enter a product short description (11).
Then enter a product long description (12).
Select the product categories for the new product (13). If the category you are looking for does not exist, please contact us so we can add it in the list of available categories.
Next select the product tags (14) or create new ones.
If the box “Catalog” is selected (4), select from the drop-down box how the product is treated using the search bar. (15). Options are in all search results (includes articles), in the shop search only, in both shop and other search results or if the product should remain hidden from search results. (See illustration below).
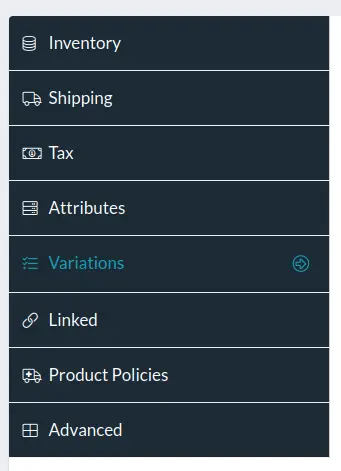
Additional steps to complete the creation of a product include defining the following details on the Product Data panel: (Click on the links to learn more on the subjects)
- Product Inventory specifics
- Product Shipping specifics
- Product Tax class
- Product Attributes (such as color, size and material)
- Product Variations (combinations of product attributes)
- Linked characteristics (like Up-Sells and Cross-sells)
- Product policies (to overwrite store policies is applicable)
- Other advanced product characteristics
Agregar producto, crear producto, foto principal, nieuw product, nuevo producto, precio descontado
The following products types can be added to DushiMart.
- Simple Products
- Variable Products (Products with multiple attributes, such as size, color, material etc.)
- Grouped Products (a product consist of multiple products)
- Virtual products ( are not physical entities. Services provided are virtual)
- Downloadable Products (Product is digital and can be downloaded)
Simple Product
Simple product is one of the easiest product types to create. You can add price, SKU and stock details, and publish a simple product. To add a new simple product, go to Products> Add New and select Simple Product from the drop-down.
Dutch Image Spanish Image
Variable Product
This product type lets you add variations to the same product to create a complex, variable product. Each variation of the product has its own price, SKU, available stock, etc. eg: A shirt or t-shirt with different sizes and different colors.
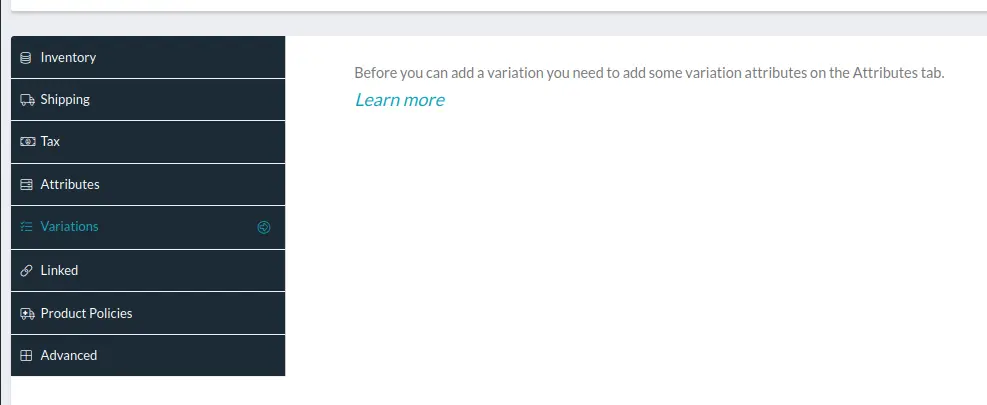
To add a variable product, go to Products> Add New and select Variable Product from the drop-down. Variations will appear in the product data panel.
If Attributes are not defined for the product, you will see the message “Before you can add a variation you need to add some variation attributes on the Attributes tab“.
Click HERE to learn how to define product Attributes.
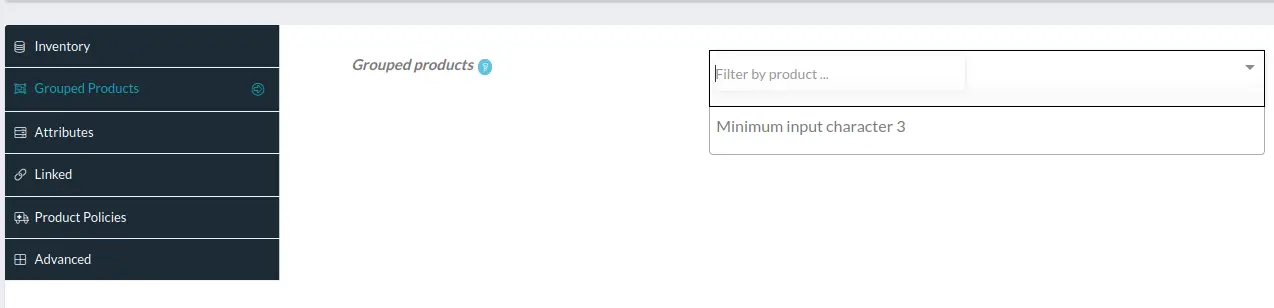
Grouped Product
You can create groups of products and sell them as one product.
Product types that are allowed to be included in the grouped product are Single, Variable, Virtual and Downloadable products.
For a grouped product, you can add a new price, or keep the sum of the total price of the individual products in the group.
To add a new grouped product, go to Products> Add New and select Grouped Product from the drop-down.
Select the products that will form the product group by typing the product description and selecting it.
Virtual Product
Defining and configuring a virtual product is a simple and straightforward process. You don’t have to bother about details such as product dimensions and weight, which are generally part of any other product settings. eg: You list a service as a product in your store.
To make a product virtual, you can select the checkbox for it, while creating the product.
Downloadable Product
Similar to virtual products, downloadable products also don’t require shipping. They are available as a downloadable file with a specified path or URL. In most cases, there will be a limit on the number of downloads of such products.
Ironically, DushiMart allows setting shipping options for downloadable products. This is in fact to include the scenario where you want to send a packaged version (like a CD) of the product to the customer.
If your product is only downloadable and has no physical version, you can mark it as a virtual product.
tipo de producto, virtueel, downloadbaar, descargable, agrupados, agrupadas, eenvoudig, sencillo, sencilla
Before you can add a variation, you need to add attributes using the Attributes tab.
After selecting the product attributes, click on Variations.
Select from any number of variations applicable for the product.
The product inventory tab is where the product quantity is managed.
To get there go to the store manager, click on the Products, select the product, click Edit.
Go to the middle of the page and click on Inventory.

Enter the SKU (1) if you have one. (SKU stands for Stock Keeping Unit. Usually it is the barcode of the product).
If the product quantity is not to be managed, do not select the “Manage Stock” box (2). Instead, select the Stock status (3).
Options are “In stock“, “Out of stock” or “On backorder“
If the product quantity must be managed, select the “Manage Stock” box (2). This will change the view as follows:
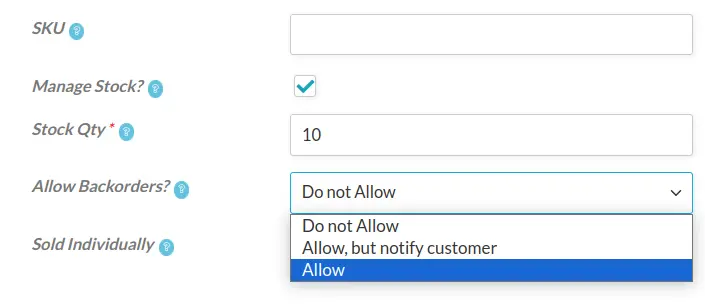
Enter the product quantity. Select if Back-orders are allowed for the product. Finally, if no other product is allowed to be sold along this product, select the box “Sold Individually”. voorraad beheer, cantidad de producto, manehar inventario, nabestelling, pedido pendiente, product kwantiteit
Shipping settings can be defined for each separate product.
Click on the edit product button to open the product edit window and click on the Shipping Tag.
Dutch Image Spanish Image 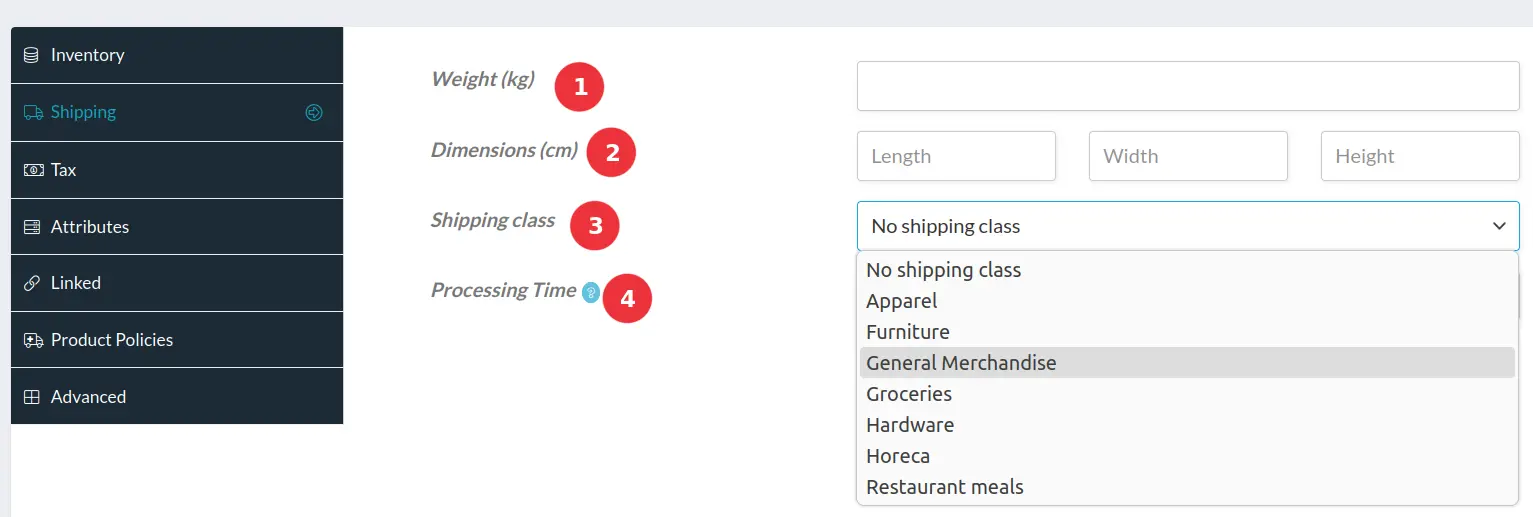 (1) If the weight of the product plays a role in the shipping of the product, enter the weight in kilograms.
(2) If the product shipping dimensions are important, enter them in centimeters.
(3) Products can be assigned a shipping class and vendors can assign shipping policies per product shipping class. If this is important to you, enter the shipping class of the product.
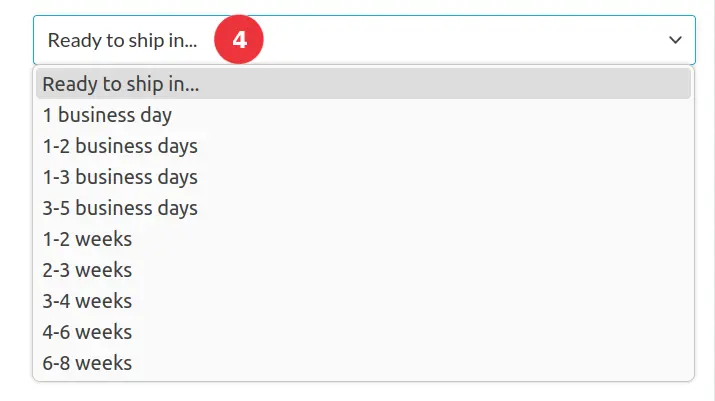
(4) Product Shipping Processing Time can be defined although. Click on the drop-down box and select the processing time for the product. (see image below).
 clase de envio, tiempo de procesamiento, verwerkingstijd, verzending, verzendklasse
Applicable sales tax per product must be defined under product settings.
Select the product you want to define the product tax for and click edit.
Click on the Tax tab.
Click on Tax Status (1) and make a selection between Taxable, Shipping Only or None.
Click on Tax Class (2) and make a selection from the drop-down selection box.
Dutch Image Spanish Image 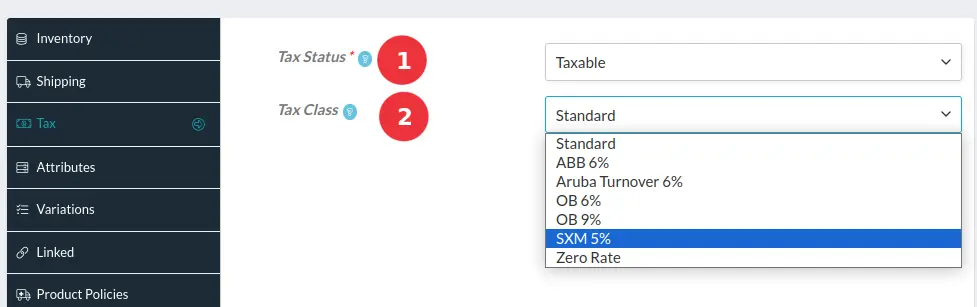 ABB, OB, omzetbelasting, sales tax, verkoopbelasting, impuesto de venta, btw
Product attributes are characteristics of a product that can be assigned to the product such as color, size and material. Examples are clothing and footwear.
To activate attributes for a product, click on the checkbox of the attribute and click on “Active?” (1)
Search for the attribute and select them. (2)
If all attributes apply to the product, click on “Select All”. (3)
If the attributes you need do not exist, click on “Add New” to add them. (3)
To make the product attribute visible on the product page, click on the checkbox. (4)
To add a new type of attribute, click on “ADD” (6). This method is applicable to each product attribute.
Dutch Image Spanish Image 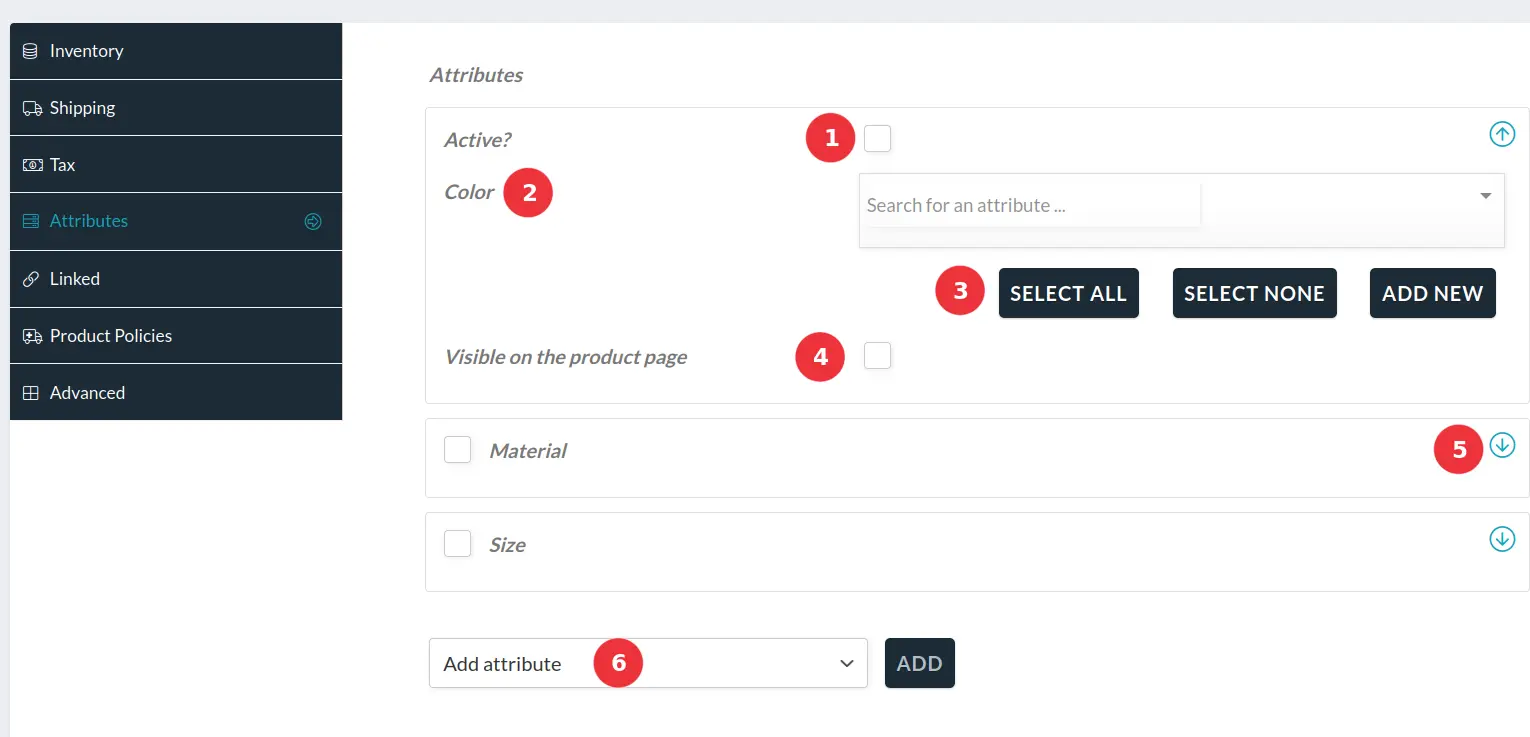 atributos, attributen
Linked Products are products that can be related to each other in three ways:
Up-Sells, Cross-Sells or by having the same tags or categories.
Up-sells are products that are recommended instead of the currently viewed product. These alternative items are usually suggestions to ‘upgrade’ current choice either in quality or price. This is a great way to get your customers to think about a similar product, same brand, that has more features, added options, and of course, is more expensive.Thereby those suggestions are intended to persuade the customer to choose the better option.
Cross-sells are complementary items that a shopper may want to buy additionally to the product s/he is currently interested in. For example, if you are selling a phone, cross-sells might be the following: a case, charger, adapter or any other accessory.
To add an Up-sell (1) or Cross-sell (2) to a product:
- Go to the Store Dashboard > Products and select the product on which you’d like to show an up-sell or cross-sell.
- Scroll down to the Product Data panel.
- Select the Linked Products tab in the left menu.
- Add the product you wish to link to by searching for it.
- Update.
Dutch Image Spanish Image 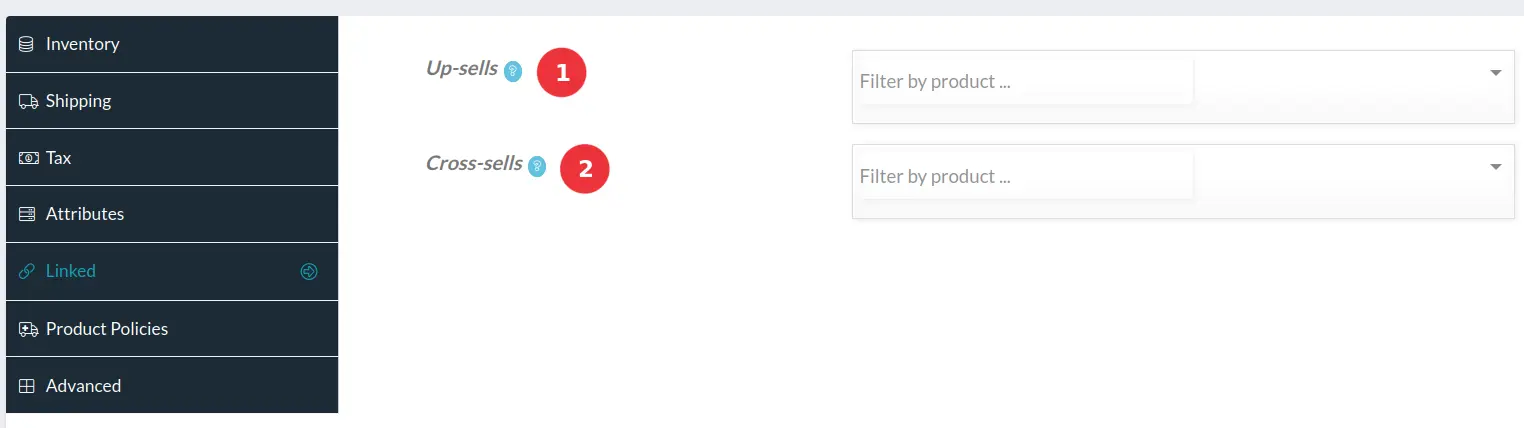 productos vinculados
Product policies are policies that apply to individual products. They override the store policies.
As with Store Policies, there are three types of product policies: Shipping Policy, Refund Policy and Cancellation/Return/Exchange Policy.
To overwrite the store policy and define a product policy:
- Go to the Store Dashboard > Products and select the product you want to define the product policy for.
- Scroll down to the Product Data panel.
- Select the Product Policies tab in the left menu.
- Click the checkbox Override Policy Fields?
- Enter the Policy Tab Label.
- Define the product policies for the product. (The store policies will be displayed. Just make the necessary changes for the product your are defining)
- Click on View, Draft or Submit.
Dutch Image Spanish Image 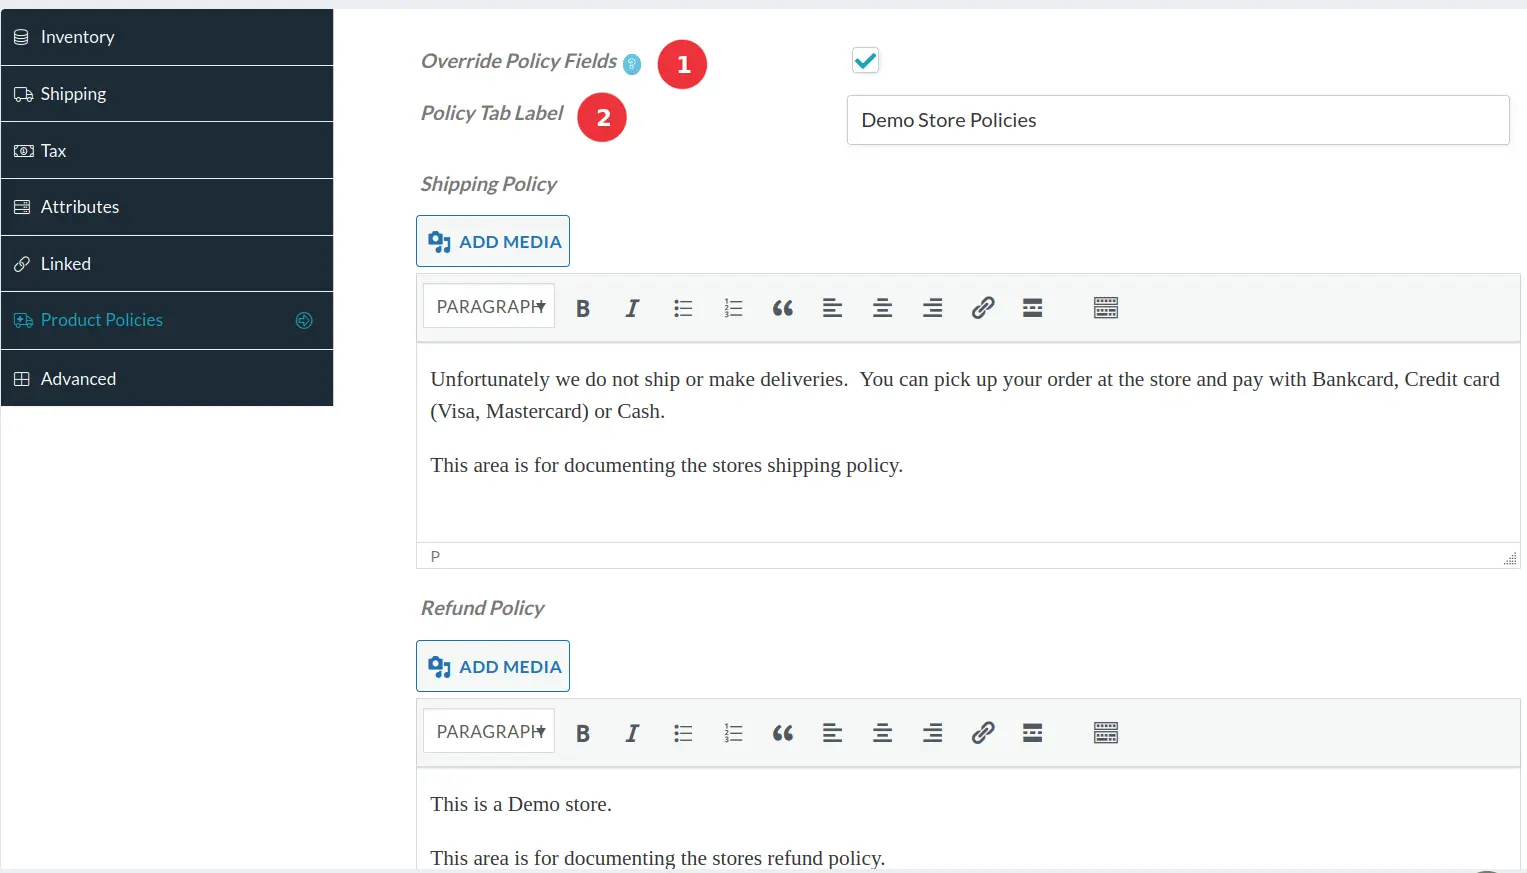 politica de cambio, politica de envios, politica de producto, productbeleid, verzendbeleid, wisselbeleid
Under Advanced Product Setting, certain characteristics can be defined for an individual product.
Characteristics include:
- The products can be reviewed by shoppers (1),
- The menu order (display sequence) of the product in the Vendor Shop can be changed (2) and,
- a special note can be added for the customer when he/she purchases the product (3).
Dutch Image Spanish Image 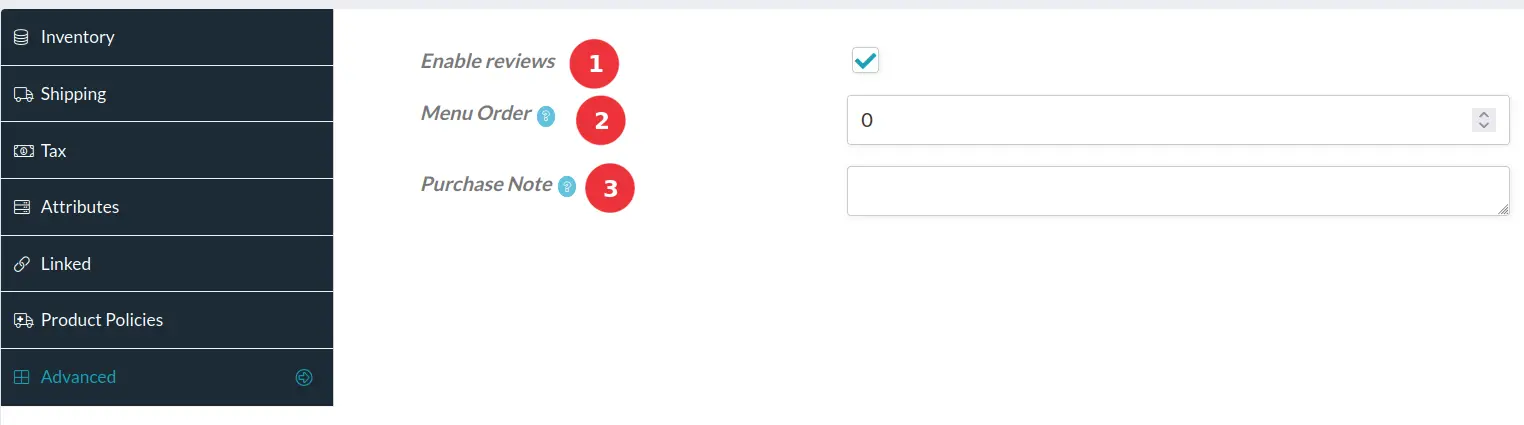 aankoopnota, ajustes avanzados, geavanceerde instellingen, nota de compra, sequencia de visualizacion, volgorde menu
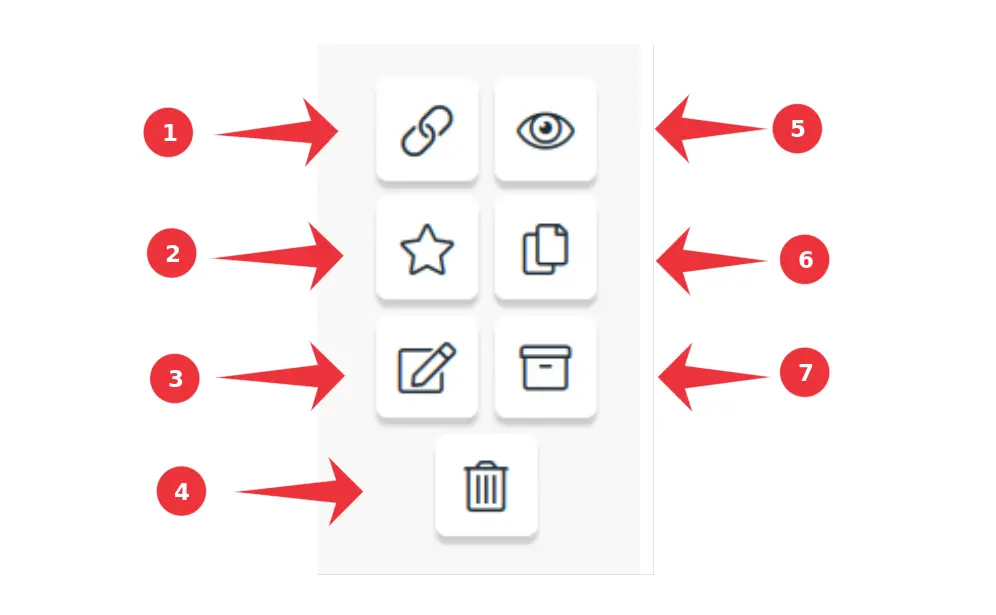
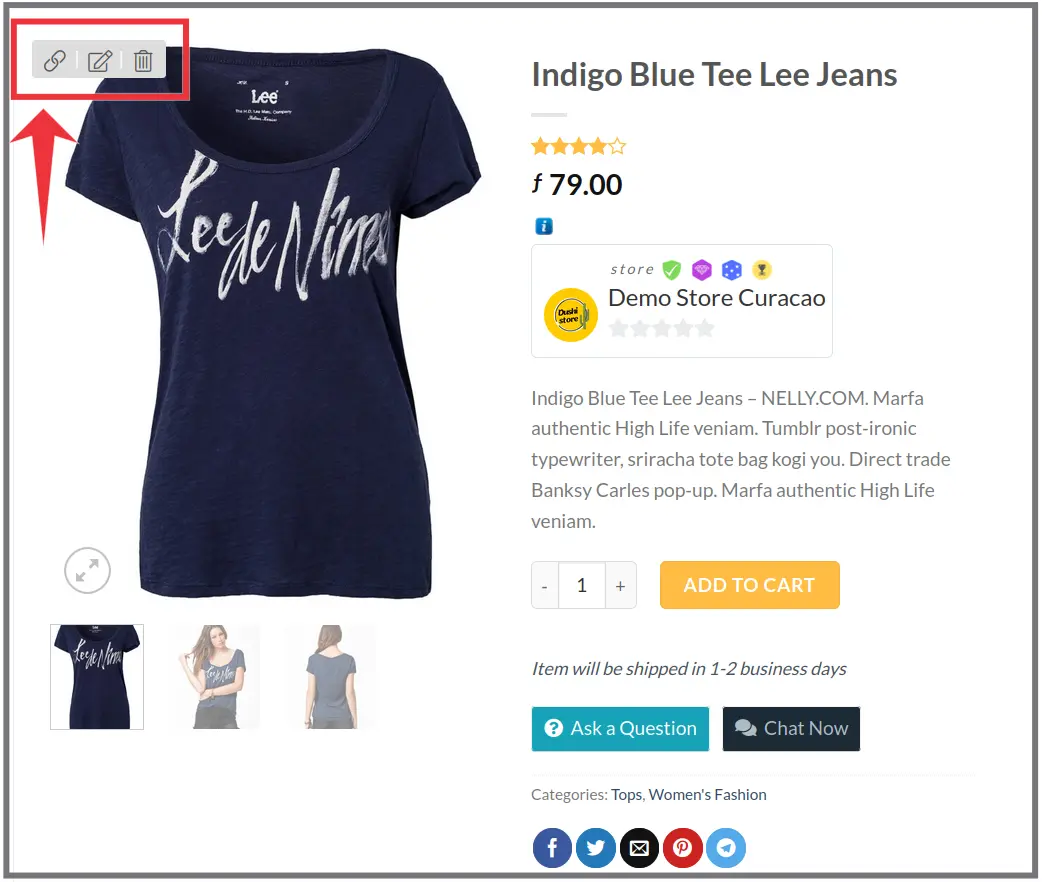
Product Actions are a group of actions made on individual products.
They are represented by icons to the right of the products display window.

Actions are:
- Quick Edit. Also called a Quick Update. Product name, SKU and Product Visibility can be edited.
- Mark Featured.
- Edit. (to edit the product)
- Delete. (Permanent erasure, product cannot be recovered. Increases the number of products available under the membership plan.)
- View. (to display the product as seen in the store)
- Duplicate (Used when similar products need to be defined).
- Archive (Used to un-publish a product. This hides the product from public view. To make the product visible to the public again, just publish it.)
Note: Archiving a product does not increase the number of products available under the membership plan. acties, acciones, copiar producto, editar producto, product kopiëren, archivar, archiveren
Yes you can. This feature is called Bulk Edit.
Dutch Image Spanish Image 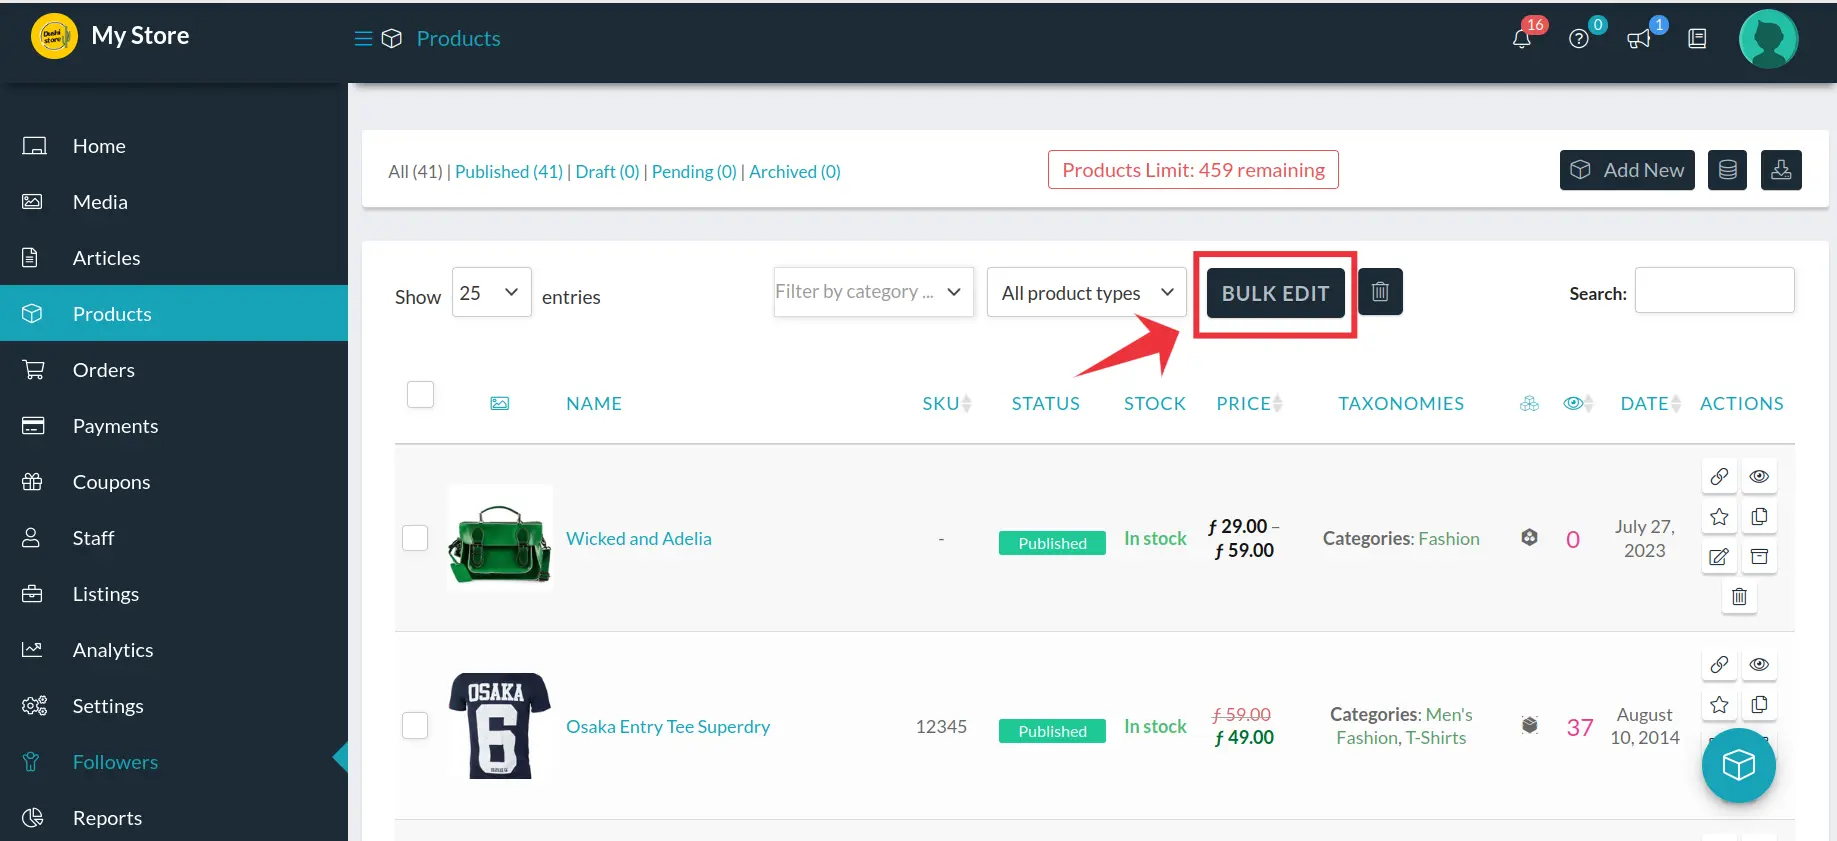 Got to the Store Manager and click on Products. Select the products you want to edit by clicking on the check boxes. Click on the Bulk Edit label. This will open the Product data window.
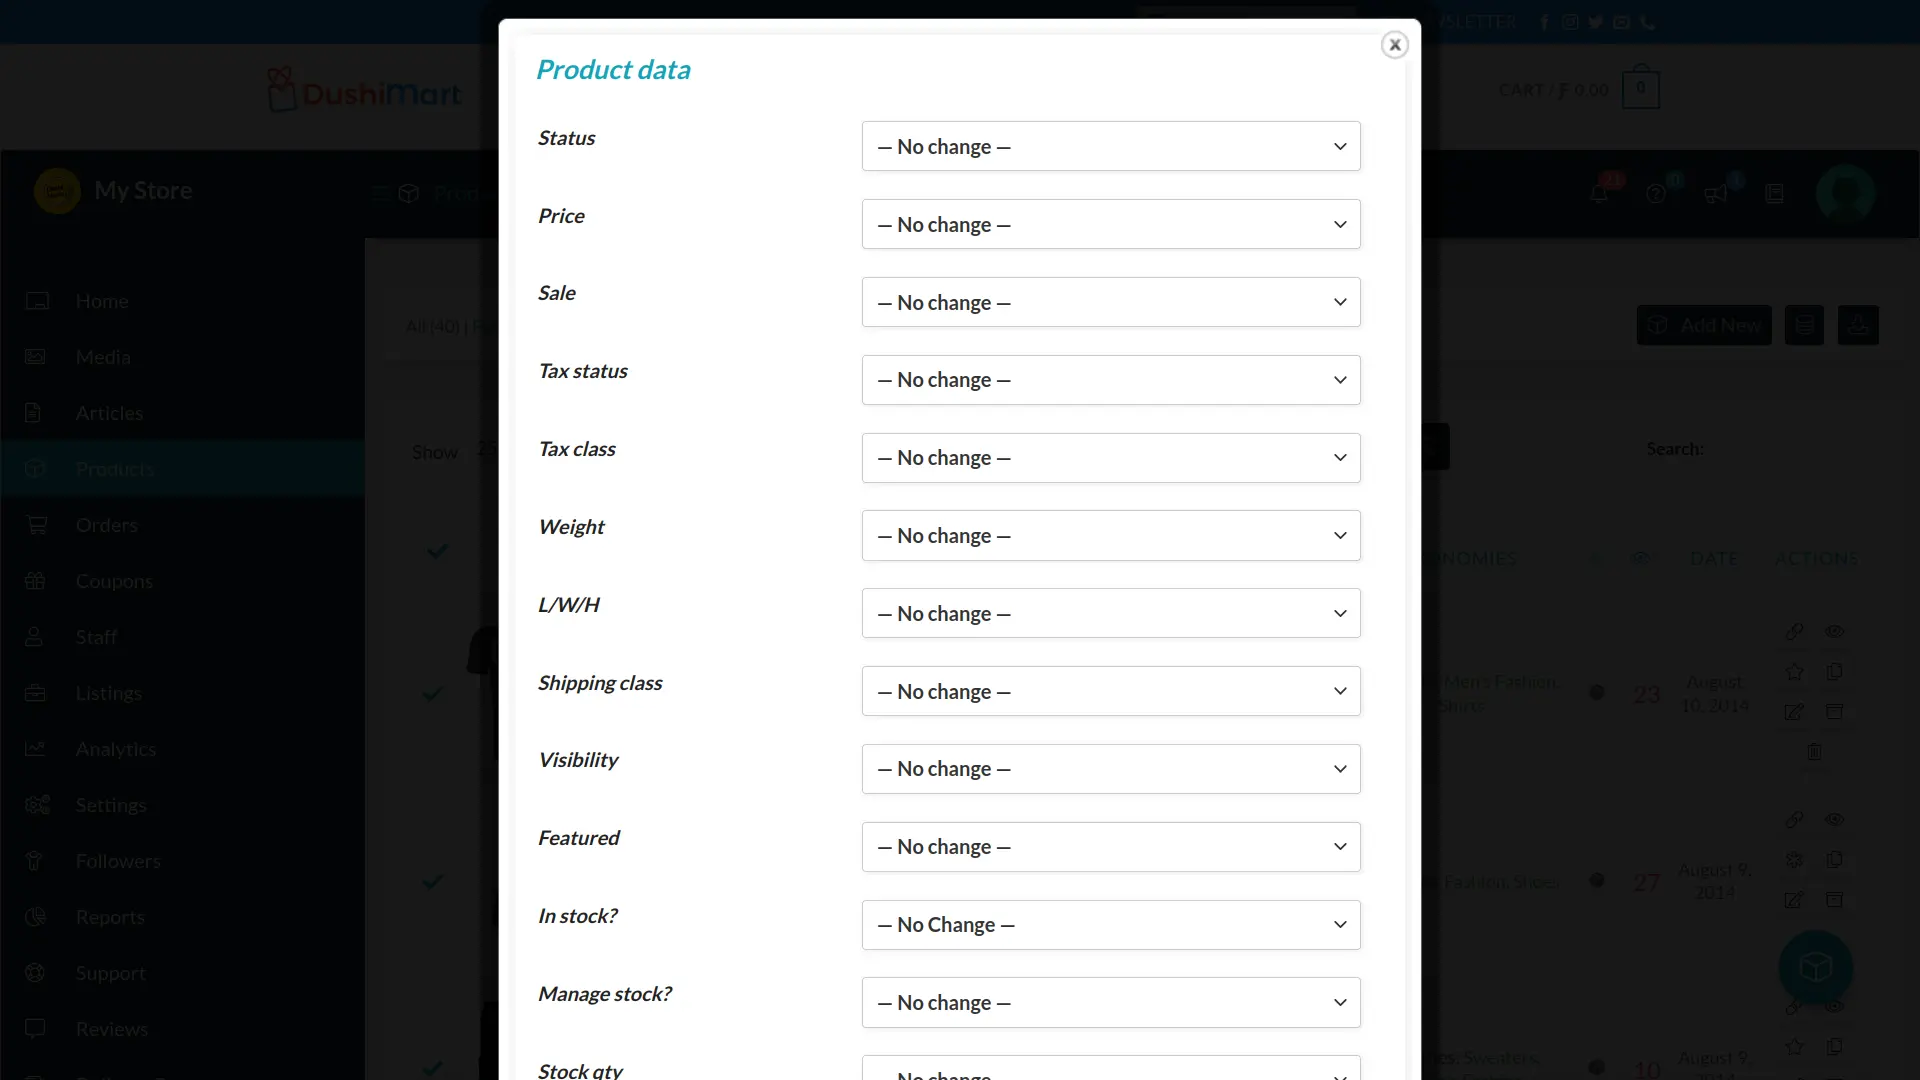
Make the changes and click UPDATE when done.
bulkbewerking, edición masiva, meerdere producten, múltiples productos
Yes there is.
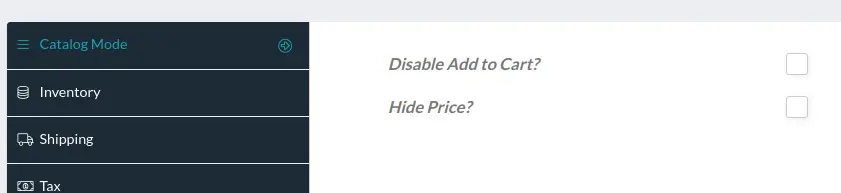
Products can be displayed in Catalog Mode. That provides the option to hide the product price and disable the Add to Cart button.
To hide the product price, first select the product and click edit. Click the checkbox next to Catalog.
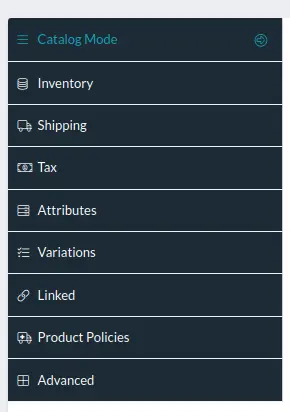
To hide the prices got to the Product Data Panel at the bottom of the page and click on Catalog Mode. Catalog mode is only visible after selecting the Catalog checkbox.
Click the checkbox next to Hide Price and save the settings.
You can also disable the “Add to Cart” button by clicking on the checkbox next to “Disable Add to Cart”.
prijs verbergen, producten verbergen, ocultar productos, ocultar precio, modo catálogo, catalogusmodus
The number of products you can sell in your store depends on your membership plan.
It also is loosely dependent on the amount of space allocated in the membership plan. Typically, a maximum of 1MB of space is allocated per product, however that depends greatly on the number of images associated with each product and the optimization of the images.
For more on Image optimization click HERE. espacio, ruimte, storage, imágenes, optimaliseren, mejoramiento, almacenaje
You can add product images while creating a new product or while editing one.
Click on any of the Image holders. (9) (10). This will engage the Media Manager.
Click on Upload Files (1)
Click on Select Files (2) to select the files to upload to your DushiMart file folder.
foto’s uploaden, subir fotos, subir imágenes, upload afbeeldingen
Featured Products are products that marked for special promotion. This is done by increasing their visibility, increasing the chances of a sale.
Featured products are displayed on a separate page in random order, with a sliding banner on the top of the page for paid product promotion.
All vendors can mark a specific number of their products as featured. The amount depends on the membership plan they subscribed to. The higher the amount of products in the plan, the higher the number of products that can be marked as featured. Check out the Membership plans for details.
To mark a product as featured, do the following;
Go to the Store Dashboard>Products and select the product you want to mark as featured.
Next click on the five pointed star icon to mark the product as featured. This will turn the star icon into a six pointed star. ![]()

Customers who follow your store will receive an email that you featured a product.
To remove the featured status of a product, click on the six pointed star.
aanbevolen product, producto destacado, uitgelichte product
There are three ways to edit a product; Quick Edit, Normal Edit, Bulk Edit.
- Quick Edit allow you to edit the short product description, SKU, regular price, sale price and catalog visibility.
- To open the quick edit window of a product, click on the Quick Edit icon (1) on the Product Action area of the product. Make the changes and click on the UPDATE button when done.

- To open the quick edit window of a product, click on the Quick Edit icon (1) on the Product Action area of the product. Make the changes and click on the UPDATE button when done.
- To edit the product using Normal Edit, click on the Product Edit icon (3) . This allow access to edit all aspects of the product.
- To edit products using Bulk Edit, click Here.

Products can also be edited on the Single Product Page by clicking the Quick Edit or the Product Edit icon.
 editar producto, product bewerken
Use the Archive function under Product Actions.
To un-archive a product, click on “Archived Products” to display a list of archived products.
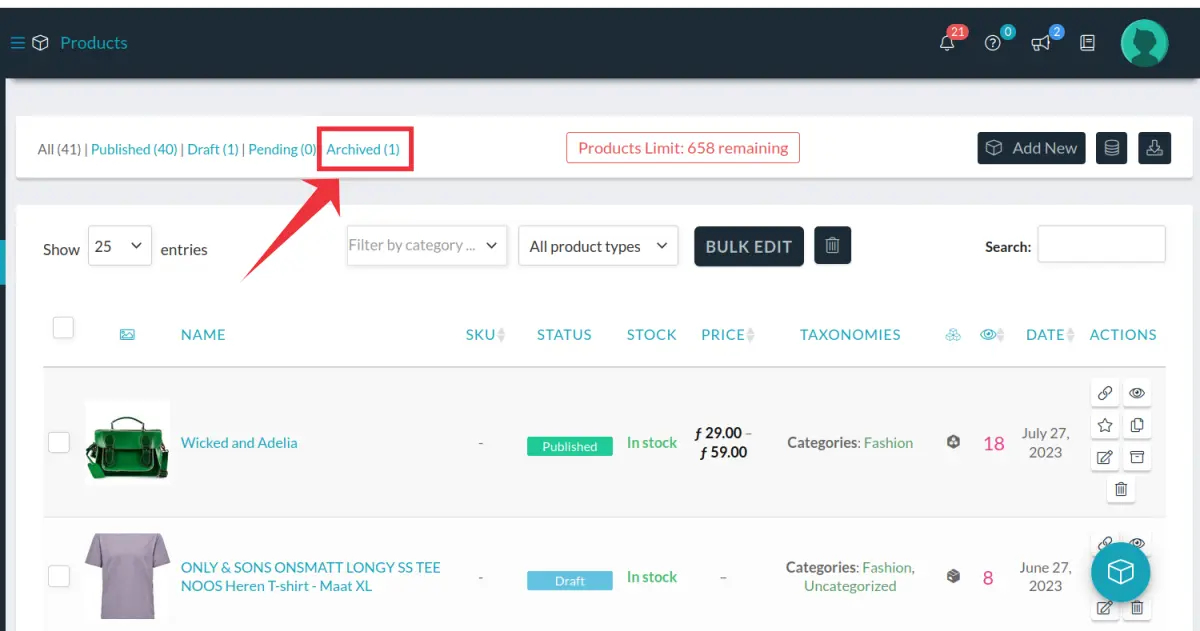
Next click on Edit to open the product in edit mode.

Next, go to the bottom of the screen and click on Submit to publish the product.
 ocultar producto product verbergen
Stock Manger is used to quickly and efficiently manage multiple product as the same time.
To use it go to the Store Manager, click on Products and click on the Stock Manager Icon on the top bar.
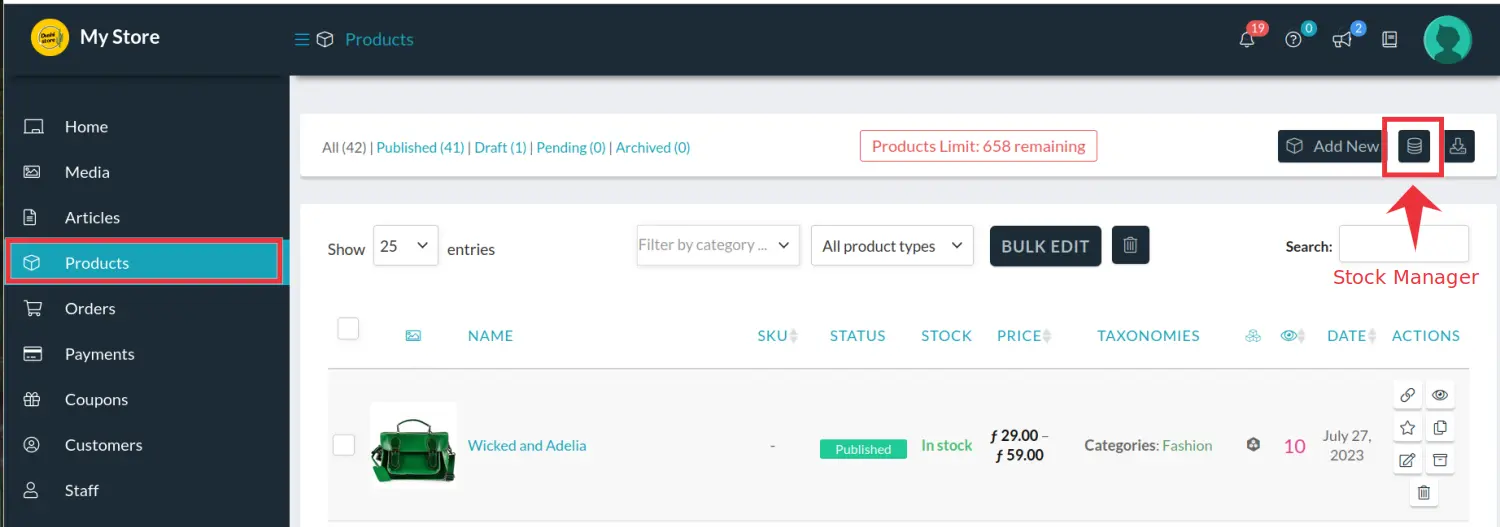
The Stock Manager Window opens up.
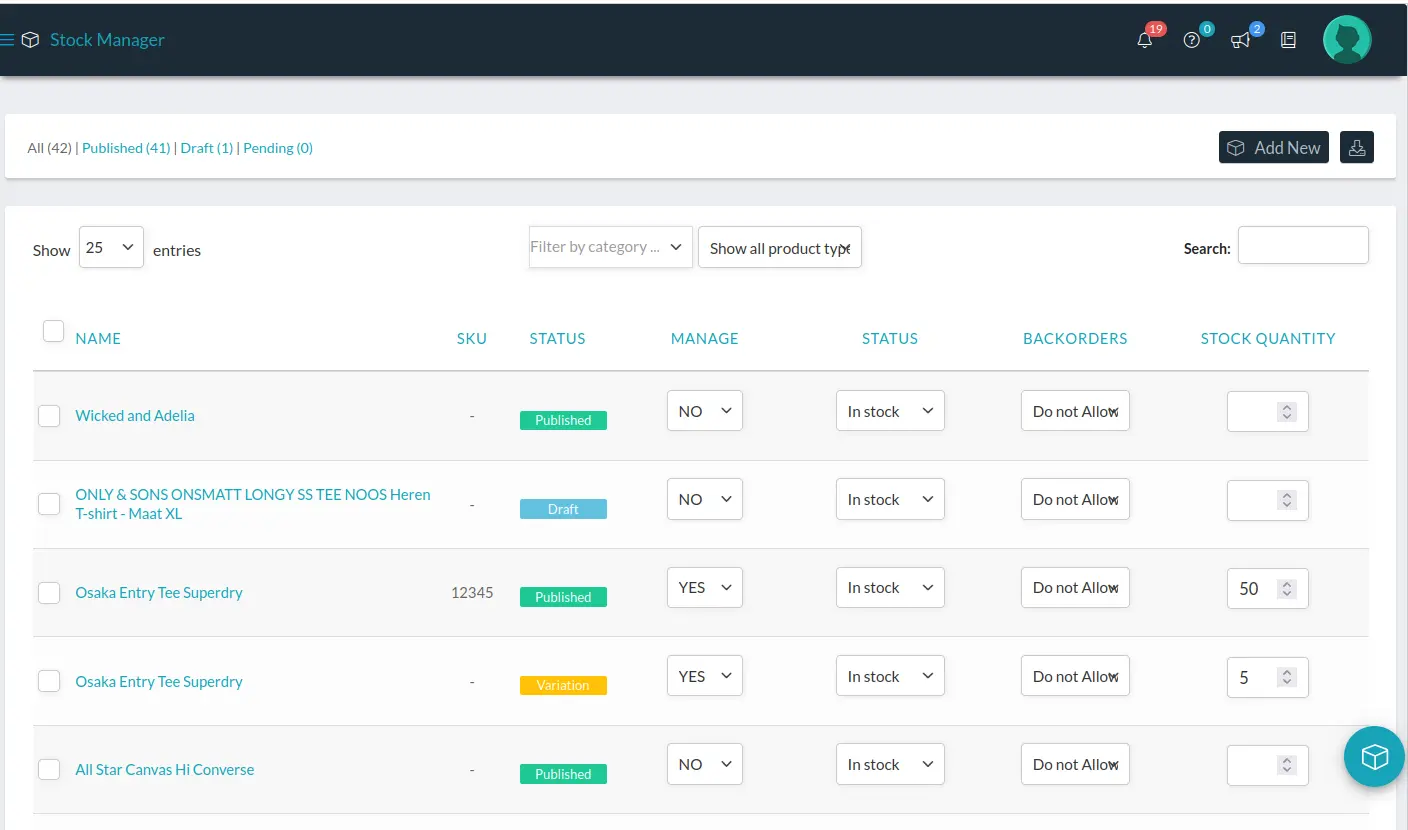
You can choose to manage a product or not.
When a product is set to “Yes“, the “Out of Stock” notice will display automatically for the product when the quantity reaches zero because the Quantity is managed. If manage product is set to “No“, the quantity is not tracked and you manually set the product as “In Stock” or “Out of Stock”. This is the easiest setting because it does not require active management of the product quantity. If manage product is set to “Yes“, the vendor must decide to allow back-orders or not when the quantity is zero. Options are “Allow”, “Do not Allow” or “Allow, but notify customer”. For managed products, the stock Quantity can be set. nabestelling pedido pendiente manehar producto
Reports (1)
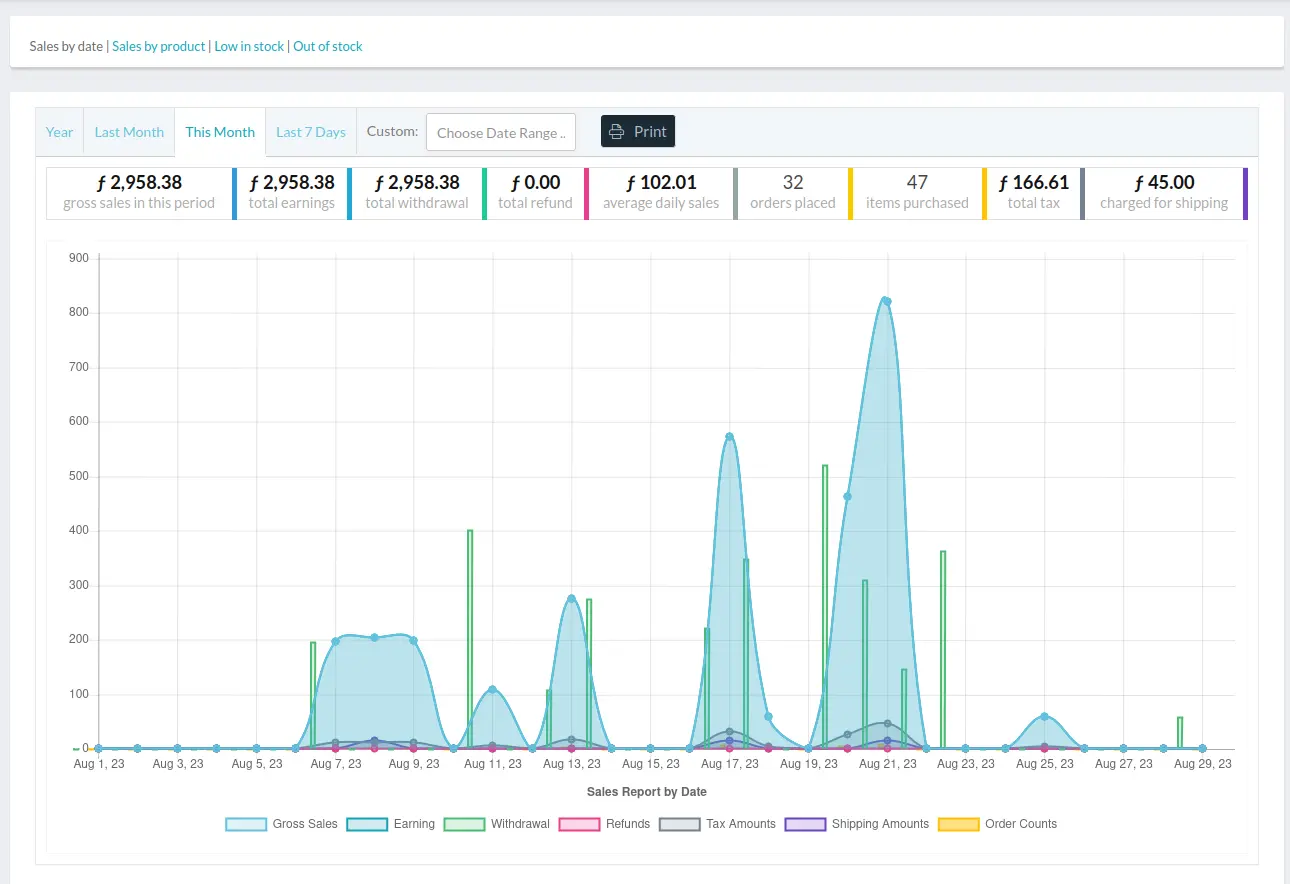
By default, when you enter the Store Manager you end up at the Home screen.
The first thing visible at the top of the screen are the main economic activities for the last seven days. They include gross sales, commissions (is zero because DushiMart by default does not charge a commission), number of items sold and the number of orders.

Underneath the four main economic data tabs is a graph representing gross sales(includes sales tax), net sales, shipping/delivery totals, and coupon amounts.
To get detailed information on the data, click on any of the points on the graph or any of the four buttons on the top of the screen. This opens up the Reports screen.
Of course you can also access Reports by clicking on “Reports” on the left menu.
The welcoming Reports screen displays all the the information you need to help you manage your store to profitability and success. The data and the display thereof, can be manipulated based on your inputs.

The four main report types are:
- Sales by Date
- Sales by Product
- Low in Stock
- Out of Stock
The Sales by Date report provides an overview of sales based on the chosen range of dates.
Sales by product Report.
Dutch Image Spanish Image 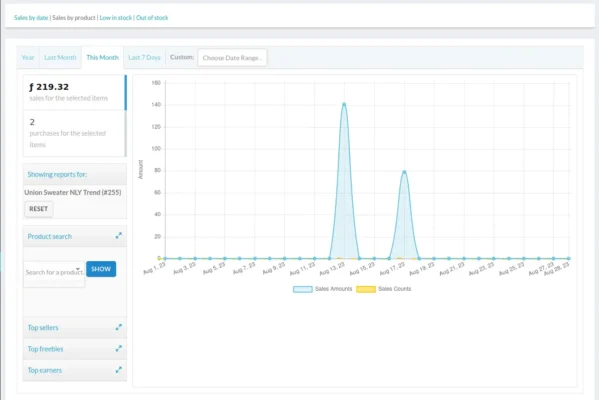 informe rapport
Shipping (1)
Vendors can choose to either allow for store pickups only or also allow for shipping and deliveries.
To allow shipping and deliveries, the shipping options must be set up first. Go to the Store Manager and click on Shipping.
Click on the checkbox “Enable Shipping“
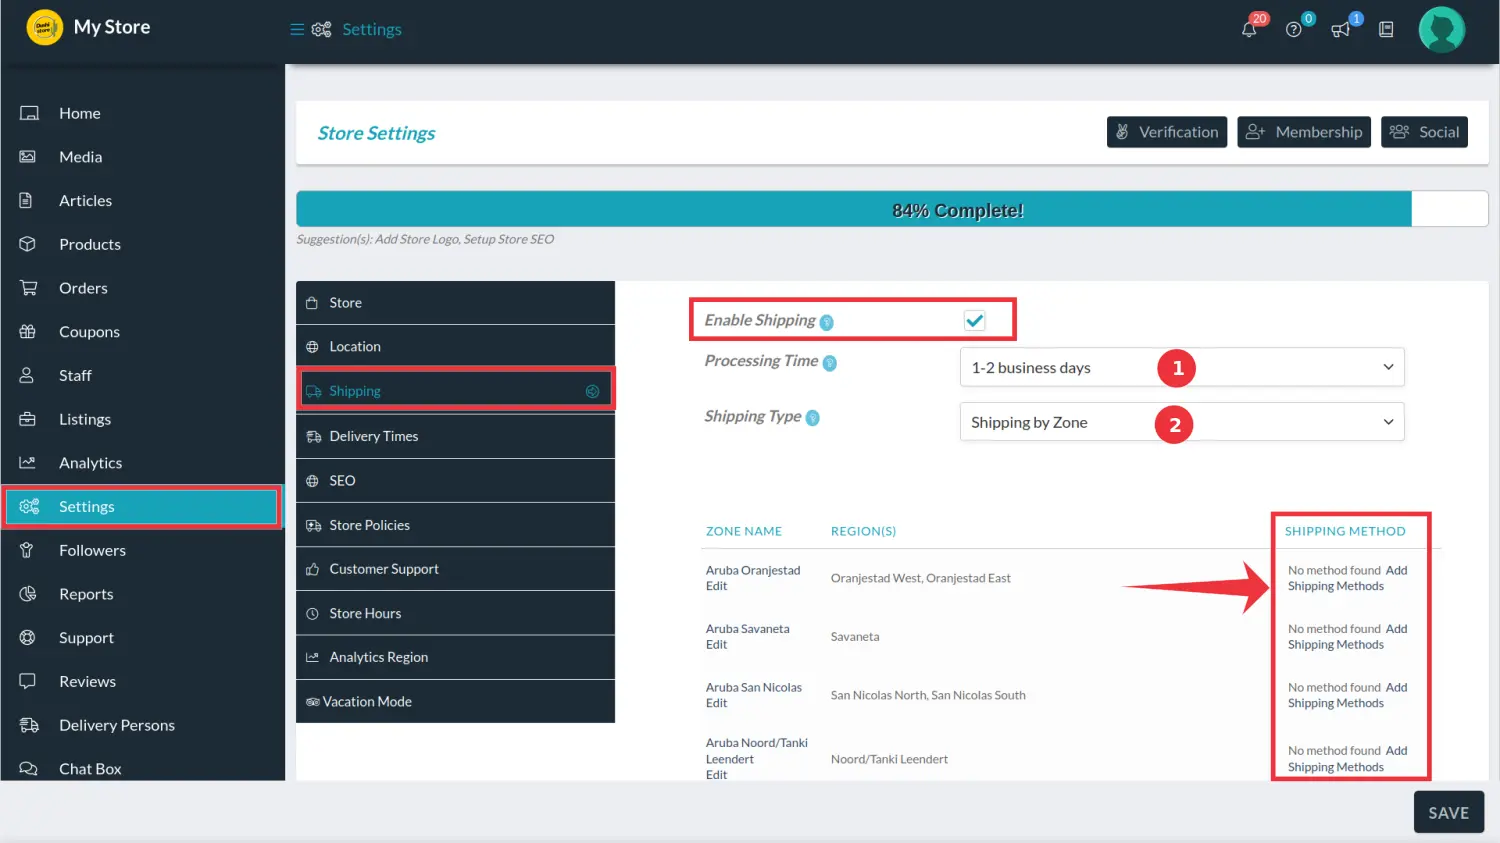
Enter the Processing Time (1) required to prepare the shipping.
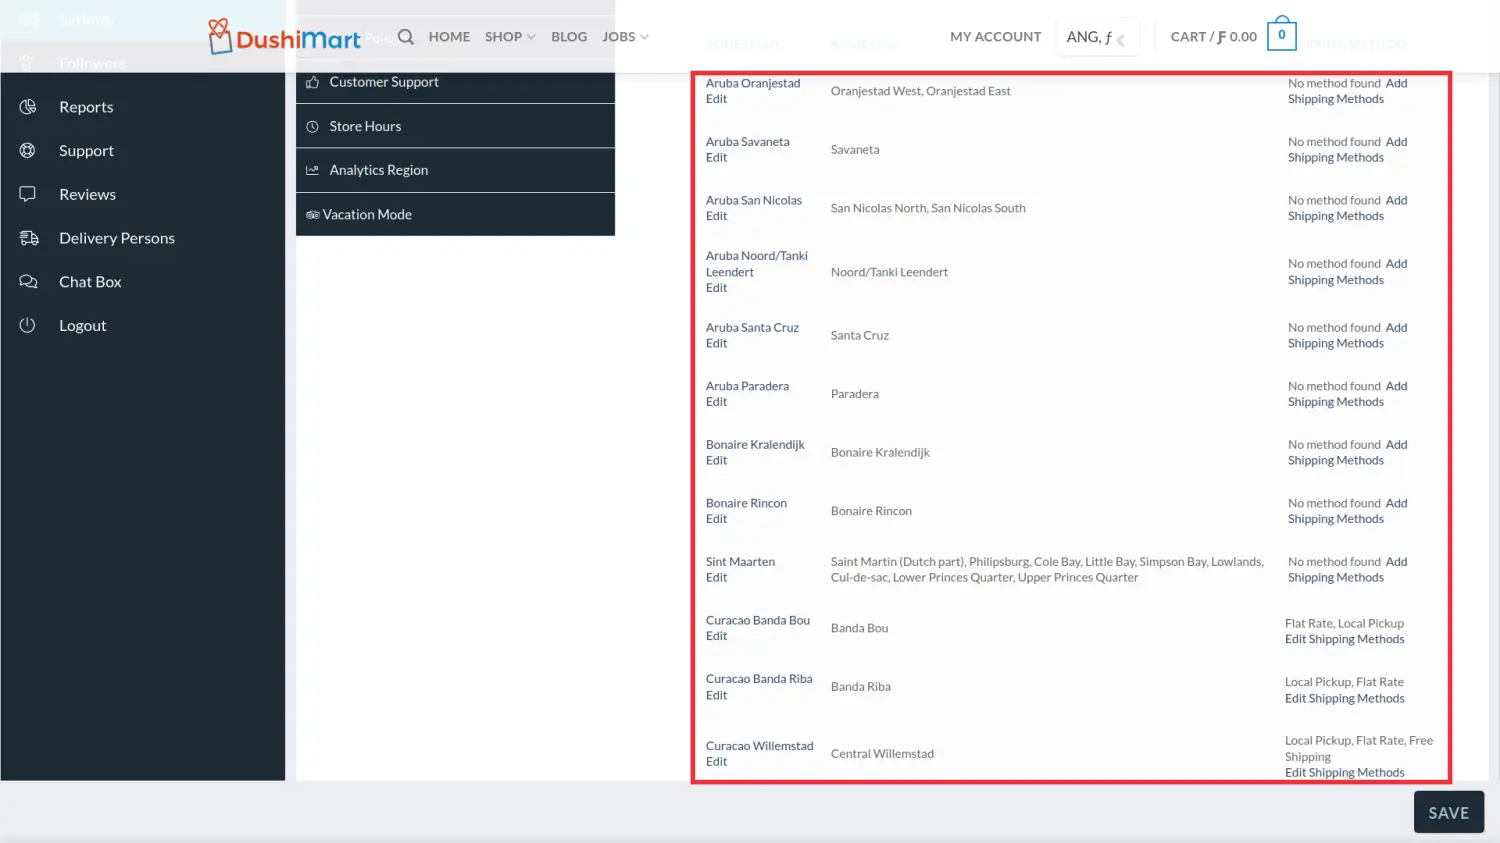
Enter the Shipping Type (2) provided by your store. Options are Shipping by Zone (best if you only sell to customers on the Island you are located) or, Shipping by Country if you sell to the other islands.
The examples above are for Shipping by Zone.
(Note: In DushiMart, the neighborhoods are defined as zones. This is because vendors many times charge different amounts for delivery based on the distance from their location. If Shipping by zone is chosen, vendors have the option to define shipping costs for each zone.)
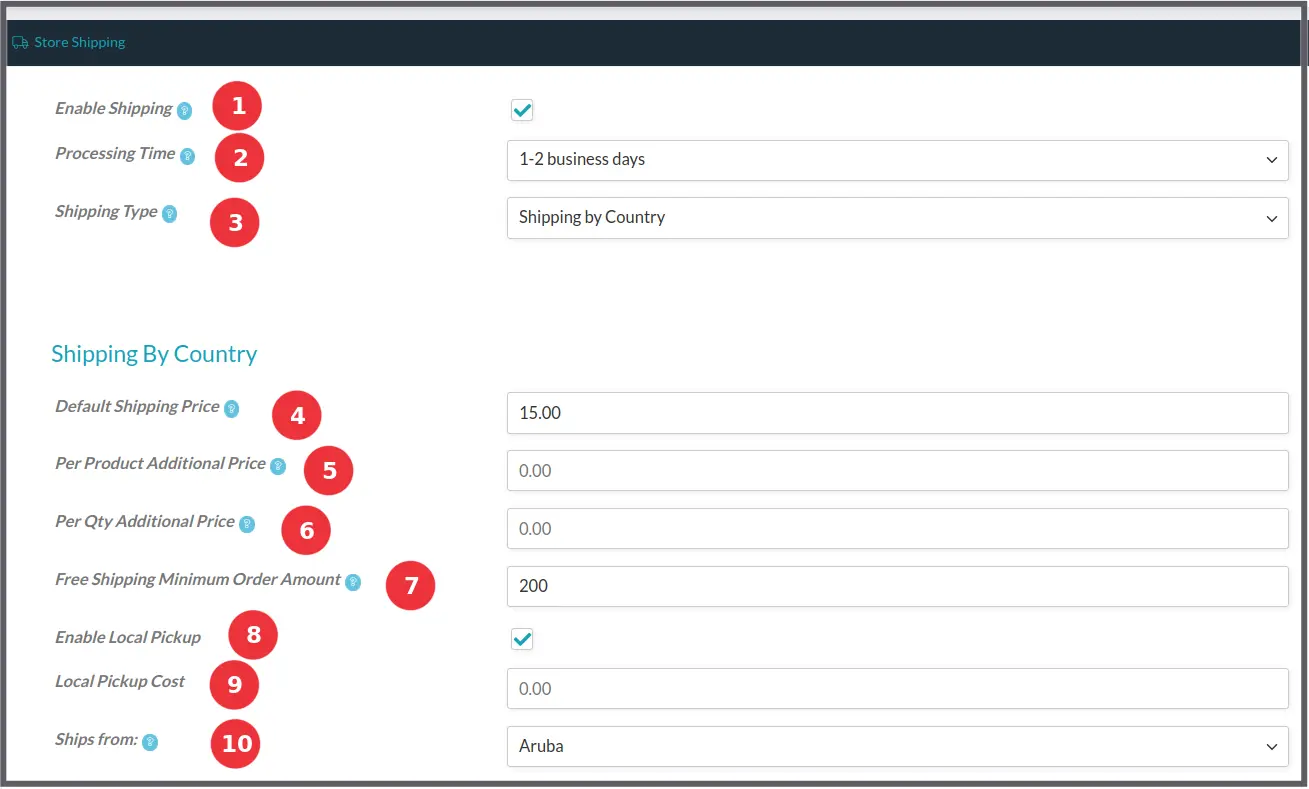
If the shipping type selected is “Shipping by Country” (3), the following data must be defined;
- The default Shipping Price (4),
- Per Product Additional Price (5),
- Per Quantity Additional Price (6),
- Free Shipping Minimum Order Amount (7),
- Enable Local Pickup (8)
- Local Pickup Cost (9), and
- Where the product is shipped from (10).
Thereafter, the Shipping Rates by Country (1) and States/Zones (2) must be defined.
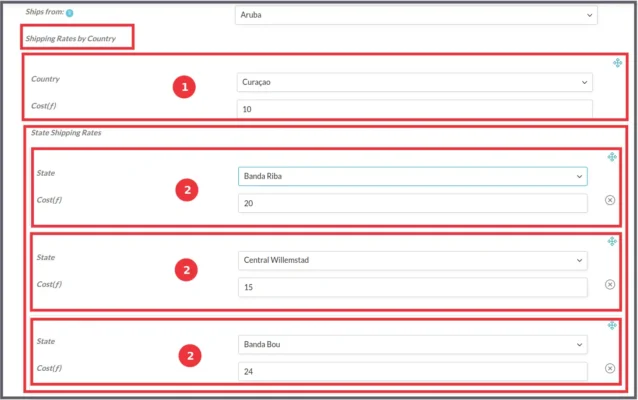
Select the Country.
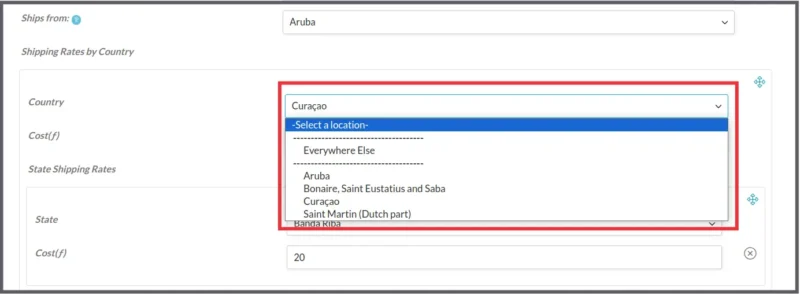
Select the State/Zone.
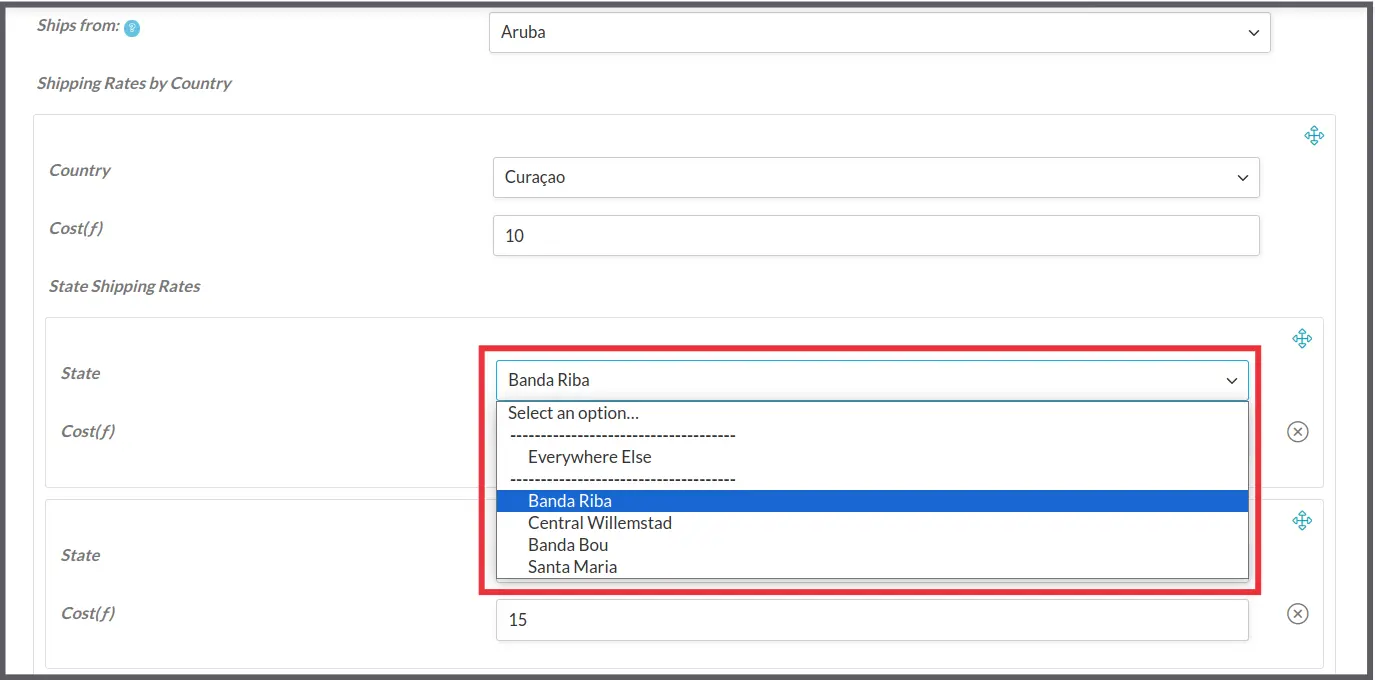
If you ship to countries outside the ABC defined islands, select “Everywhere Else” and enter the amount of the shipping cost.
Remember to set up your Shipping Policy in your store settings.
Click HERE for instructions on how to do that. envio, verzenden, verzendzone, zona de envio
Staff (2)
DushiMart allows you as a vendor to add employees and associates as staff members. Examples are administrative personnel, inventory management personnel etc.
The vendor assigns each staff member access to every area of the online store depending on their functions and responsibilities. The number of staff members per store depends on the membership plan the vendor subscribed to. For information on the number of staff members allowed per membership plan, check out the membership plan schedule here.
To define a new staff member go to the Store Manager.
Click on Staff (1). This will open a window of all staff members currently defined.
Depending on the membership plan you are subscribed to you will see at the top of the screen the number of remaining staff members you can define. (2) Click on Add New (3). This will open the window to define the new staff member.
Dutch Image Spanish Image Fill out the information for the new staff member and click on Custom Capability to define what the staff member has access to. For more information on staff member capabilities, click HERE. acceso, capacidades, mogelijkheden, personal, personeel, toegang
Staff members are assigned capabilities depending on their function and tasks.
Vendors must first define their staff members using the Store Manager. For instructions on how to do this, click here.
To assign capabilities to staff members, select the staff member and click on the Manage Staff Icon.
Next click on the checkbox Custom Capability.
This will open a window with all capabilities as depicted in the video clip hereunder. Each capability can be triggered on or off.
capacidades, manejar personal, mogelijkheden, personeel beheer
Store Policy (1)
To set up your store policies go to the Store Manager.
Click on Settings, Store Policies.
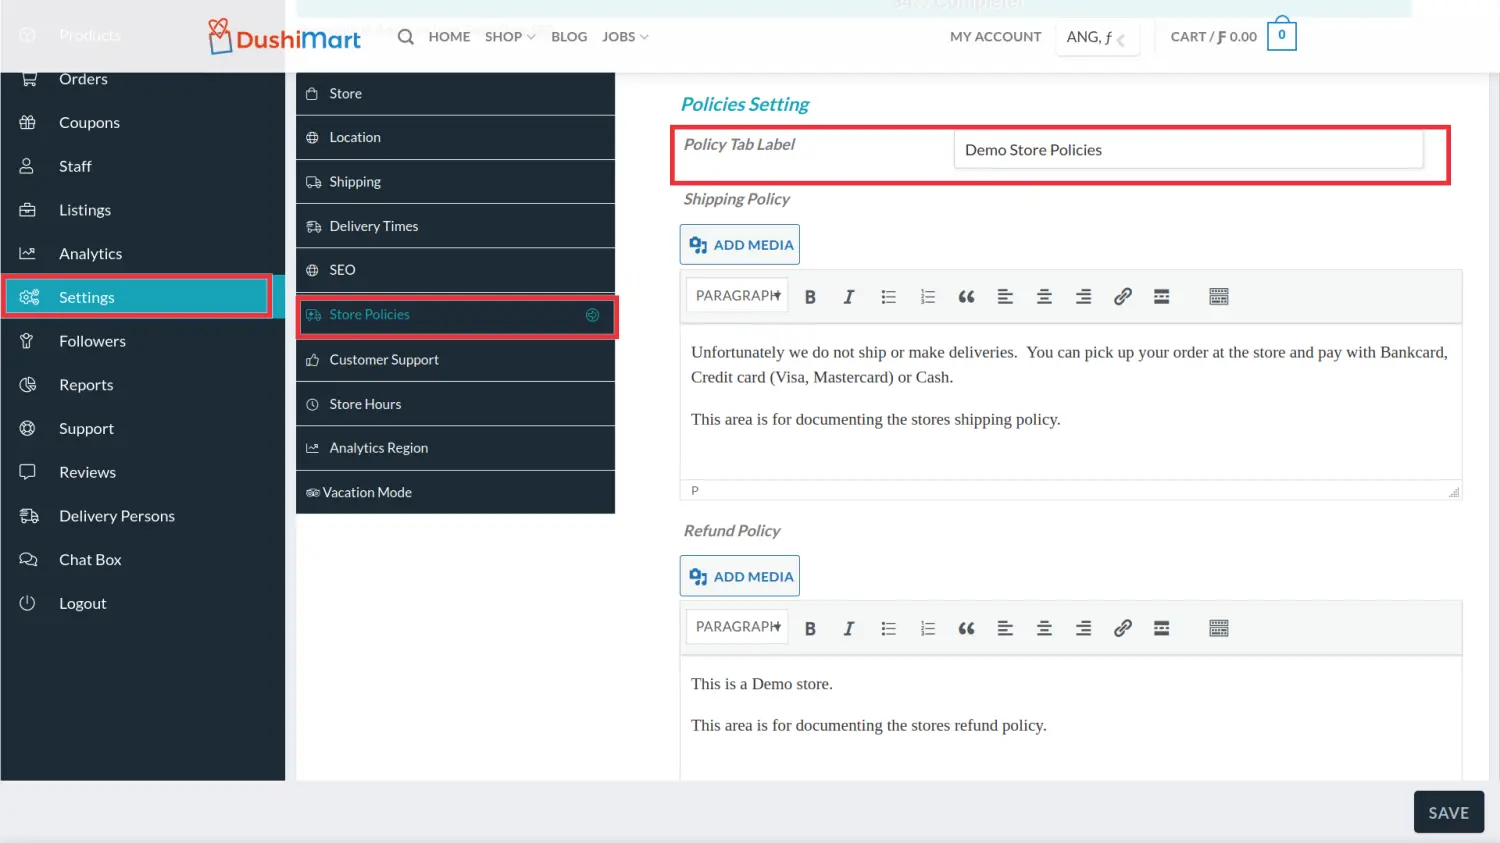
Enter a description for the Policy Tab Label. This will be displayed on vendor store page and on product pages.
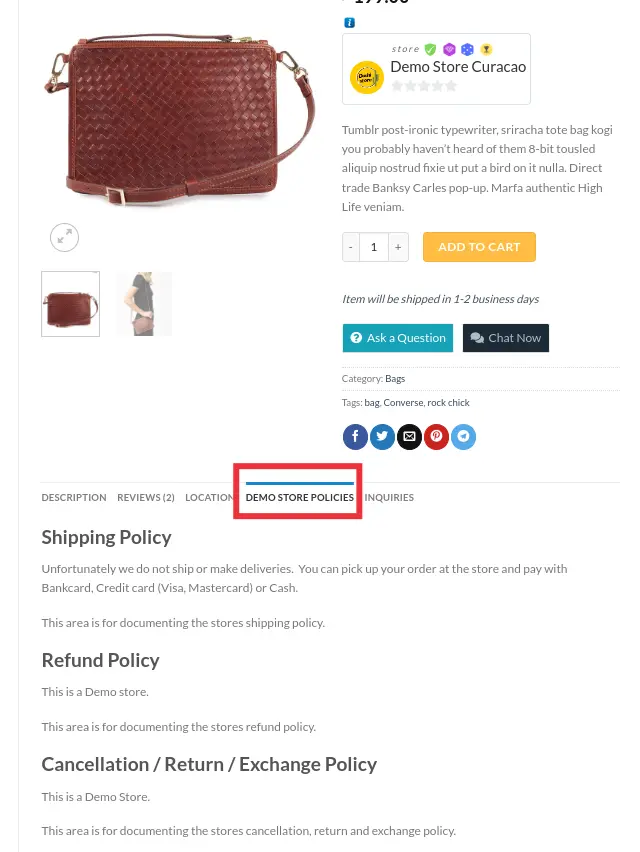
Next enter the Shipping Policy, Refund Policy and Cancellation, Return and Exchange Policy.
Click Save when done.
Dutch Image Spanish Image 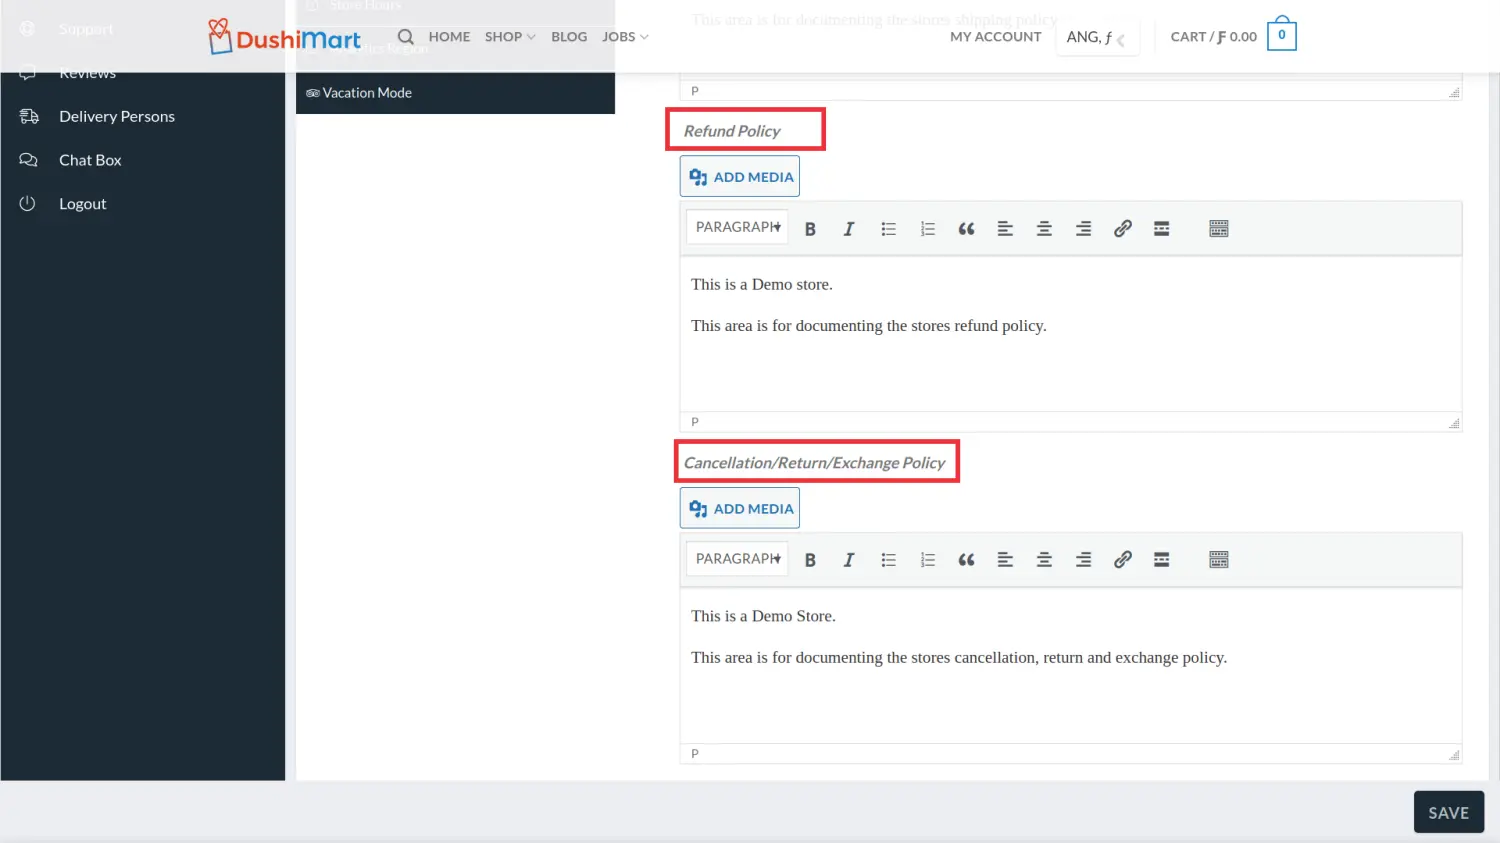 política de la tienda, winkel beleid, verzenden, verzendbeleid, retorno, devolver, reembolso, restitueren
Store Settings (8)
Vendors can choose to either allow for store pickups only or also allow for shipping and deliveries.
To allow shipping and deliveries, the shipping options must be set up first. Go to the Store Manager and click on Shipping.
Click on the checkbox “Enable Shipping“
Enter the Processing Time (1) required to prepare the shipping.
Enter the Shipping Type (2) provided by your store. Options are Shipping by Zone (best if you only sell to customers on the Island you are located) or, Shipping by Country if you sell to the other islands.
The examples above are for Shipping by Zone.
(Note: In DushiMart, the neighborhoods are defined as zones. This is because vendors many times charge different amounts for delivery based on the distance from their location. If Shipping by zone is chosen, vendors have the option to define shipping costs for each zone.)
If the shipping type selected is “Shipping by Country” (3), the following data must be defined;
- The default Shipping Price (4),
- Per Product Additional Price (5),
- Per Quantity Additional Price (6),
- Free Shipping Minimum Order Amount (7),
- Enable Local Pickup (8)
- Local Pickup Cost (9), and
- Where the product is shipped from (10).
Thereafter, the Shipping Rates by Country (1) and States/Zones (2) must be defined.
Select the Country.
Select the State/Zone.
If you ship to countries outside the ABC defined islands, select “Everywhere Else” and enter the amount of the shipping cost.
Remember to set up your Shipping Policy in your store settings.
Click HERE for instructions on how to do that. envio, verzenden, verzendzone, zona de envio
To set up your store policies go to the Store Manager.
Click on Settings, Store Policies.
Enter a description for the Policy Tab Label. This will be displayed on vendor store page and on product pages.
Next enter the Shipping Policy, Refund Policy and Cancellation, Return and Exchange Policy.
Click Save when done.
Dutch Image Spanish Image política de la tienda, winkel beleid, verzenden, verzendbeleid, retorno, devolver, reembolso, restitueren
DushiMart allows you to define any number of store branches. Only one membership plan is required.
Go to the Store Manager, click on Settings and Location.
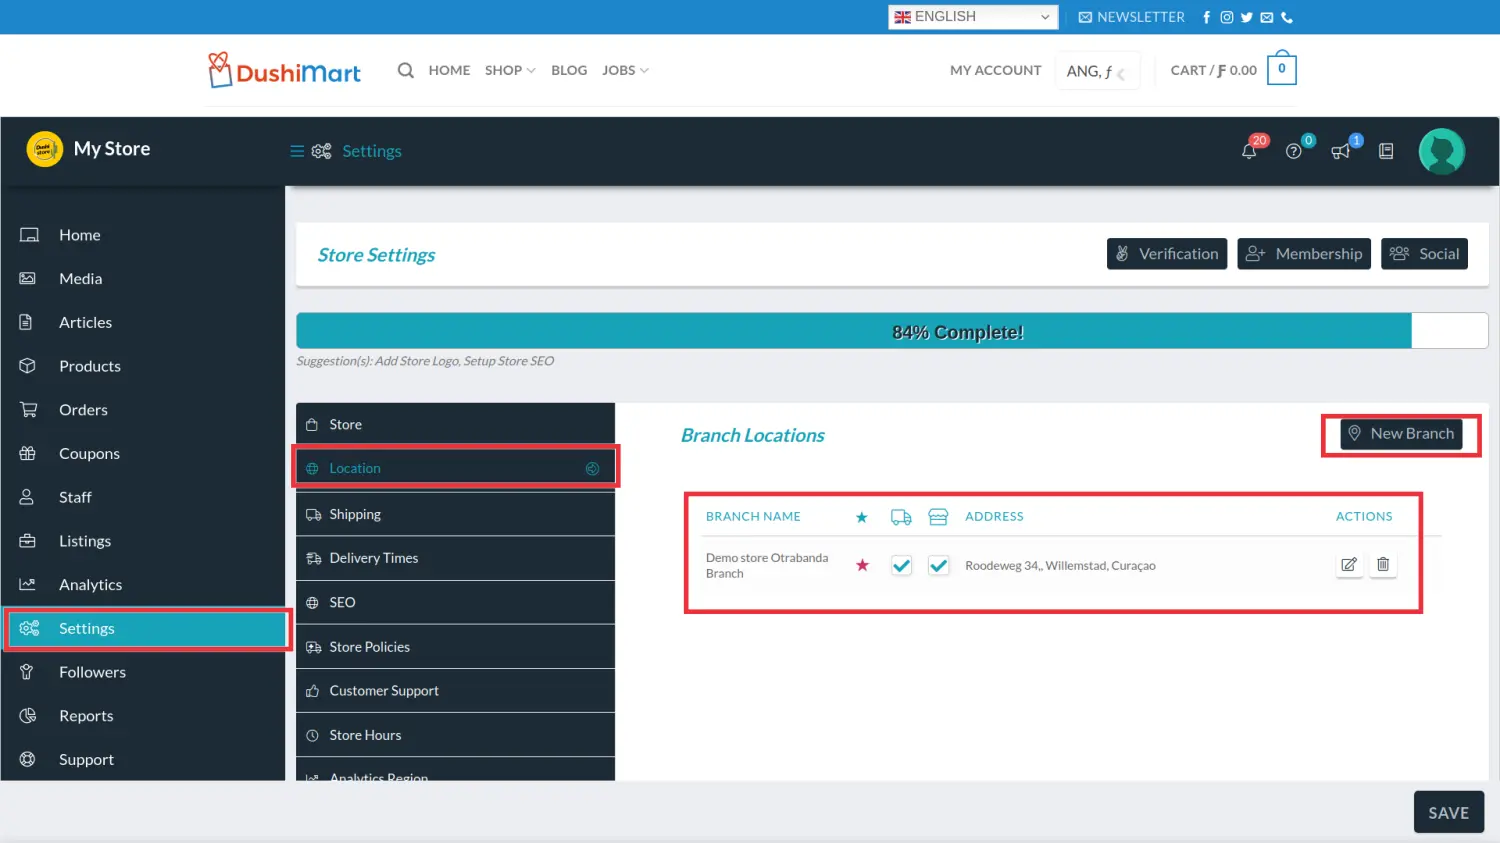
Click on New Branch to define a new store branch.
If the store branch is the main store, click on the star.
If the store branch offers shipping/delivery, click on the delivery checkbox (truck icon).
If the store branch offers store pickup, click on the pickup checkbox (store icon).
To edit the store branch information, click on the edit icon (pen and paper icon).
Click on Update Branch when done.
 sucursal filiaal recoger ophalen
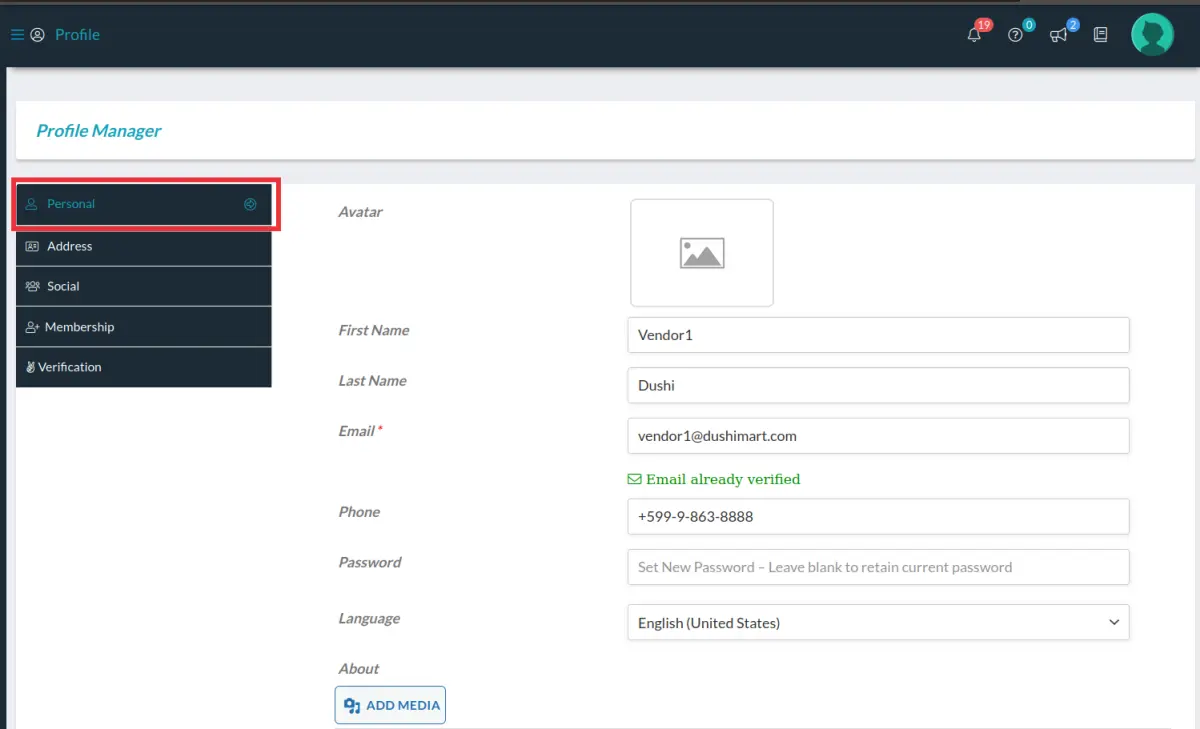
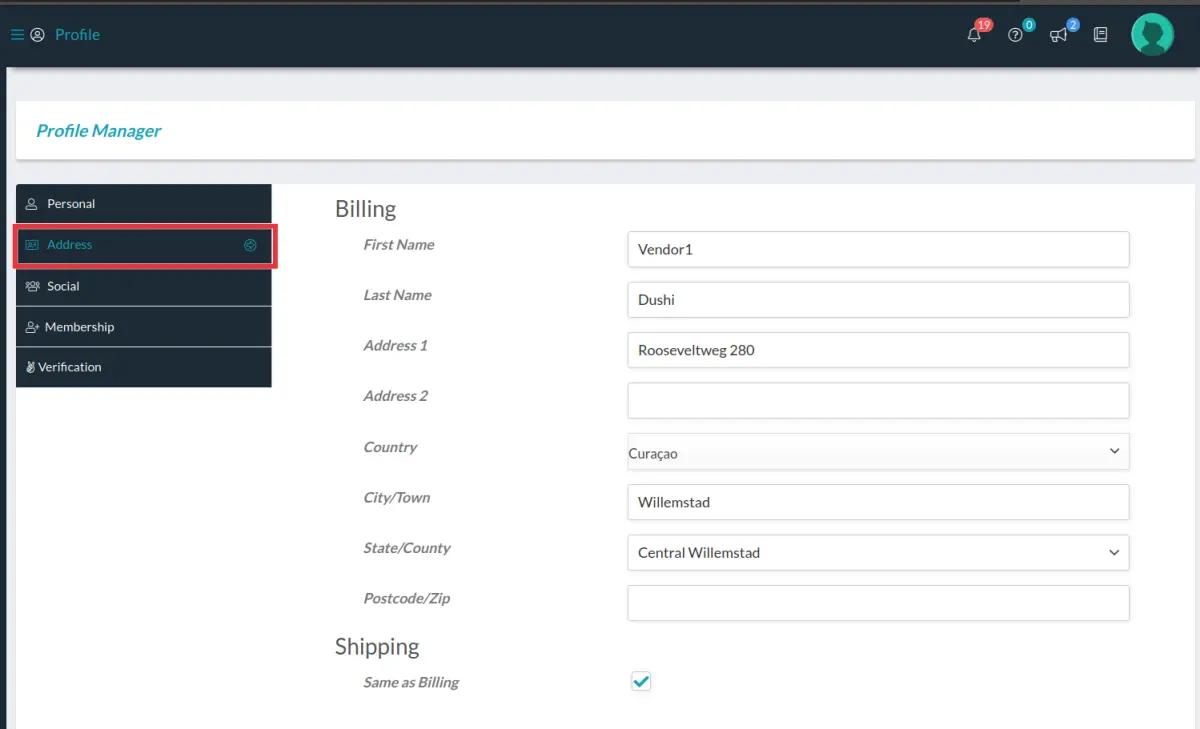
The vendor profile consist of the vendor personal information, their address, social media profiles, their membership and verification status.
To access the profile settings, go the the Store Manager and click on the Profile Icon.
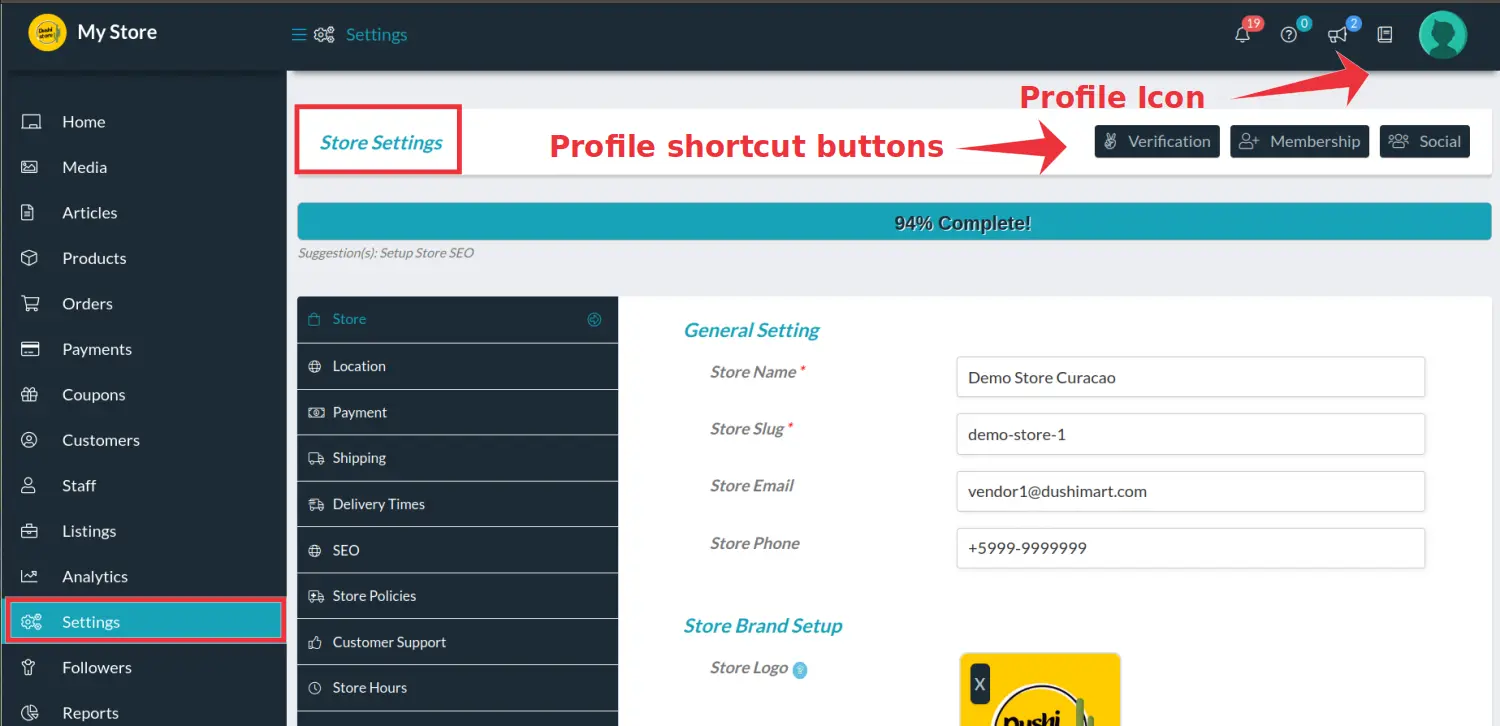
Click Personal to enter all personal information.
Click on Address to enter billing and shipping address.
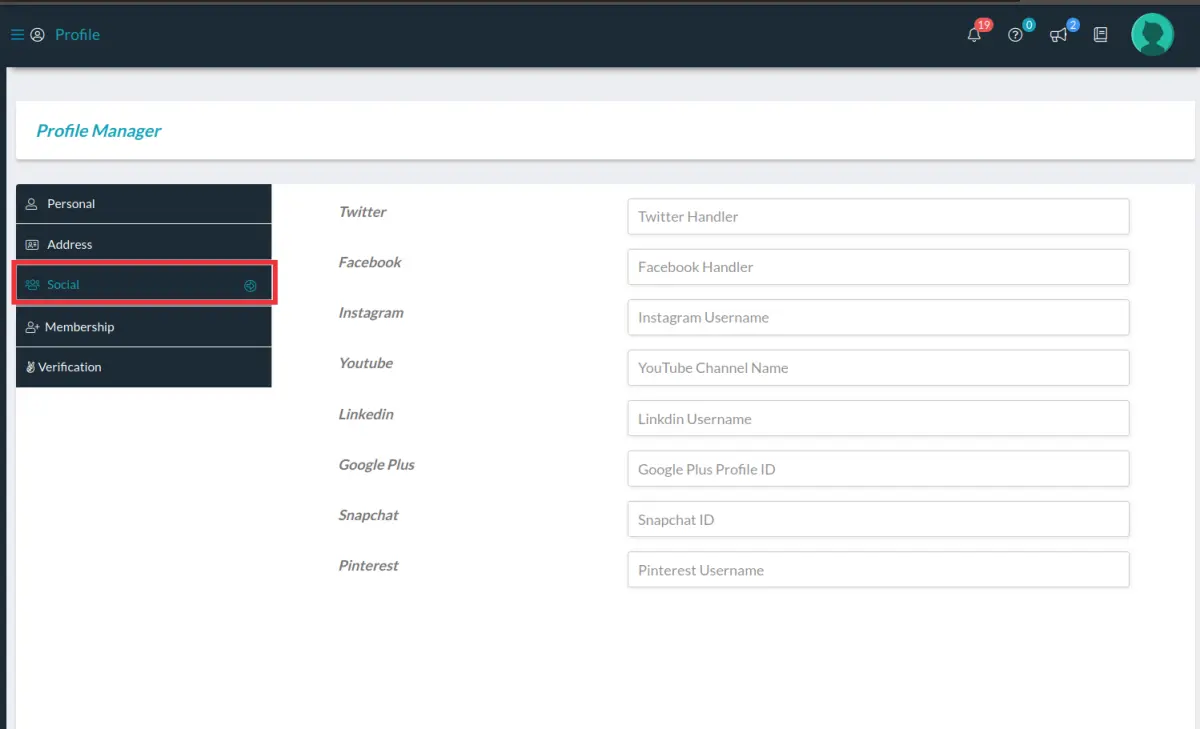
Click on Social to enter social media accounts.
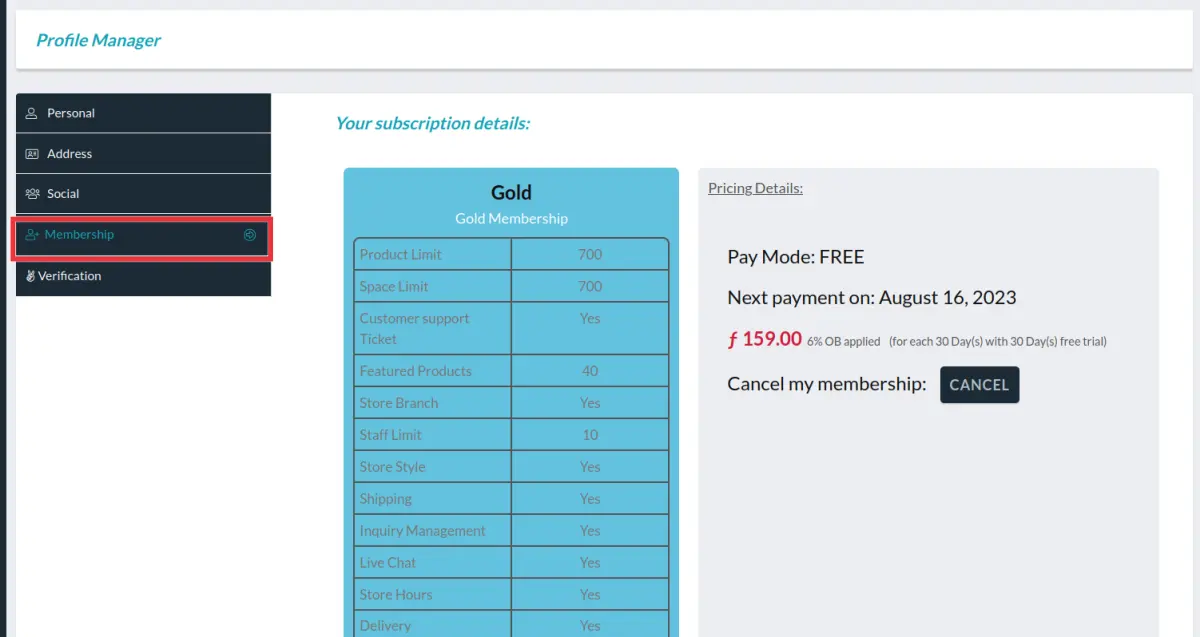
Click on Membership to see the vendor membership status.
DushiMart allows sellers to verify themselves by uploading a copy of an official document (Passport, government issued ID, Chamber of Commerce document or Utility bill).
Although this is not required, it is advisable because it increases buyer trust.
All verified Sellers are identified by a “verified seller” badge that is visible throughout the site. This substantially increases the vendors success because it helps to install trust in the customer.
Click on Verification to request vendor verification status.
Click on the checkbox “Prompt Verify” to activate the verification process.
Choose what official document you want to upload to verify your account and enter the Address Verification information.
Click on Save at the bottom of the screen when done.
Dutch Image Spanish Image 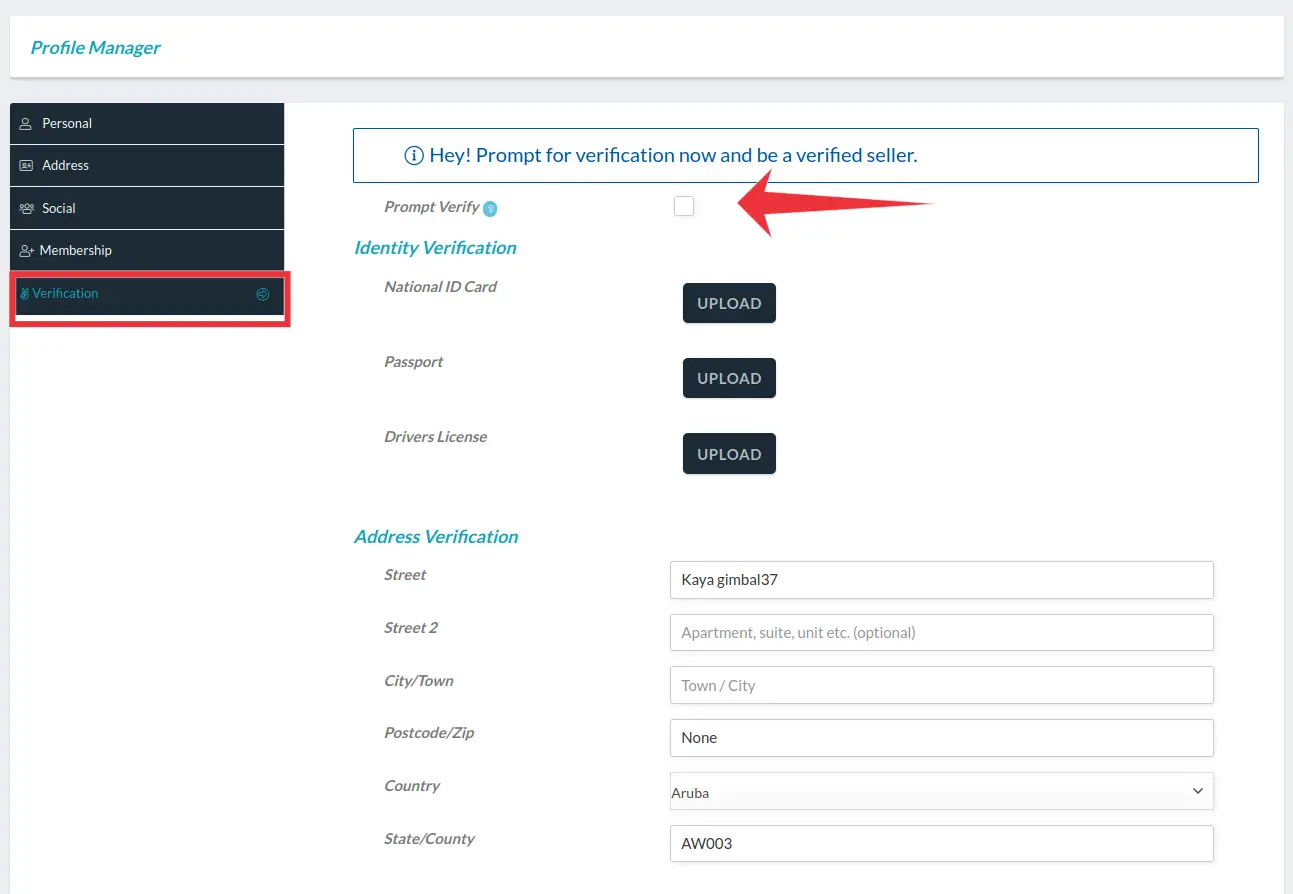 membresia leveranciersprofiel lidmaatschapstatus perfil de proveedoor vendedor verkopersprofiel
First, set up Shipping in the Store Manager. For details click Here.
In the Store Manager, click on Settings and then on Delivery Times.
Click on the checkbox “Enable Delivery Time” to activate the delivery feature for your store. Fill out the settings and click SAVE.
When customers place orders and choose for them to be delivered, they will be presented with a window to choose the desired delivery day and time. leveringen, entregas
Yes you can.
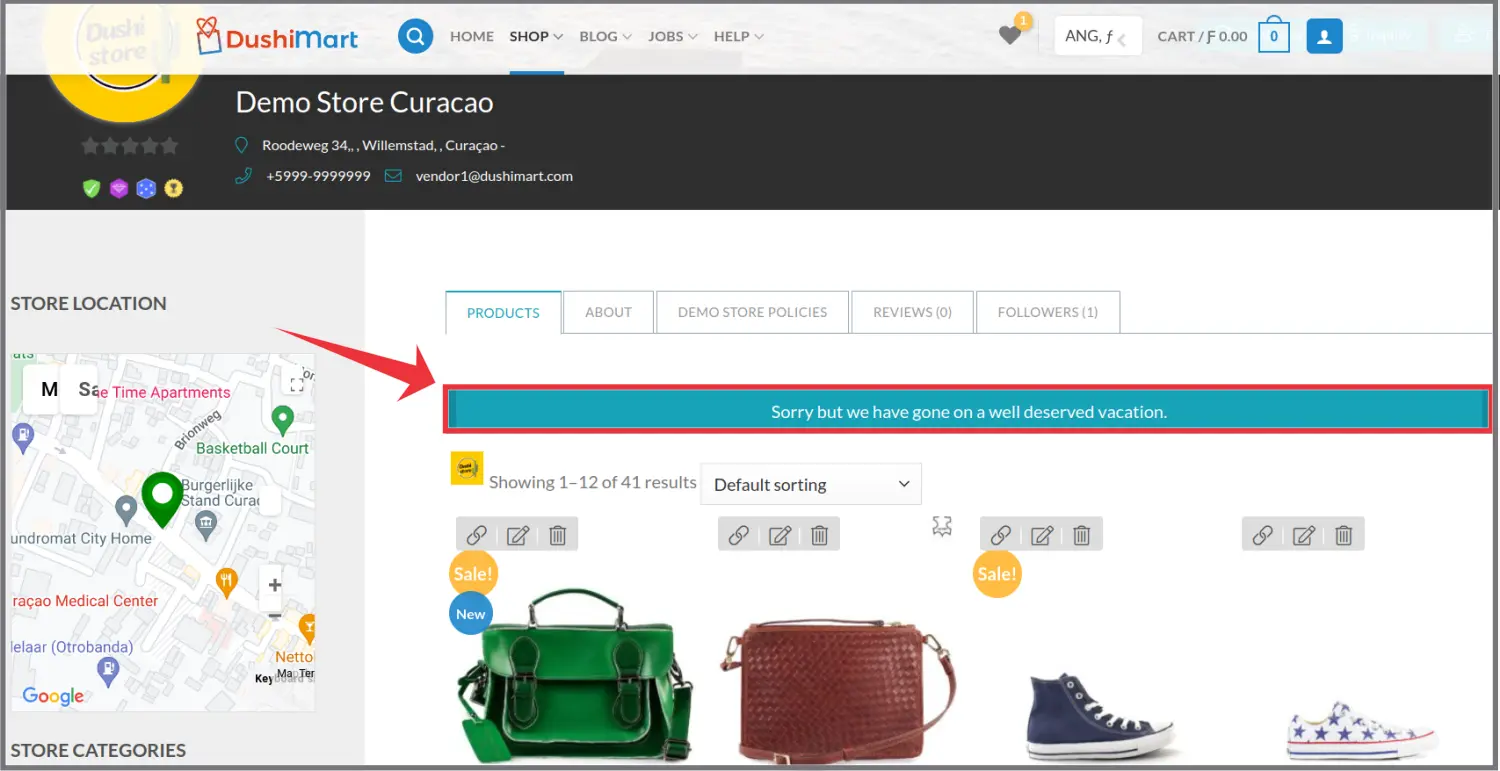
Go to your Store Manager and click Settings and click on the checkbox Enable Vacation Mode.
Click on the checkbox Disable Purchase During Vacation if you want to disallow sales during the vacation mode.
Next choose the Vacation Type. Choices are Instantly Close or Date Wise Close to enter the beginning and ending dates of the store vacation mode.
Next, enter a Vacation Message that will display to visitors of DushiMart whenever they visit your store.
Click SAVE.

The Vacation Message prominently displays on the vendor store page.
 deactiveren, desactivar, vacacion, vakantie, vakantiemodus
All payments occur offline.
Customers make payments directly to vendors via bank transfers, swipe / debit card (store pickup and delivery) or by COD (cash or swipe or both).
For bank transfers, vendors must specify their banking information in their store settings.
Go to the Store Manager. Click on Settings and then Customer Pay Option. Enter the banking information the customer needs to pay you.
The payment details will display on the order complete form.
Customers can view the payment details of their orders from their Customer Dashboard.
betaaloptie pago overschrijving transferencia bancaria
SEO is an acronym for Search Engine Optimization.
It allows search engines like Google to find and categorize a website. You can read more about the technology HERE.
Each vendor can set the SEO for their store so as to increase the search ranking of their store. That way customers are able to find their products easier and faster.
To set the SEO, open the Store Manager, click on Settings and then SEO.

Enter the information for the General, Facebook and Twitter Setup. Click Save when done.
Support Ticket (1)
Support tickets are issued to customers after they raise a question related to a product they have purchased.
This allows for direct communication between the customer and the vendor.
The customer selects the order and clicks on Support to open the support ticket.
The customer chooses the Category for the query.
The customer chooses the Priority level, and the product of the order.
They fill out the Issue your are having and then click on Submit. Customers can view their tickets by clicking on Support Tickets on their dashboard and then on View.
Both the customer and the vendor receive notification of the support ticket via email.
The vendor opens their Shop Manager and clicks on Support to see the ticket.
To reply to the ticket, click on the Return Arrow icon under Actions. This opens the Ticket window where the vendor can provide their response to the ticket.
Upon conclusion of the support ticket, the vendor and the customer can close the ticket.
Customers can also contact vendor support via telephone and email for matters not related to a purchase.
This information is provided to the customer via the information entered in the settings of the vendor store.
Open the Store manager, click on Settings and then Customer Support. Enter all relevant information.
apoyo cliente klantenservice ondersteuningsticket soporte
Vendor FAQ (52)
The answer depends on your intent.
Do you wish to be a shopper, a vendor or both?
The best way to “test the waters” so to speak, is to create an account and make several transactions with one of the Demo Stores to see how the system works. The Curacao Demo Store is HERE, the Aruba Demo Store is HERE and the Bonaire Demo Store is HERE.
Of course since it is a demo store with demo products there are no commitments whatsoever involved. However, it will give you a real feel for DushiMart.
If you are interested in registering as a vendor, the best place to start is to go through the Help/FAQ’s to get an idea how the system works.
After you feel comfortable that DushiMart is for you, decide which of the three options you have for working with DushiMart:
- Pay a monthly membership fee. You set up your store yourself and manage it 100%. All monetary transactions occur directly between you and your customer, which is standard policy of DushiMart.
- Pay the monthly membership fee. DushiMart sets up your store for you for a fee. You provide DushiMart with all digital artwork and data needed to set up your store. You manage your store thereafter.
- No membership fee. You sign a separate agreement with DushiMart to market your product online for you. You pay DushiMart a commission for each sale. Commission depends on the scope of work and conditions agreed upon.
If you decide on option 1 or 2, go ahead and open a vendor account with a membership plan that fits your needs. Each membership plan comes with the first 30 days free of charge so you have the time to set up your store and learn to work with the system. If you wish to have assistance in setting up your store or a contract to help you manage your store, contact us. begin starten comienza empezar
To add a new product, go to the Store Dashboard and click on Products. (1)
At the top of the screen to the right, click on “Add New” (2).
Select the type of product you want to create (3) (4). For a detail description of the different types of products click here.
If Catalog is selected (4), the “Add to Cart” and product price can be hidden as illustrated below.
Enter a Product Title (5).
Enter the product Price (6). Please take note that the law requires that prices be entered including taxes.
If the product is on sale, enter the Sale Price (7).
If the sale price is triggered by a date, click on Schedule (8) and enter the beginning and ending date of the sale.
Click on the Product Featured Image holder (9) and select or upload the image that will represent the main image for the product. To attach additional product images, click on the image place holder below the Featured Image place holder (10).
To add more images, click on the + icon.
Next enter a product short description (11).
Then enter a product long description (12).
Select the product categories for the new product (13). If the category you are looking for does not exist, please contact us so we can add it in the list of available categories.
Next select the product tags (14) or create new ones.
If the box “Catalog” is selected (4), select from the drop-down box how the product is treated using the search bar. (15). Options are in all search results (includes articles), in the shop search only, in both shop and other search results or if the product should remain hidden from search results. (See illustration below).
Additional steps to complete the creation of a product include defining the following details on the Product Data panel: (Click on the links to learn more on the subjects)
- Product Inventory specifics
- Product Shipping specifics
- Product Tax class
- Product Attributes (such as color, size and material)
- Product Variations (combinations of product attributes)
- Linked characteristics (like Up-Sells and Cross-sells)
- Product policies (to overwrite store policies is applicable)
- Other advanced product characteristics
Agregar producto, crear producto, foto principal, nieuw product, nuevo producto, precio descontado
The following products types can be added to DushiMart.
- Simple Products
- Variable Products (Products with multiple attributes, such as size, color, material etc.)
- Grouped Products (a product consist of multiple products)
- Virtual products ( are not physical entities. Services provided are virtual)
- Downloadable Products (Product is digital and can be downloaded)
Simple Product
Simple product is one of the easiest product types to create. You can add price, SKU and stock details, and publish a simple product. To add a new simple product, go to Products> Add New and select Simple Product from the drop-down.
Dutch Image Spanish Image
Variable Product
This product type lets you add variations to the same product to create a complex, variable product. Each variation of the product has its own price, SKU, available stock, etc. eg: A shirt or t-shirt with different sizes and different colors.
To add a variable product, go to Products> Add New and select Variable Product from the drop-down. Variations will appear in the product data panel.
If Attributes are not defined for the product, you will see the message “Before you can add a variation you need to add some variation attributes on the Attributes tab“.
Click HERE to learn how to define product Attributes.
Grouped Product
You can create groups of products and sell them as one product.
Product types that are allowed to be included in the grouped product are Single, Variable, Virtual and Downloadable products.
For a grouped product, you can add a new price, or keep the sum of the total price of the individual products in the group.
To add a new grouped product, go to Products> Add New and select Grouped Product from the drop-down.
Select the products that will form the product group by typing the product description and selecting it.
Virtual Product
Defining and configuring a virtual product is a simple and straightforward process. You don’t have to bother about details such as product dimensions and weight, which are generally part of any other product settings. eg: You list a service as a product in your store.
To make a product virtual, you can select the checkbox for it, while creating the product.
Downloadable Product
Similar to virtual products, downloadable products also don’t require shipping. They are available as a downloadable file with a specified path or URL. In most cases, there will be a limit on the number of downloads of such products.
Ironically, DushiMart allows setting shipping options for downloadable products. This is in fact to include the scenario where you want to send a packaged version (like a CD) of the product to the customer.
If your product is only downloadable and has no physical version, you can mark it as a virtual product.
tipo de producto, virtueel, downloadbaar, descargable, agrupados, agrupadas, eenvoudig, sencillo, sencilla
Before you can add a variation, you need to add attributes using the Attributes tab.
After selecting the product attributes, click on Variations.
Select from any number of variations applicable for the product.
Sometimes and order must be edited. This is possible as long as the order hasn’t been paid by the customer. When an order is paid, the status must be updated to “Processing“.
Once the order has been paid, it cannot be edited unless the status is changed to “Pending Payment” or “On Hold“
When a customer places a Cash On Delivery (COD) order, the status is updated to “Pending Payment“.
If the customer chooses Bank Transfer as the payment method, the initial order status is “On Hold“.
To edit an order, the status must first be changed to “Pending Payment” or “On Hold“.
At the bottom of the screen to the right, click on “Edit Order“. The order can now be changed.
You may additionally apply a discount to the order by clicking “Apply Discount“.
Also you can inform the customer of the changes made to the order by using the “Note to Customer” field.
aplicar descuento, bestelling bewerken, beteling, editar orden, korting toepassen, pago pendiente, nota al cliente, aantekening
The product inventory tab is where the product quantity is managed.
To get there go to the store manager, click on the Products, select the product, click Edit.
Go to the middle of the page and click on Inventory.
Enter the SKU (1) if you have one. (SKU stands for Stock Keeping Unit. Usually it is the barcode of the product).
If the product quantity is not to be managed, do not select the “Manage Stock” box (2). Instead, select the Stock status (3).
Options are “In stock“, “Out of stock” or “On backorder“
If the product quantity must be managed, select the “Manage Stock” box (2). This will change the view as follows:
Enter the product quantity. Select if Back-orders are allowed for the product. Finally, if no other product is allowed to be sold along this product, select the box “Sold Individually”. voorraad beheer, cantidad de producto, manehar inventario, nabestelling, pedido pendiente, product kwantiteit
Shipping settings can be defined for each separate product.
Click on the edit product button to open the product edit window and click on the Shipping Tag.
Dutch Image Spanish Image (1) If the weight of the product plays a role in the shipping of the product, enter the weight in kilograms.
(2) If the product shipping dimensions are important, enter them in centimeters.
(3) Products can be assigned a shipping class and vendors can assign shipping policies per product shipping class. If this is important to you, enter the shipping class of the product.
(4) Product Shipping Processing Time can be defined although. Click on the drop-down box and select the processing time for the product. (see image below).
clase de envio, tiempo de procesamiento, verwerkingstijd, verzending, verzendklasse
Applicable sales tax per product must be defined under product settings.
Select the product you want to define the product tax for and click edit.
Click on the Tax tab.
Click on Tax Status (1) and make a selection between Taxable, Shipping Only or None.
Click on Tax Class (2) and make a selection from the drop-down selection box.
Dutch Image Spanish Image ABB, OB, omzetbelasting, sales tax, verkoopbelasting, impuesto de venta, btw
Product attributes are characteristics of a product that can be assigned to the product such as color, size and material. Examples are clothing and footwear.
To activate attributes for a product, click on the checkbox of the attribute and click on “Active?” (1)
Search for the attribute and select them. (2)
If all attributes apply to the product, click on “Select All”. (3)
If the attributes you need do not exist, click on “Add New” to add them. (3)
To make the product attribute visible on the product page, click on the checkbox. (4)
To add a new type of attribute, click on “ADD” (6). This method is applicable to each product attribute.
Dutch Image Spanish Image atributos, attributen
Linked Products are products that can be related to each other in three ways:
Up-Sells, Cross-Sells or by having the same tags or categories.
Up-sells are products that are recommended instead of the currently viewed product. These alternative items are usually suggestions to ‘upgrade’ current choice either in quality or price. This is a great way to get your customers to think about a similar product, same brand, that has more features, added options, and of course, is more expensive.Thereby those suggestions are intended to persuade the customer to choose the better option.
Cross-sells are complementary items that a shopper may want to buy additionally to the product s/he is currently interested in. For example, if you are selling a phone, cross-sells might be the following: a case, charger, adapter or any other accessory.
To add an Up-sell (1) or Cross-sell (2) to a product:
- Go to the Store Dashboard > Products and select the product on which you’d like to show an up-sell or cross-sell.
- Scroll down to the Product Data panel.
- Select the Linked Products tab in the left menu.
- Add the product you wish to link to by searching for it.
- Update.
Dutch Image Spanish Image productos vinculados
Product policies are policies that apply to individual products. They override the store policies.
As with Store Policies, there are three types of product policies: Shipping Policy, Refund Policy and Cancellation/Return/Exchange Policy.
To overwrite the store policy and define a product policy:
- Go to the Store Dashboard > Products and select the product you want to define the product policy for.
- Scroll down to the Product Data panel.
- Select the Product Policies tab in the left menu.
- Click the checkbox Override Policy Fields?
- Enter the Policy Tab Label.
- Define the product policies for the product. (The store policies will be displayed. Just make the necessary changes for the product your are defining)
- Click on View, Draft or Submit.
Dutch Image Spanish Image politica de cambio, politica de envios, politica de producto, productbeleid, verzendbeleid, wisselbeleid
Under Advanced Product Setting, certain characteristics can be defined for an individual product.
Characteristics include:
- The products can be reviewed by shoppers (1),
- The menu order (display sequence) of the product in the Vendor Shop can be changed (2) and,
- a special note can be added for the customer when he/she purchases the product (3).
Dutch Image Spanish Image aankoopnota, ajustes avanzados, geavanceerde instellingen, nota de compra, sequencia de visualizacion, volgorde menu
Product Actions are a group of actions made on individual products.
They are represented by icons to the right of the products display window.
Actions are:
- Quick Edit. Also called a Quick Update. Product name, SKU and Product Visibility can be edited.
- Mark Featured.
- Edit. (to edit the product)
- Delete. (Permanent erasure, product cannot be recovered. Increases the number of products available under the membership plan.)
- View. (to display the product as seen in the store)
- Duplicate (Used when similar products need to be defined).
- Archive (Used to un-publish a product. This hides the product from public view. To make the product visible to the public again, just publish it.)
Note: Archiving a product does not increase the number of products available under the membership plan. acties, acciones, copiar producto, editar producto, product kopiëren, archivar, archiveren
Yes you can. This feature is called Bulk Edit.
Dutch Image Spanish Image Got to the Store Manager and click on Products. Select the products you want to edit by clicking on the check boxes. Click on the Bulk Edit label. This will open the Product data window.
Make the changes and click UPDATE when done.
bulkbewerking, edición masiva, meerdere producten, múltiples productos
Yes there is.
Products can be displayed in Catalog Mode. That provides the option to hide the product price and disable the Add to Cart button.
To hide the product price, first select the product and click edit. Click the checkbox next to Catalog.
To hide the prices got to the Product Data Panel at the bottom of the page and click on Catalog Mode. Catalog mode is only visible after selecting the Catalog checkbox.
Click the checkbox next to Hide Price and save the settings.
You can also disable the “Add to Cart” button by clicking on the checkbox next to “Disable Add to Cart”.
prijs verbergen, producten verbergen, ocultar productos, ocultar precio, modo catálogo, catalogusmodus
The number of products you can sell in your store depends on your membership plan.
It also is loosely dependent on the amount of space allocated in the membership plan. Typically, a maximum of 1MB of space is allocated per product, however that depends greatly on the number of images associated with each product and the optimization of the images.
For more on Image optimization click HERE. espacio, ruimte, storage, imágenes, optimaliseren, mejoramiento, almacenaje
You can add product images while creating a new product or while editing one.
Click on any of the Image holders. (9) (10). This will engage the Media Manager.
Click on Upload Files (1)
Click on Select Files (2) to select the files to upload to your DushiMart file folder.
foto’s uploaden, subir fotos, subir imágenes, upload afbeeldingen
Yes you can. However please take note that it is best to make all necessary modification prior to uploading media files.
Once uploaded, images can be cropped, rotated flipped vertically and horizontally. However, most important is that the images can be scaled to another size.
Click on Products on the Store Manager menu.
Click on edit (3) to open the product in edit mode.
Next click on the Featured Product image holder. (1) This will open the Media Manager. Note: Alternatively, the secondary image place holder (2) can also be clicked, or click on the + (3) to add more images)
Next click on Media Library. (1)
Select the image you want to modify. (2)
Click on Edit Image (3).
Choose from different image editing tools on the top bar (1)
To scale the image, enter the new dimensions and click SCALE. (2)
foto’s optimaliseren, optimaliseren, optimizar fotos, imagines
The Ideal size for images depend on the type of image:
- Product Image typically should be a minimum of 1000 X 1000 px
- Store banners width 1300 px X height 500 px. For mobile devices 650 px X 250 px
- Store Logos should be 250 X 250 px.
- Blog posts images 1000 X 650 px.
Featured Products are products that marked for special promotion. This is done by increasing their visibility, increasing the chances of a sale.
Featured products are displayed on a separate page in random order, with a sliding banner on the top of the page for paid product promotion.
All vendors can mark a specific number of their products as featured. The amount depends on the membership plan they subscribed to. The higher the amount of products in the plan, the higher the number of products that can be marked as featured. Check out the Membership plans for details.
To mark a product as featured, do the following;
Go to the Store Dashboard>Products and select the product you want to mark as featured.
Next click on the five pointed star icon to mark the product as featured. This will turn the star icon into a six pointed star. ![]()
Customers who follow your store will receive an email that you featured a product.
To remove the featured status of a product, click on the six pointed star.
aanbevolen product, producto destacado, uitgelichte product
There are three ways to edit a product; Quick Edit, Normal Edit, Bulk Edit.
- Quick Edit allow you to edit the short product description, SKU, regular price, sale price and catalog visibility.
- To open the quick edit window of a product, click on the Quick Edit icon (1) on the Product Action area of the product. Make the changes and click on the UPDATE button when done.
- To open the quick edit window of a product, click on the Quick Edit icon (1) on the Product Action area of the product. Make the changes and click on the UPDATE button when done.
- To edit the product using Normal Edit, click on the Product Edit icon (3) . This allow access to edit all aspects of the product.
- To edit products using Bulk Edit, click Here.
Products can also be edited on the Single Product Page by clicking the Quick Edit or the Product Edit icon.
editar producto, product bewerken
Vendors can make their own coupons that customers can use to purchase their products at a discount.
These coupons will be visible to shoppers on the vendor store if the vendor chooses this option (7).
To make a coupon, click on Coupons and click on Add New
Enter all details of the coupon.
(1) Enter the coupon code. This code will be the code the shoppers see and use to redeem the coupon when checking out.
(2) Enter the Code description.
(3) Select the Discount Type for the coupon. Options are a percentage discount or a fixed amount discount.
(4) Enter the Coupon amount.
(5) Enter the expiry date. After this date the coupon will expire.
(6) If free shipping is allowed with this coupon click on the checkbox.
(7) To display the coupon on the store page, click on the checkbox.
Next, the coupon restrictions must be defined. Click on Restriction.
(8) If the coupon is valid only if a certain amount is spent, enter the amount here. Else leave it empty.
(9) If the coupon is not valid above a certain amount, enter the amount here. Else leave it empty.
(10) If the coupon cannot be used together with other coupons, click the checkbox.
(11) if the coupon cannot be used for products on sale, click the checkbox.
(12) If the coupon is valid for specific products, select them here.
(13) If the coupon cannot be used for certain products, select them here.
(14) If the coupon is valid only for certain categories of products, select the categories here.
(15) If the coupon is invalid for certain categories of products, select them here.
(16) If the coupon cannot be used by certain shoppers, enter their emails here.
Next, the Coupon Limits must be defined. Click on Limit.
(1) If the coupon can be used a maximum number of times then enter the maximum number here. Once this number is reached, the coupon will not be applicable anymore. For example if the number is 100 then the first 100 customers will be able to use the coupon.
(2) If the coupon is valid for only a maximum number of products in the cart, enter it here. For example if the number is 10 and the cart has 12 items, the coupon will be valid for the first 10 items only.
(3) Enter the number of times a customer can use the coupon. When done, click on SUMBIT to save it and make it live so that it is visible to the public. To prevent the coupon from going live (being made public), click on DRAFT. cupón, coupones, kortingsbonnen
DushiMart allows you as a vendor to add employees and associates as staff members. Examples are administrative personnel, inventory management personnel etc.
The vendor assigns each staff member access to every area of the online store depending on their functions and responsibilities. The number of staff members per store depends on the membership plan the vendor subscribed to. For information on the number of staff members allowed per membership plan, check out the membership plan schedule here.
To define a new staff member go to the Store Manager.
Click on Staff (1). This will open a window of all staff members currently defined.
Depending on the membership plan you are subscribed to you will see at the top of the screen the number of remaining staff members you can define. (2) Click on Add New (3). This will open the window to define the new staff member.
Dutch Image Spanish Image Fill out the information for the new staff member and click on Custom Capability to define what the staff member has access to. For more information on staff member capabilities, click HERE. acceso, capacidades, mogelijkheden, personal, personeel, toegang
Live Chat is used to allow direct communication between visitors of DushiMart in real time.
The Live Chat feature can be activated and deactivated per staff member by the store vendor. This is done by using the Manage Staff feature in the Store Manager.
The Live chat can also be used Offline. When Live Chat is in Offline mode, visitors and members of DushiMart can leave a message for the vendor. These messages can be read by clicking on “Offline Messages“. (Read more about this feature at the bottom is this page).
When the Live Chat feature is activated, “Chat Now” will appear on the Store Manager Menu. Click it. This will open a new window in the Browser for the chat module. To remain in Live Chat mode, do not close this window. Closing the window will put it in Offline mode.
Next, click the button “Connect” if you see the message “Your are offline” under the connect box. This will activate the live chat.
Members of DushiMart can activate the Live Chat by clicking on the “Chat Now” button on the Vendor Store Banner or the Single Product Page.
The “Chat Now” window will open. The member’s name and email will display. They must click on “Start Chat” to begin the live chat with the store vendor staff member(s).
The vendor “Chat Box” window will display the information related to the visitor. It consist of the following areas: the name of the visitor(s) (1), the contents of the chat (2), their connection data (3), the Chat History (4) and the Offline Messages (5).
To save chat, click on the “Save Chat” button. To end the chat, click on “End Chat“.
At the end of each chat session, visitors have the option to rate the chat and to choose the option to receive a copy of the chat via e-mail.
If the chat is offline, visitors can still communicate with the vendor via offline messages.
Vendors are able to read offline messages by clicking on the “Offline Messages” button. (5) (see above)
To display saved chats, click on “Chat History”. (4)
charlar, chat en vivo, chatten, desconectada, desconectado
Vendors can choose to either allow for store pickups only or also allow for shipping and deliveries.
To allow shipping and deliveries, the shipping options must be set up first. Go to the Store Manager and click on Shipping.
Click on the checkbox “Enable Shipping“
Enter the Processing Time (1) required to prepare the shipping.
Enter the Shipping Type (2) provided by your store. Options are Shipping by Zone (best if you only sell to customers on the Island you are located) or, Shipping by Country if you sell to the other islands.
The examples above are for Shipping by Zone.
(Note: In DushiMart, the neighborhoods are defined as zones. This is because vendors many times charge different amounts for delivery based on the distance from their location. If Shipping by zone is chosen, vendors have the option to define shipping costs for each zone.)
If the shipping type selected is “Shipping by Country” (3), the following data must be defined;
- The default Shipping Price (4),
- Per Product Additional Price (5),
- Per Quantity Additional Price (6),
- Free Shipping Minimum Order Amount (7),
- Enable Local Pickup (8)
- Local Pickup Cost (9), and
- Where the product is shipped from (10).
Thereafter, the Shipping Rates by Country (1) and States/Zones (2) must be defined.
Select the Country.
Select the State/Zone.
If you ship to countries outside the ABC defined islands, select “Everywhere Else” and enter the amount of the shipping cost.
Remember to set up your Shipping Policy in your store settings.
Click HERE for instructions on how to do that. envio, verzenden, verzendzone, zona de envio
Yes you can.
Go to the Store Manager and click on Orders. Click on Add New.
Enter the customer or if the customer is new, click on “Add new customer“. Next enter the products and their quantities. To add more products, click on the + icon.
Next select the payment method for the offline order.
Next select the shipping method.
Enter the billing and shipping address if that was not entered when the customer was created or selected.
If applicable, enter a discount for the order.
Enter any comments for the order and click Submit to complete the order.
offline bestelling orden manual
If you are a registered vendor, you will have access to the Store Manager.
Log into your account. Next click on the “Store Manager” button or on “Store Manager” on the menu to the left of the screen.
Dutch Image Spanish Image gerente de tienda winkel manager
Staff members are assigned capabilities depending on their function and tasks.
Vendors must first define their staff members using the Store Manager. For instructions on how to do this, click here.
To assign capabilities to staff members, select the staff member and click on the Manage Staff Icon.
Next click on the checkbox Custom Capability.
This will open a window with all capabilities as depicted in the video clip hereunder. Each capability can be triggered on or off.
capacidades, manejar personal, mogelijkheden, personeel beheer
DushiMart allows you to define any number of store branches. Only one membership plan is required.
Go to the Store Manager, click on Settings and Location.
Click on New Branch to define a new store branch.
If the store branch is the main store, click on the star.
If the store branch offers shipping/delivery, click on the delivery checkbox (truck icon).
If the store branch offers store pickup, click on the pickup checkbox (store icon).
To edit the store branch information, click on the edit icon (pen and paper icon).
Click on Update Branch when done.
sucursal filiaal recoger ophalen
The vendor profile consist of the vendor personal information, their address, social media profiles, their membership and verification status.
To access the profile settings, go the the Store Manager and click on the Profile Icon.
Click Personal to enter all personal information.
Click on Address to enter billing and shipping address.
Click on Social to enter social media accounts.
Click on Membership to see the vendor membership status.
DushiMart allows sellers to verify themselves by uploading a copy of an official document (Passport, government issued ID, Chamber of Commerce document or Utility bill).
Although this is not required, it is advisable because it increases buyer trust.
All verified Sellers are identified by a “verified seller” badge that is visible throughout the site. This substantially increases the vendors success because it helps to install trust in the customer.
Click on Verification to request vendor verification status.
Click on the checkbox “Prompt Verify” to activate the verification process.
Choose what official document you want to upload to verify your account and enter the Address Verification information.
Click on Save at the bottom of the screen when done.
Dutch Image Spanish Image membresia leveranciersprofiel lidmaatschapstatus perfil de proveedoor vendedor verkopersprofiel
Use the Archive function under Product Actions.
To un-archive a product, click on “Archived Products” to display a list of archived products.
Next click on Edit to open the product in edit mode.
Next, go to the bottom of the screen and click on Submit to publish the product.
ocultar producto product verbergen
There are three main areas. The Menu (1), the Heading (2) and the Content Area. (3)
Dutch Image Spanish Image Depending on the Menu choice (1), the Content Area (3) will change.
The Heading has several icons of importance.
- Notification Board provides an overview of all notification important to the vendor
- Inquiry Board shows a list of customer inquiries. Vendors can use it to respond to questions posed by customers.
- Announcements to vendors made by DushiMart. Vendors will have the option to respond to the announcements or not, depending on the type of message.
- Knowledgebase is a repository of Instructions, “How To’s” and FAQ’s related to vendor issues. Many of these articles can also be accessed via FAQ on the main menu.
- Profile Manager. Define things like addresses, password, social media accounts etc.
The Notification Board looks like this:
Types of Notifications include:
- Direct messages from users of DushiMart
- Store Announcements from DushiMart
- Product Reviews of customers
- Low Stock Product
- Changes is Status
- New Product
- New Category
- New Order
- New Inquiry
- New Support request
- New Staff
- New Customer
- New Follower
- New Seller
- New Membership
- Approved Membership
- Reminders Membership issues
- Shipment Tracking
- Shipment Received by Customer
- Seller Verification
- Store Review
- New Delivery Person
- Delivery Person Assigned to order
- Delivery Completed.
gerente tienda, winkel manager
Customer have several options to ask vendors questions.
The first is via the Single Product page by clicking on the “Ask a Question” button.
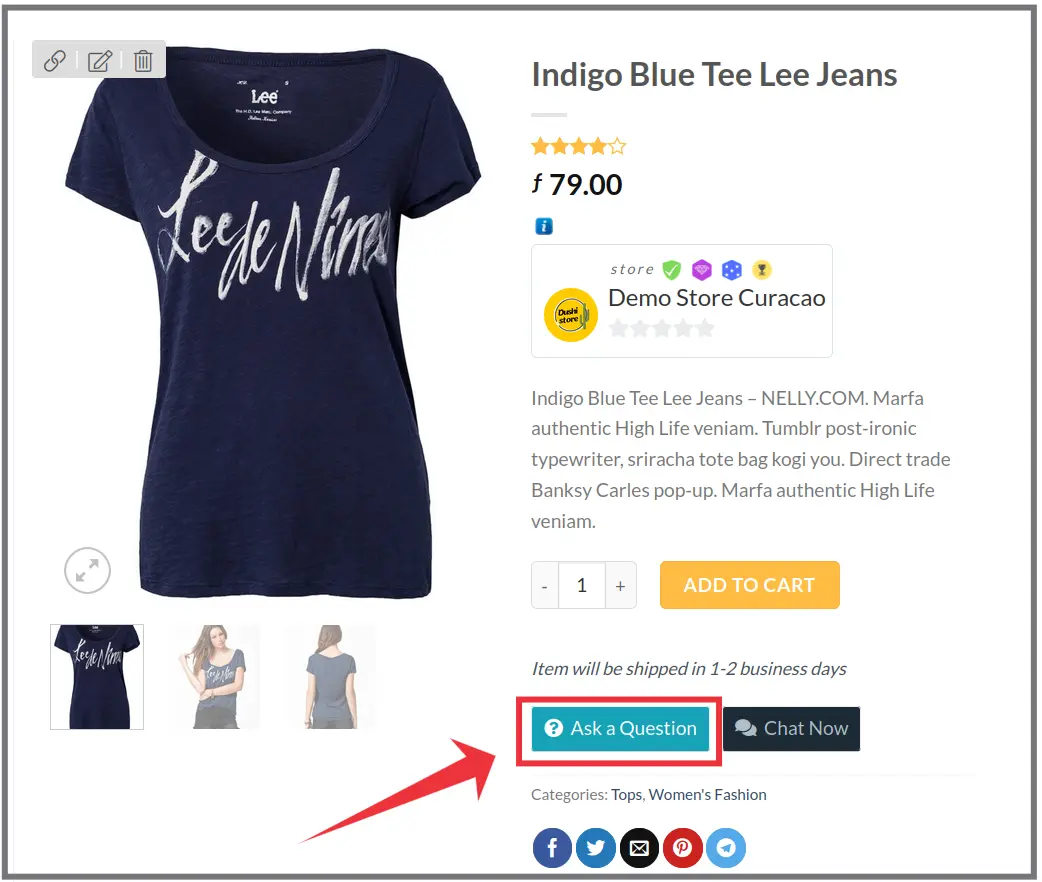
Another way for customers to pose questions to vendors is by clicking on the “Inquiry” button on the store banner of the vendor.
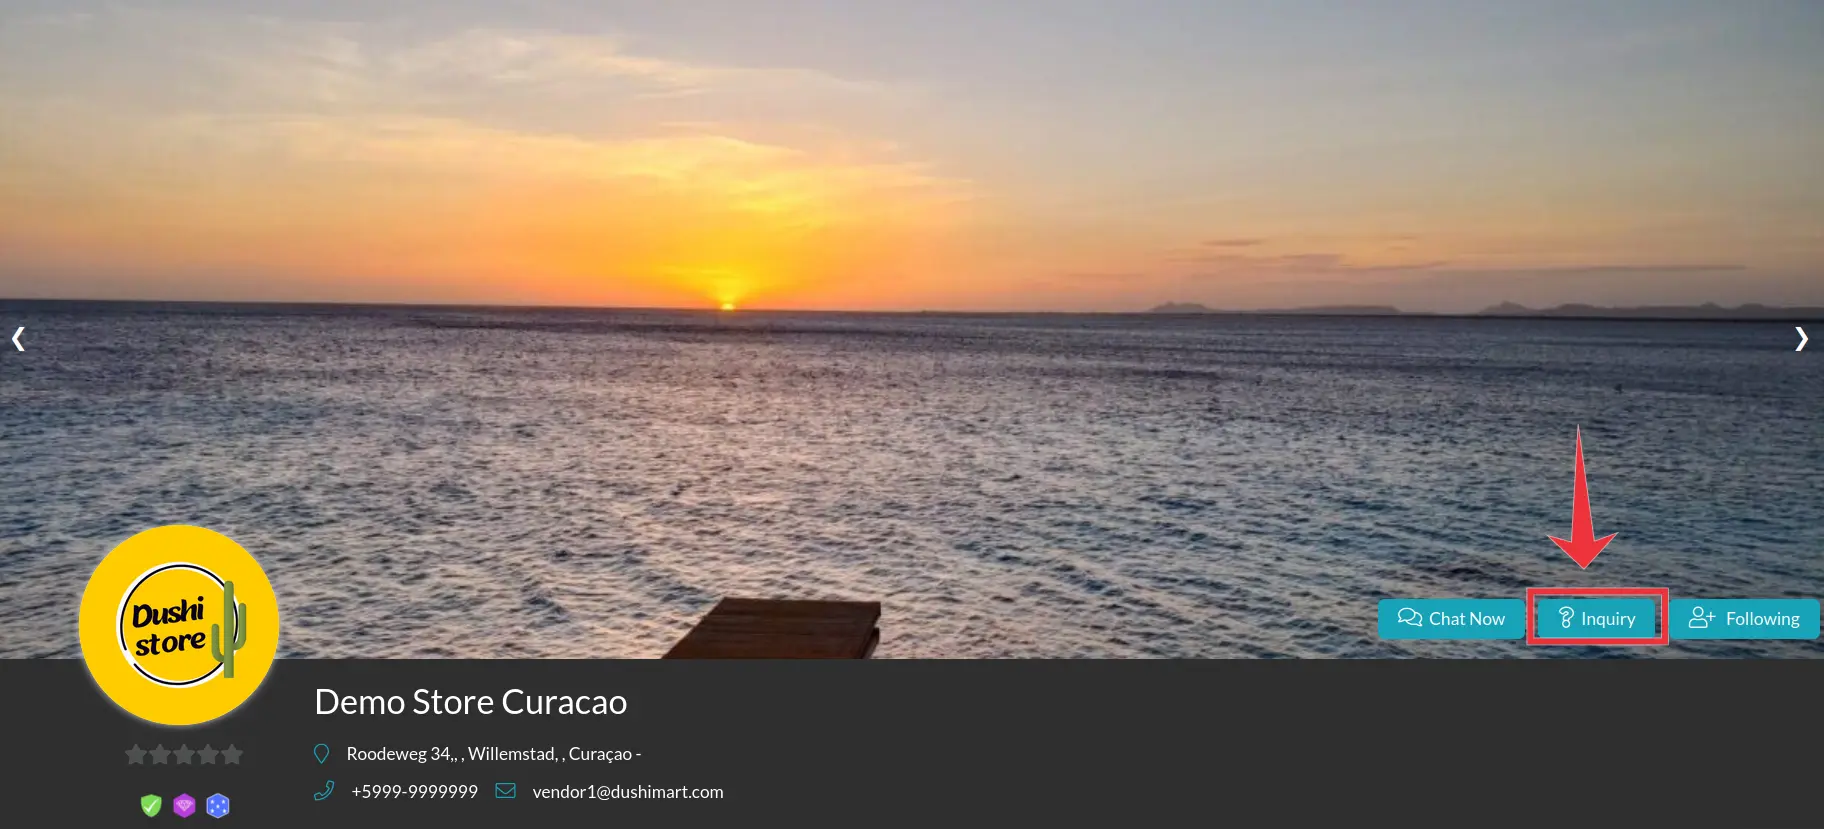
When customers send Inquiries, vendors will receive an e-mail. To answer the inquiry, click the link in the email to log into DushiMart if not logged in already.
In the Store Manager, click on the inquiry icon. It is the Question Mark on top right of the screen. To reply to the inquiry, click on the Return Arrow under Actions.
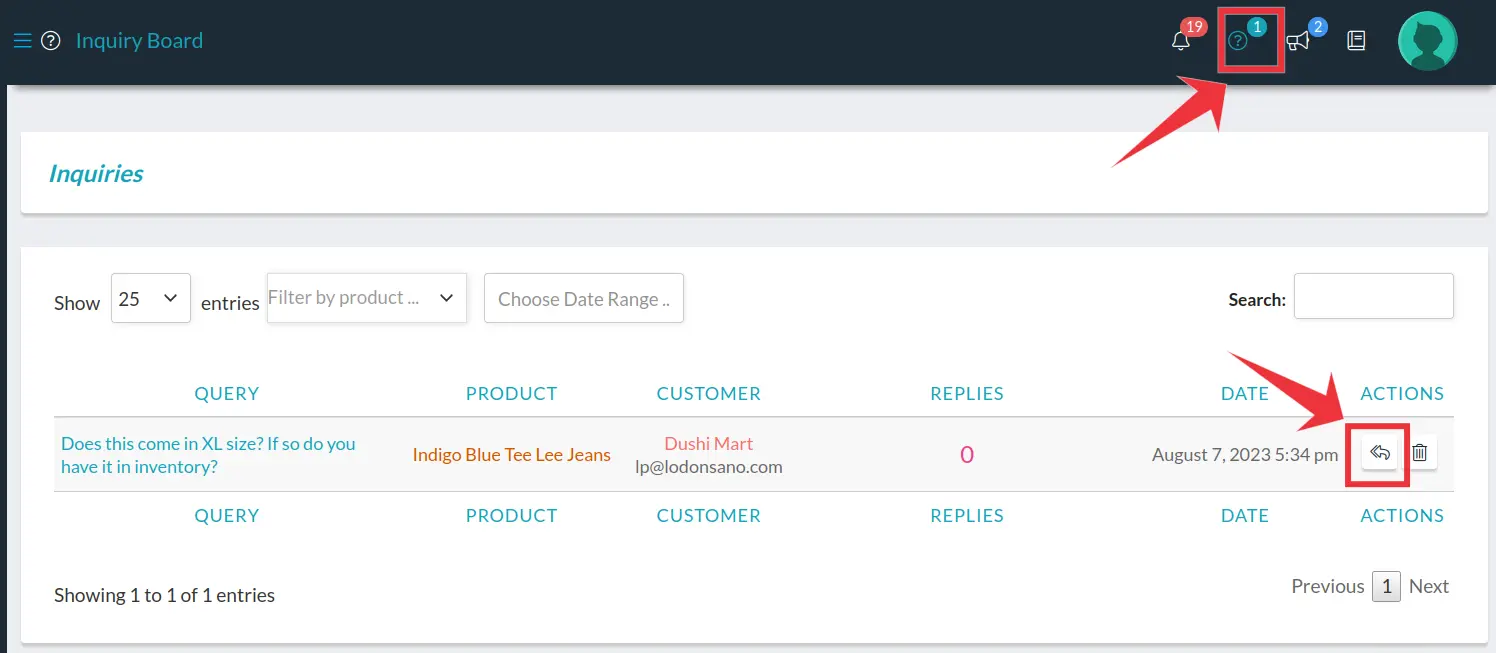
Enter the reply to the inquiry. If you want the reply to be part of the Inquiry Tab under the single product page, click the checkbox marked “Stick at Product Page” and click SEND.
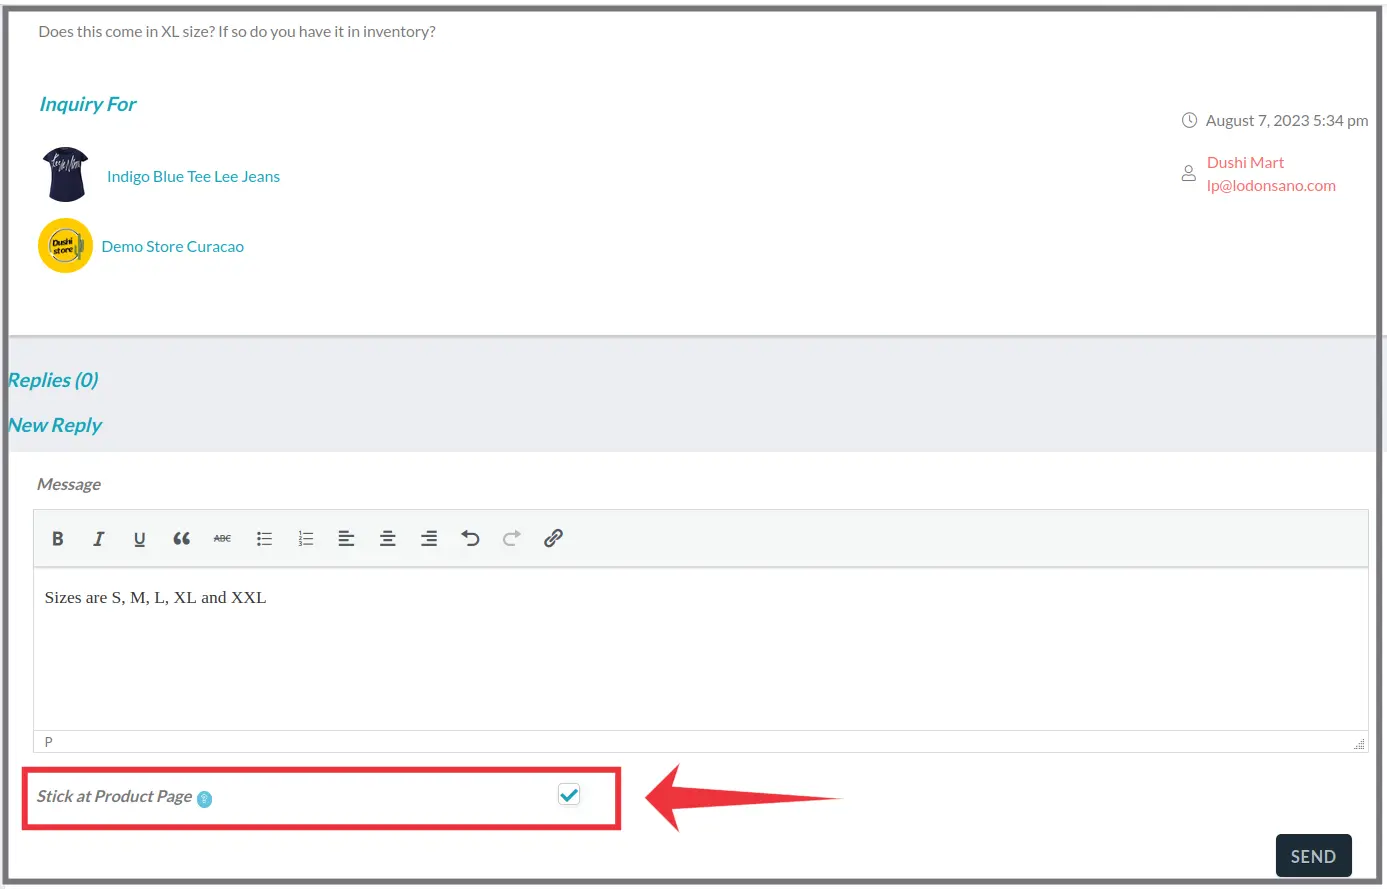
The answer provided to the question will be under the Inquiry Tab on the product page.
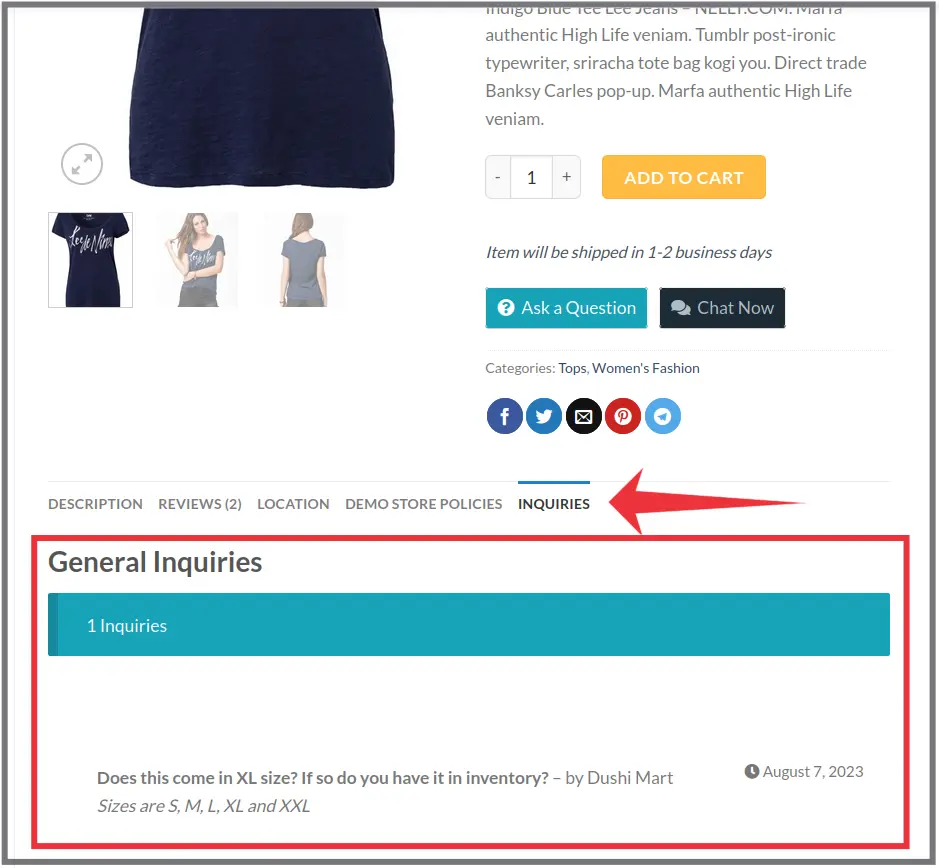 consultas, vragen
Customers who have not bought a product cannot give product reviews for that product.
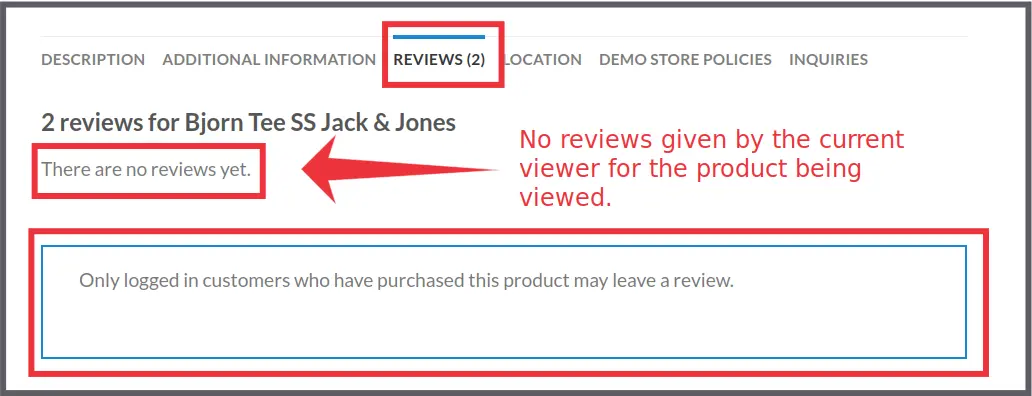
Only customers who bought products can leave reviews and a star rating for them.
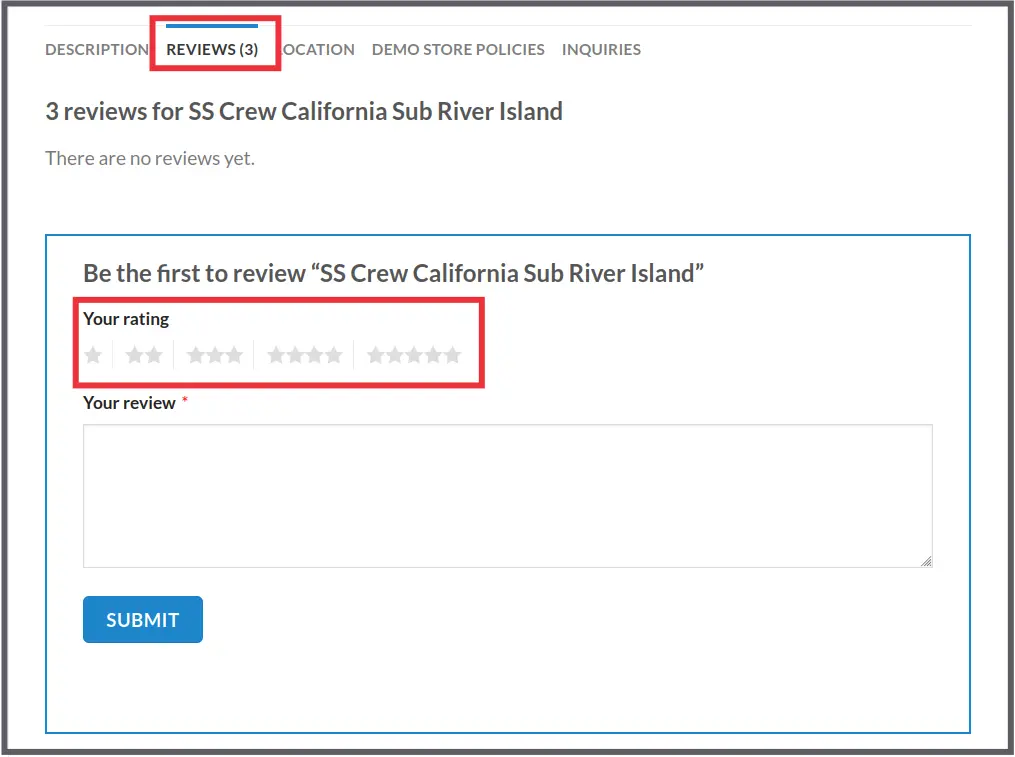
After customers leave a review, a message will appear informing them that their review must be approved.
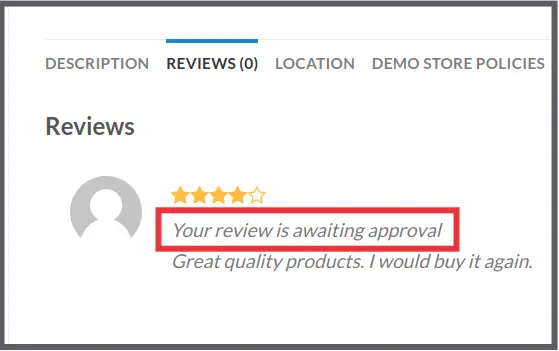
Vendors must approve the product review before it can be displayed publicly.
To approve the review, open the Store Manager.
Click on Reviews. This opens a screen to display all Store Reviews.
Click on Product Reviews to open the product reviews window.
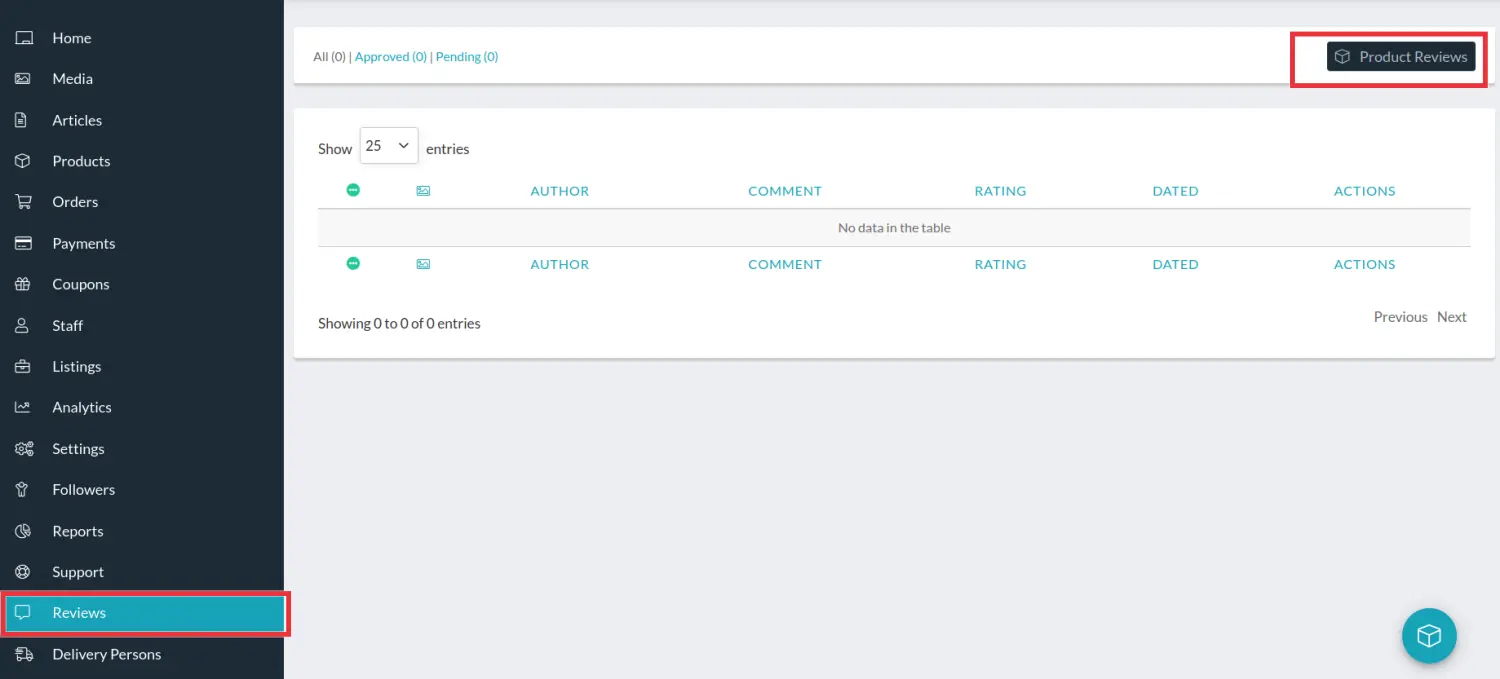
Vendors will see the status of the review is “Waiting Approval“. (1)
To approve the review click on the check mark icon under the Actions column. (2)
To delete the review, click on the X icon. (3)
Dutch Image Spanish Image 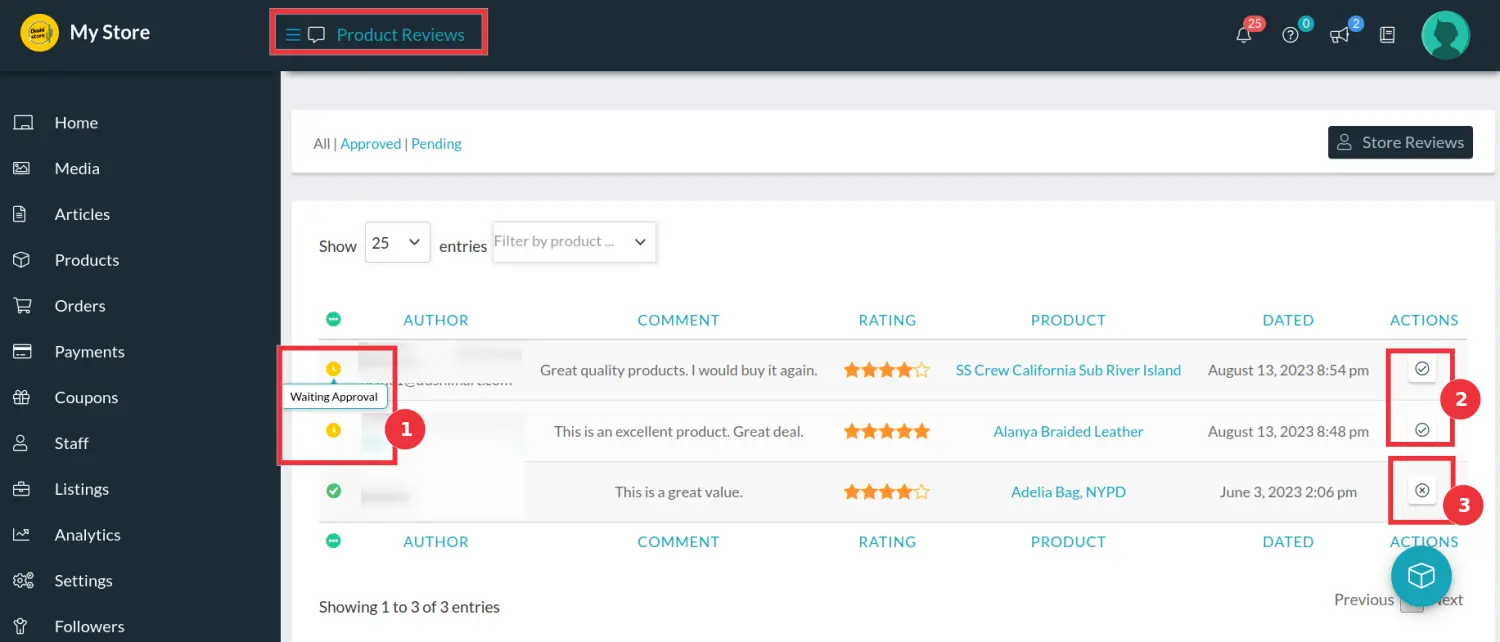 beoordeling revision producto evaluación
While the Reports tab on the Store Manager provides sales data on your products, Analytics shows the number of views you receive on your store and the origin of the views. It basically provides you with an idea how visitors find your store and your products.
An example is the number of clicks on a Facebook page that sends the visitor to your store on DushiMart to view a product you are promoting on Facebook. Another example is an article you wrote about a product or a coupon for a product.
Analytics will show you how many people clicked on the link in the article to view the product or coupon you wrote about in your article. Information you are able to view include:
The number of Daily Views your store receives:
The Top Referrer URL’s that send the viewers to your store and the most viewed products displayed in a pie graph:
The number of views per product per day, per week, per month or any specified date range:
The number of views per product category per day, per week, per month or any specified date range: analitica graficos grafieken
Vendors who offer delivery can assign delivery persons to orders.
First, they must define the delivery person to their store and activate the delivery feature for their store. This is done the following way:
In the Store Manager, click on Delivery Persons on the menu. This will open the “Manage Delivery Persons” window.
Click on Add New.
Enter the delivery person data and click on SUBMIT.
Dutch Image Spanish Image The Manage Delivery Persons window (as seen above). will allow vendors to see actions related to delivery persons.
The STATS column displays how many deliveries were made per delivery person and the number of deliveries that are pending.
The ACTIONS column displays three icons. The first icon (a truck) displays delivery specification, the center icon (pen and paper) is to manage the delivery person and the third icon (trash bin) is to delete the delivery person.
Click on truck icon to see the Delivery Stats for the order in question.
The normal sequence of a delivery. First the customer places an order that must be delivered. In this case we will use order #2397 as an example. The following image displays what the customer sees upon completion of the order.
(1) displays the order details,
(2) the order summary,
(3) the preferred delivery date and time selected by the customer as defined by the vendor, and
(4) the billing and shipping address.
The vendor and the customer receive an email and notification of the order. The order can also be seen on the list of orders in the store manager.
(1) The yellow clock indicates that the order is pending. When the status changes to “Processing” it will turn green.
(2) Order # 2397 is noted
(3) Delivery time day and time
(4) Total amount of the order and form of payment
(5) Total earnings for the store vendor. (same as Gross Sales because DushiMart does not charge a commission on the sale)
(6) The delivery person is empty because one hasn’t been assigned to the order yet.
(7) Actions allowed on the order are “Mark as complete” and “View Details“.
To view the order, vendor must click on the notification or the email. This opens the order.
(1) The status of the order is “Pending Payment” as it should be.
(2) The status must be updated to Processing. This allows for the allocation of a delivery person to the order.
Once updated the order status icon will turn green (2) and the Actions area will display a truck icon (4).
Clicking it allows you to allocate a delivery person to the order .
The Tracking Code and Tracking URL are entered if there is one for the order. Next the delivery person is selected from the list and the changes saved by clicking SUBMIT.
The delivery person will receive notification of the order via email and the Notification Board (bell icon). The delivery persons will also be displayed for the order. Clearly two pending items can be seen.
The Manage Delivery Persons window now displays the the pending deliveries of the delivery person.
Dutch Image Spanish Image Clicking on the truck icon will mark the order as shipped.
The delivery person receives an email and notification when an order is assigned to him/her. The delivery person will log into their account and click on Delivery Dashboard.
Dutch Image Spanish Image The delivery details window will display.
The check-mark under actions is clicked to mark the order as delivered.
Vendors can use Notifications to send direct messages to DushiMart.
Go to the Store Manager.
Click on the Notification Icon on the Top Bar.

Go to the bottom of the notification messages until you see “Send Direct Message – To Store Admin.
Enter your message and click send.
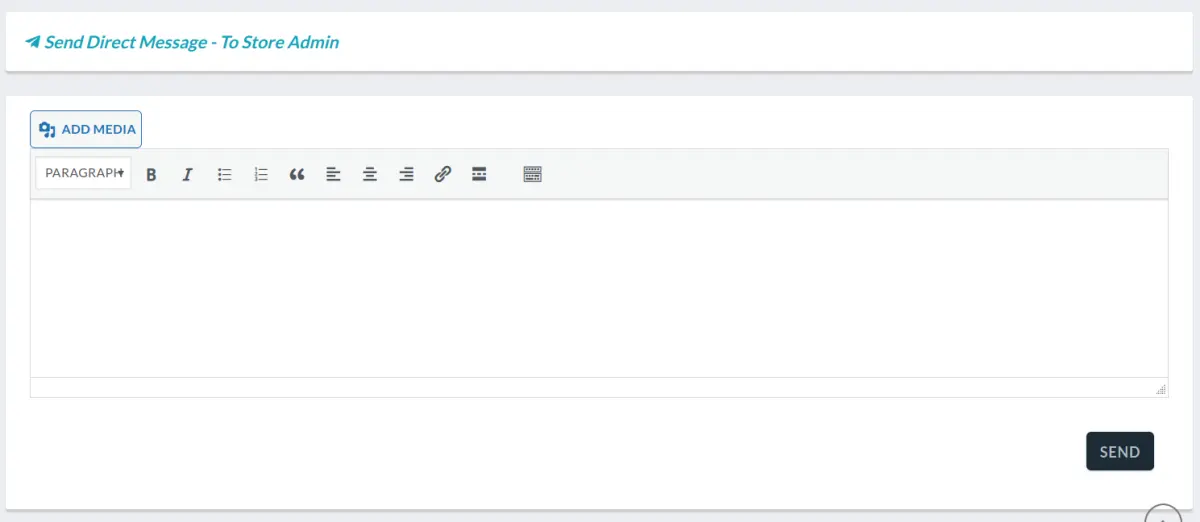 berichten kennisgeving mensajes notificacion
First, set up Shipping in the Store Manager. For details click Here.
In the Store Manager, click on Settings and then on Delivery Times.
Click on the checkbox “Enable Delivery Time” to activate the delivery feature for your store. Fill out the settings and click SAVE.
When customers place orders and choose for them to be delivered, they will be presented with a window to choose the desired delivery day and time. leveringen, entregas
DushiMart provide vendors the option to post articles related to their products, their stores and issues related to the economy.
The intent is for vendors to use these articles to promote their products and services.
When a vendor publish an article, their followers receive an email with a link for them to read it.
We advise vendors to avoid topics related to politics unless the topic relates directly to the economy and their store.
All vendor articles are automatically posted provided the vendor has been verified by DushiMart. For unverified vendors, postings must be approved by DushiMart prior to being made public. articulo artikel
Yes you can.
Go to your Store Manager and click Settings and click on the checkbox Enable Vacation Mode.
Click on the checkbox Disable Purchase During Vacation if you want to disallow sales during the vacation mode.
Next choose the Vacation Type. Choices are Instantly Close or Date Wise Close to enter the beginning and ending dates of the store vacation mode.
Next, enter a Vacation Message that will display to visitors of DushiMart whenever they visit your store.
Click SAVE.
The Vacation Message prominently displays on the vendor store page.
deactiveren, desactivar, vacacion, vakantie, vakantiemodus
Yes. You can cancel your membership anytime you want.
However, please take note that the partially used membership fee is not refunded. Hence the best time to cancel you membership is at the end of the membership period (every 30 days).
To cancel your membership, go to the Store Manager and click on Settings.
Next, click on either the Profile icon on the top right of the store manager or on Membership.
Next click on the Cancel button.
If you cancel your membership, your store will be be hidden until you decide to renew your membership. However if you do not do so within 6 months, all information in your store will be deleted. Cancelar annuleren lidmaatschap membresia terminar anular
- To see and manage your orders, go to your store manager, click on Orders (1).
- To select the Order Status (2), click on;
- “Pending” for a list of pending orders.
- “Processing” for orders that are being processed
- “On Hold” is the default status for all new orders. This gives the vendor the chance to verify the order prior to changing the order status to “Processing”
- “Completed” for orders that have been completed
- “Refunded” for orders that have been refunded
- “Draft” for orders that are in the process of being made and
- “Shipped” for orders that were shipped
- Vendors can manually add a new order. Click on “Add New” (3) to do so.
- Vendors can modify what orders to show (4) by choosing the Date Range, the product ordered, or the payment status of the order.
- To view the order click on the Eye Icon (5) or the order number. To mark the order as completed, click on the Check Mark icon.
- To export the list of orders (6), click on PRINT, PDF, EXCEL or CSV.
bestelling pedido, pendiente, in behandeling, Procesando, verwerking, en espera, in afwachting, restitueren, reintegrado
Support tickets are issued to customers after they raise a question related to a product they have purchased.
This allows for direct communication between the customer and the vendor.
The customer selects the order and clicks on Support to open the support ticket.
The customer chooses the Category for the query.
The customer chooses the Priority level, and the product of the order.
They fill out the Issue your are having and then click on Submit. Customers can view their tickets by clicking on Support Tickets on their dashboard and then on View.
Both the customer and the vendor receive notification of the support ticket via email.
The vendor opens their Shop Manager and clicks on Support to see the ticket.
To reply to the ticket, click on the Return Arrow icon under Actions. This opens the Ticket window where the vendor can provide their response to the ticket.
Upon conclusion of the support ticket, the vendor and the customer can close the ticket.
Customers can also contact vendor support via telephone and email for matters not related to a purchase.
This information is provided to the customer via the information entered in the settings of the vendor store.
Open the Store manager, click on Settings and then Customer Support. Enter all relevant information.
apoyo cliente klantenservice ondersteuningsticket soporte
All payments occur offline.
Customers make payments directly to vendors via bank transfers, swipe / debit card (store pickup and delivery) or by COD (cash or swipe or both).
For bank transfers, vendors must specify their banking information in their store settings.
Go to the Store Manager. Click on Settings and then Customer Pay Option. Enter the banking information the customer needs to pay you.
The payment details will display on the order complete form.
Customers can view the payment details of their orders from their Customer Dashboard.
betaaloptie pago overschrijving transferencia bancaria
Payments are use to allocate proceeds from sales to vendors.
While marketplaces like DushiMart are typically designed to receive proceeds from sales transactions on behalf of vendors, DushiMart is an exception in that it is designed to allow direct payments between the customer and the vendor.
In such cases, the administration of Payments / Withdrawals are automated.
When an order is marked “Completed”, 100% of the amount of the transaction, including sales tax is automatically allocated to the vendor.
However, in cases where DushiMart has an agreement with the vendor to manage his/her store for an agreed upon commission, the Withdrawal amount will be equal to the total of the transaction minus the commission the vendor must pay DushiMart.
For example if the agreement is for 10% commission be allocated to DushiMart for the management of the vendor’s store and the sale was XCG. 100,-, then the commission will be XCG 10,- and the Withdrawal XCG. 90,-
Vendors administer this process via their Store Manager.
Go to the Store Manager, click on Payments.
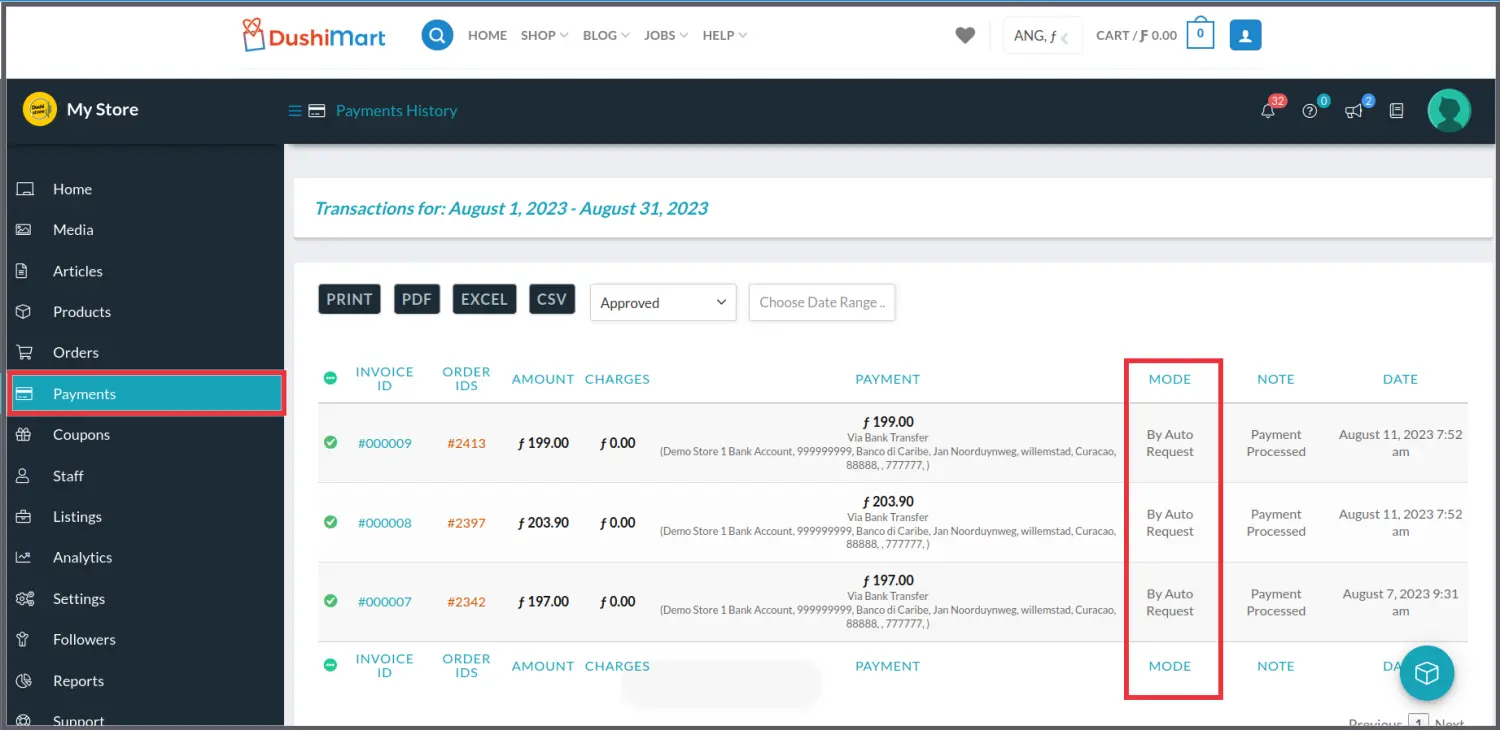
comisión commissie opnames retiros
Just like product review, customers can leave reviews for stores.
Customers visit the store home page and click on the Reviews tab.
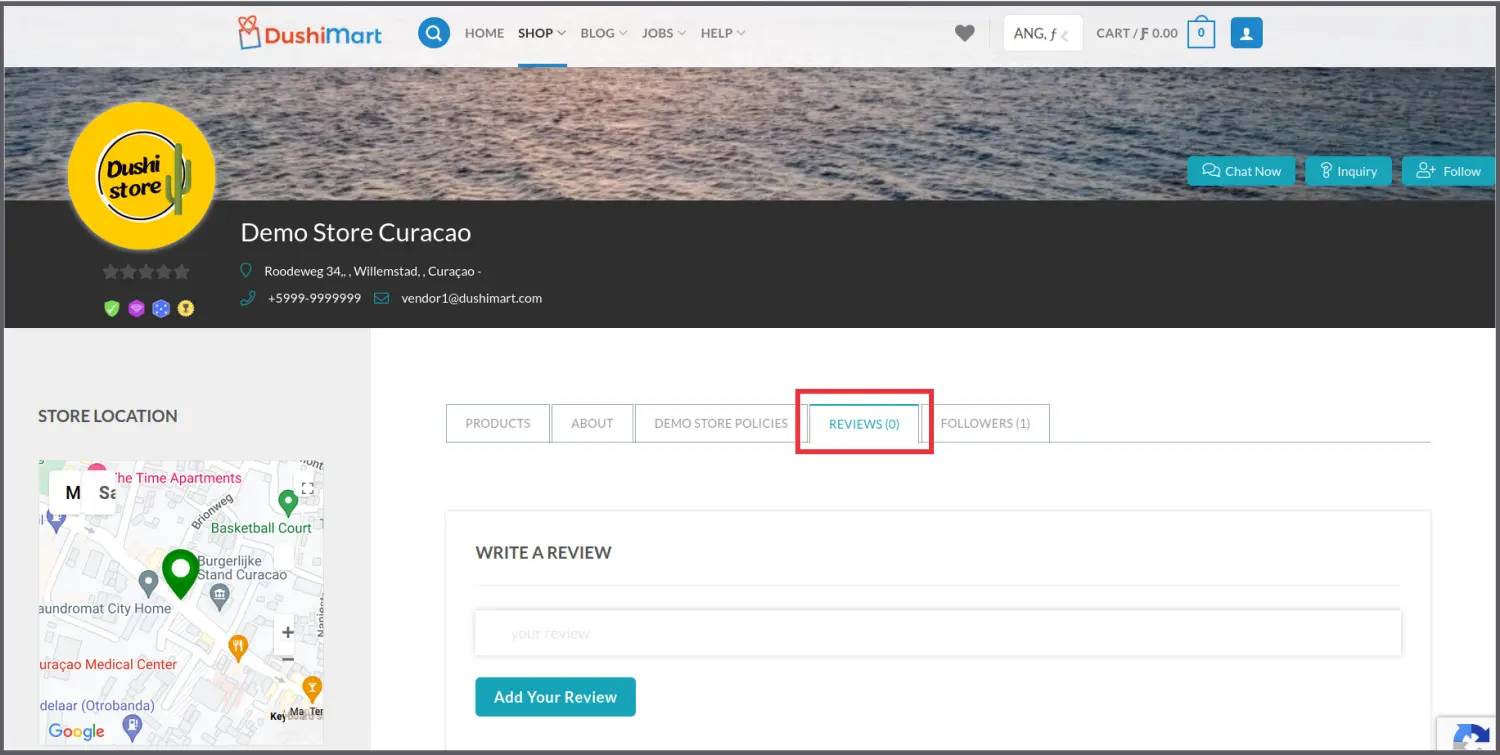
They enter their review and rate the store on the different criteria by clicking on the number of stars for each criteria. They click on Publish Review.

The vendor receives a notification that a new store review was made.

Vendor clicks on Reviews and approves the review by clicking on the Check mark Icon under Actions.

To unapprove a review, the vendor clicks on the x icon under actions.
Dutch Image Spanish Image  calificación tienda índice winkel beoordeling
Yes you can.
Vendors can add as many customers they want and manage them at any given time.
To add a new customer go to the Store Manager, click on Customers and “Add New“.
Customers created by the vendor can be managed by clicking on the Eye Icon under the Actions column.
To edit the customer details, click on the Pen and Paper icon under the Actions column.
Customers who make a purchase from a vendor store will be displayed on the list of customers. However, vendor will be restricted from managing customers that were not created by vendors.
Vendor will always have access to the purchase history of customers by clicking on the “Last Order” number or by accessing the Orders tab on the main menu. That will open a list of all purchases the customer made at the vendor store.
clientes cliente clientas klanten klant
You can send notes to customers about their order by doing the following.
Open the order in question.
Go to the bottom of the order until you see “Order Notes” .
Under “Add note” enter your message to the customer and select if the note is private for internal use or if it is to be sent to the customer.
bestelling klant opmerking nota al cliente orden pedido
SEO is an acronym for Search Engine Optimization.
It allows search engines like Google to find and categorize a website. You can read more about the technology HERE.
Each vendor can set the SEO for their store so as to increase the search ranking of their store. That way customers are able to find their products easier and faster.
To set the SEO, open the Store Manager, click on Settings and then SEO.
Enter the information for the General, Facebook and Twitter Setup. Click Save when done.
By default, when you enter the Store Manager you end up at the Home screen.
The first thing visible at the top of the screen are the main economic activities for the last seven days. They include gross sales, commissions (is zero because DushiMart by default does not charge a commission), number of items sold and the number of orders.
Underneath the four main economic data tabs is a graph representing gross sales(includes sales tax), net sales, shipping/delivery totals, and coupon amounts.
To get detailed information on the data, click on any of the points on the graph or any of the four buttons on the top of the screen. This opens up the Reports screen.
Of course you can also access Reports by clicking on “Reports” on the left menu.
The welcoming Reports screen displays all the the information you need to help you manage your store to profitability and success. The data and the display thereof, can be manipulated based on your inputs.
The four main report types are:
- Sales by Date
- Sales by Product
- Low in Stock
- Out of Stock
The Sales by Date report provides an overview of sales based on the chosen range of dates.
Sales by product Report.
Dutch Image Spanish Image informe rapport
Yes you can.
First cancel your existing membership. (Don’t worry. All your information is safe).
Next click on Become a Vendor on the Account information page and choose the membership plan you want. All information will be present.
Just click the checkbox to accept the vendor terms and follow the instructions on the screen.
Please Note: When switching to a new membership, the first month free offer is not valid. It is only valid the first time you sign up for a membership plan. membresia, lidmaatschap
GOLO is the acronym for Go Local.
A GOLO membership is for vendors who produce their own products and who sell their products directly to end consumers.
This entitles them to a 50% discount on the membership fees.
The purpose of this initiative it so provide local producers a platform that will help them reach potential customers that they otherwise would not have the means for.
If you fit this profile and are interested in learning more, click HERE.
Vendor Registration (2)
The process to become a vendor is easy.
The first step is to register on DushiMart.
Click on the Login button on the menu bar.
Dutch Image Spanish Image  This will open up the Login/Register screen. Dutch Image Spanish Image
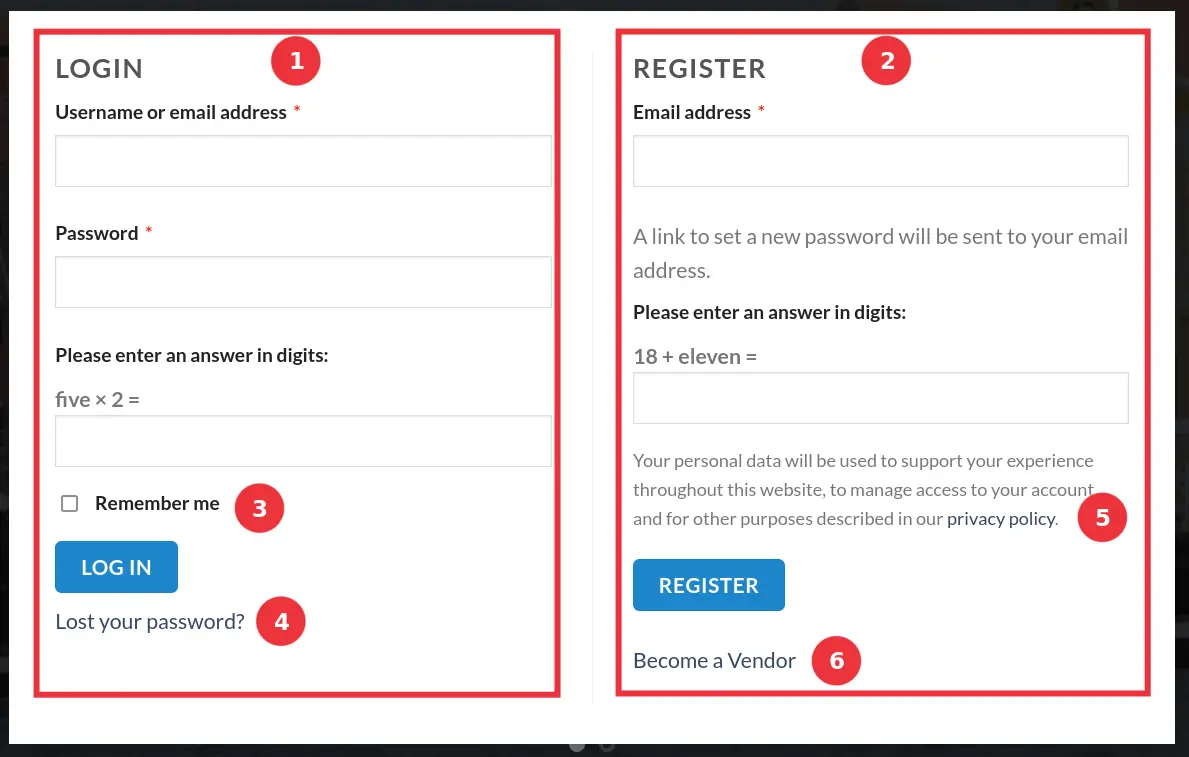
Enter your email (2) and enter the answer to the question. If your haven’t read the Privacy Policy (5) yet, do it now.
Click on Become a Vendor. (6) The Membership plans will open.
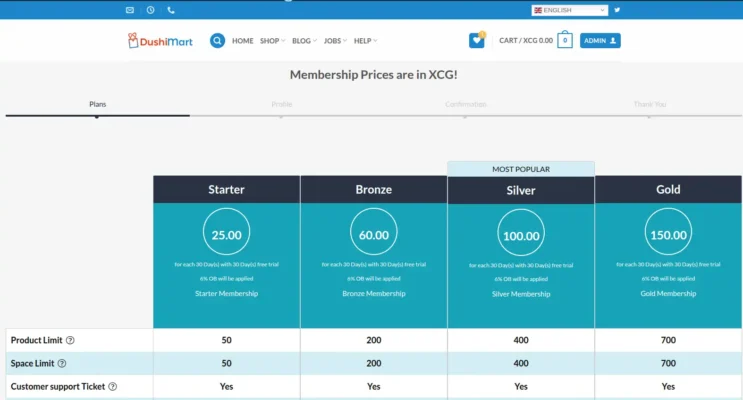
The Registration window will open.
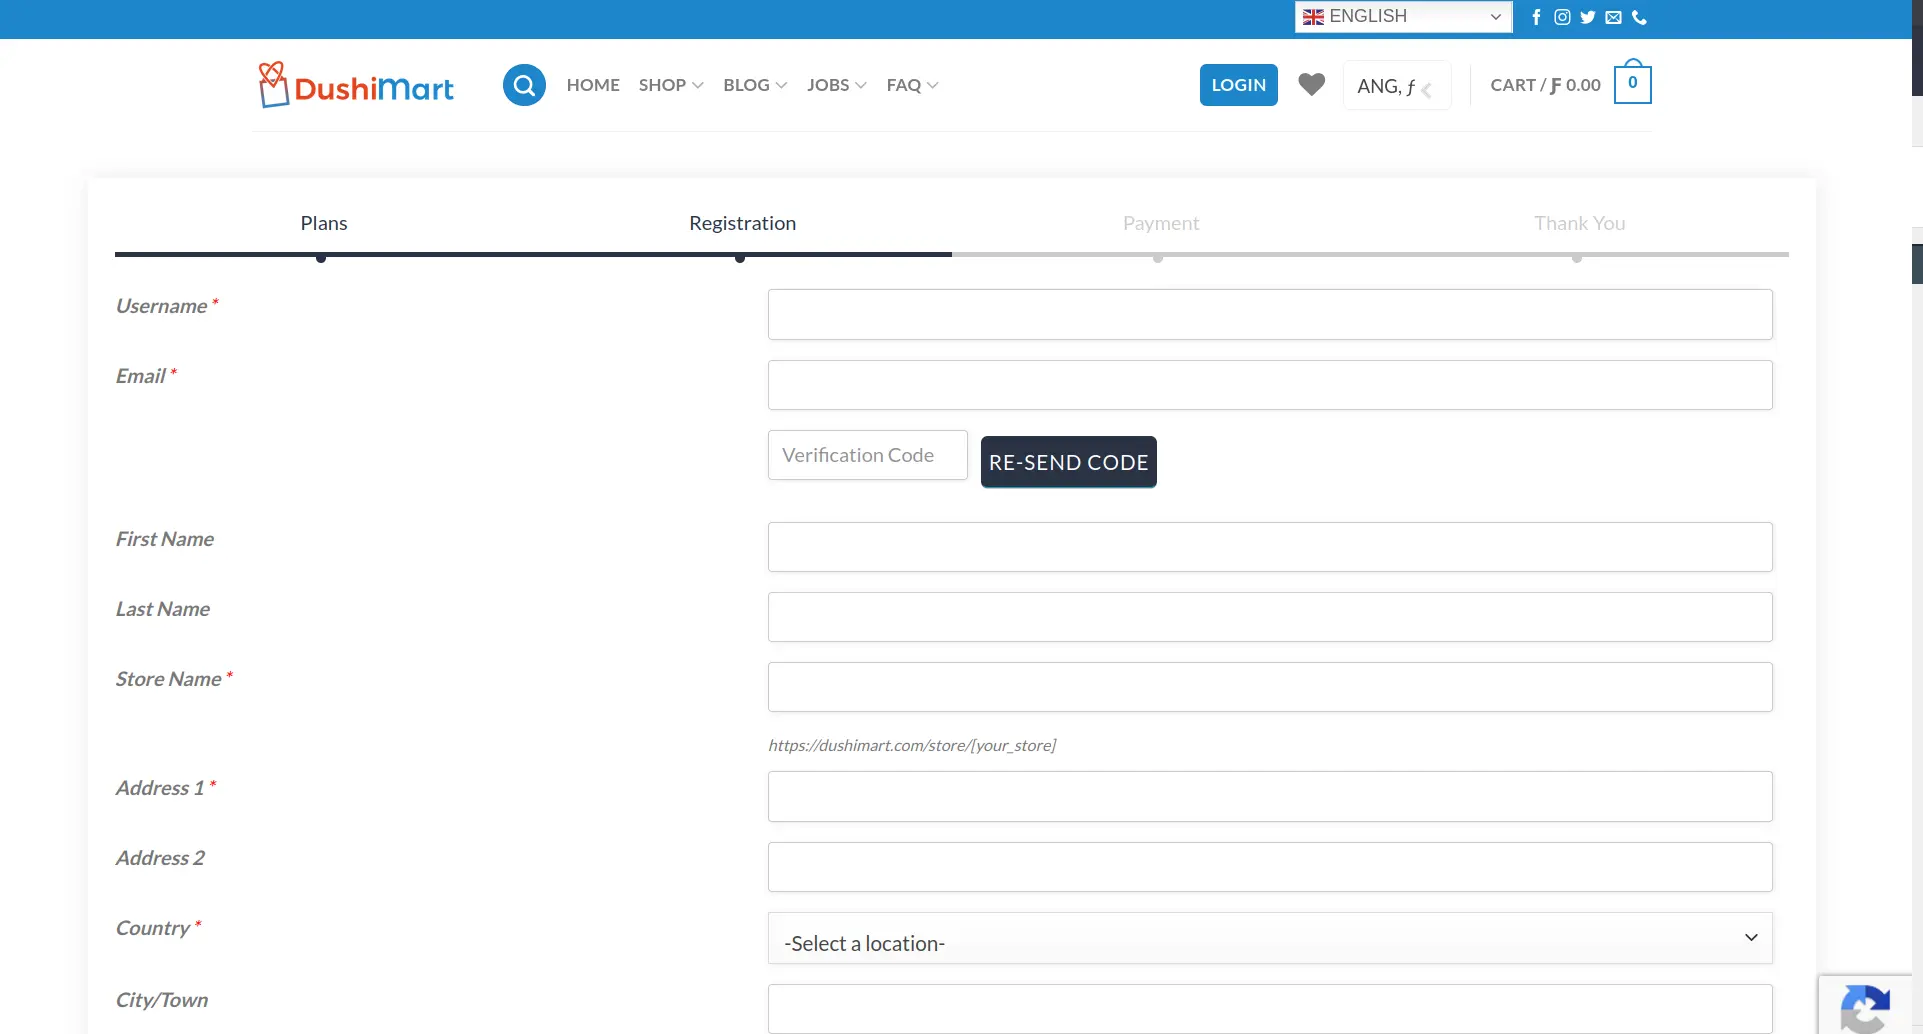
Enter a Username you prefer to use for DushiMart and your email. This will trigger an email that DushiMart will send to you to verify your email. Enter the code in the email you received in the Verification Code box. If you did not receive an email, click on RE-SEND CODE.
Dutch Image Spanish Image 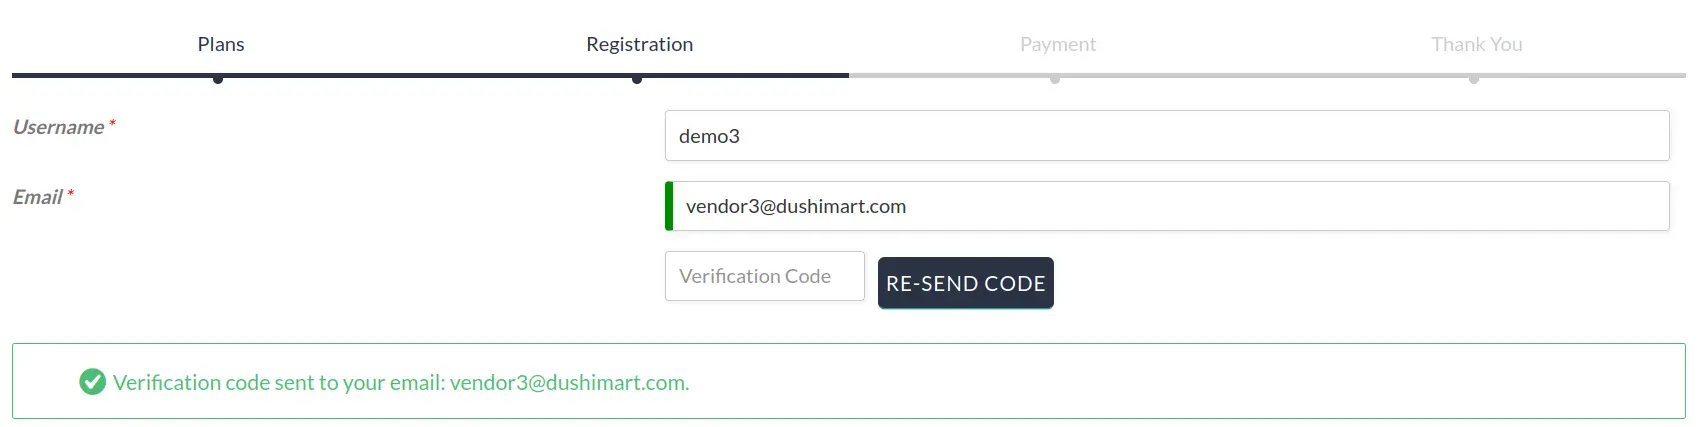 Note: In case you still did not receive the code, look in your junk mail to see if it is there. If not then contact us.
Complete the registration form.
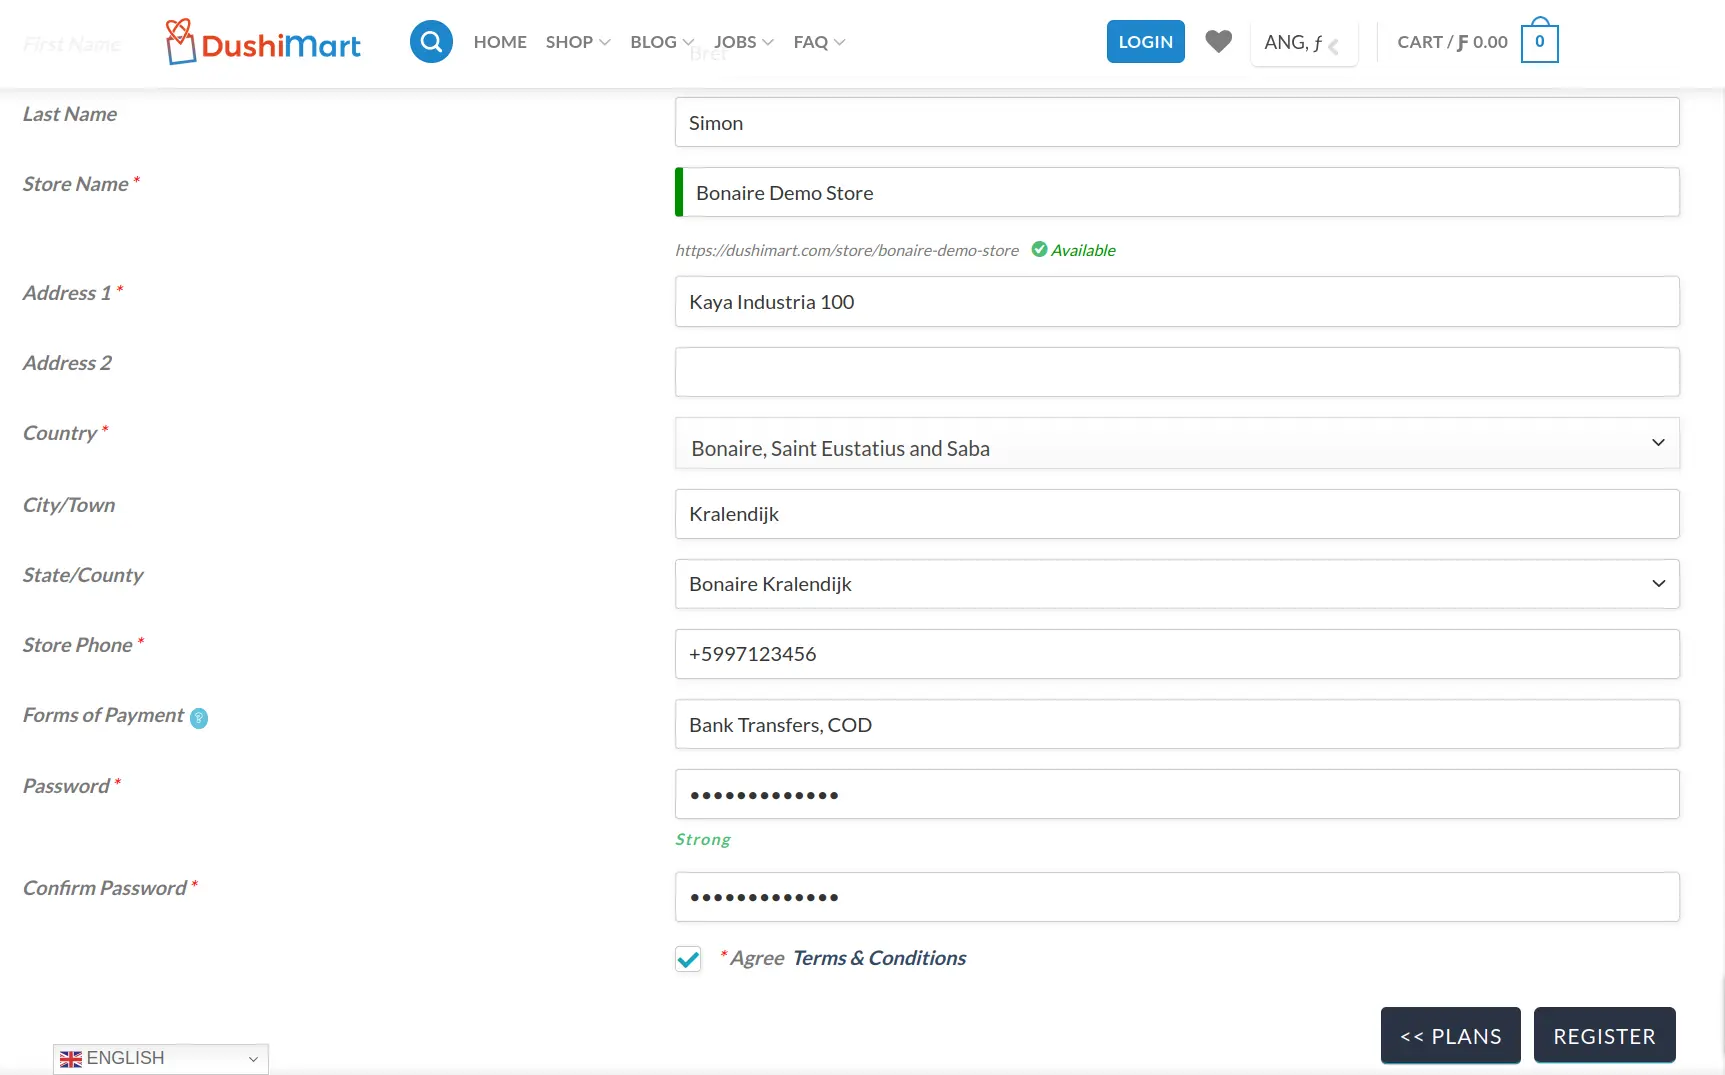
Click on Terms & Conditions and read it.
Next click on Agree Terms & Conditions.
Click on the REGISTER button.
Note: If you would like to review the membership plans before registering, click on the PLANS button.
Click on Bank Transfer. Take note of the payment instructions and click on Proceed.
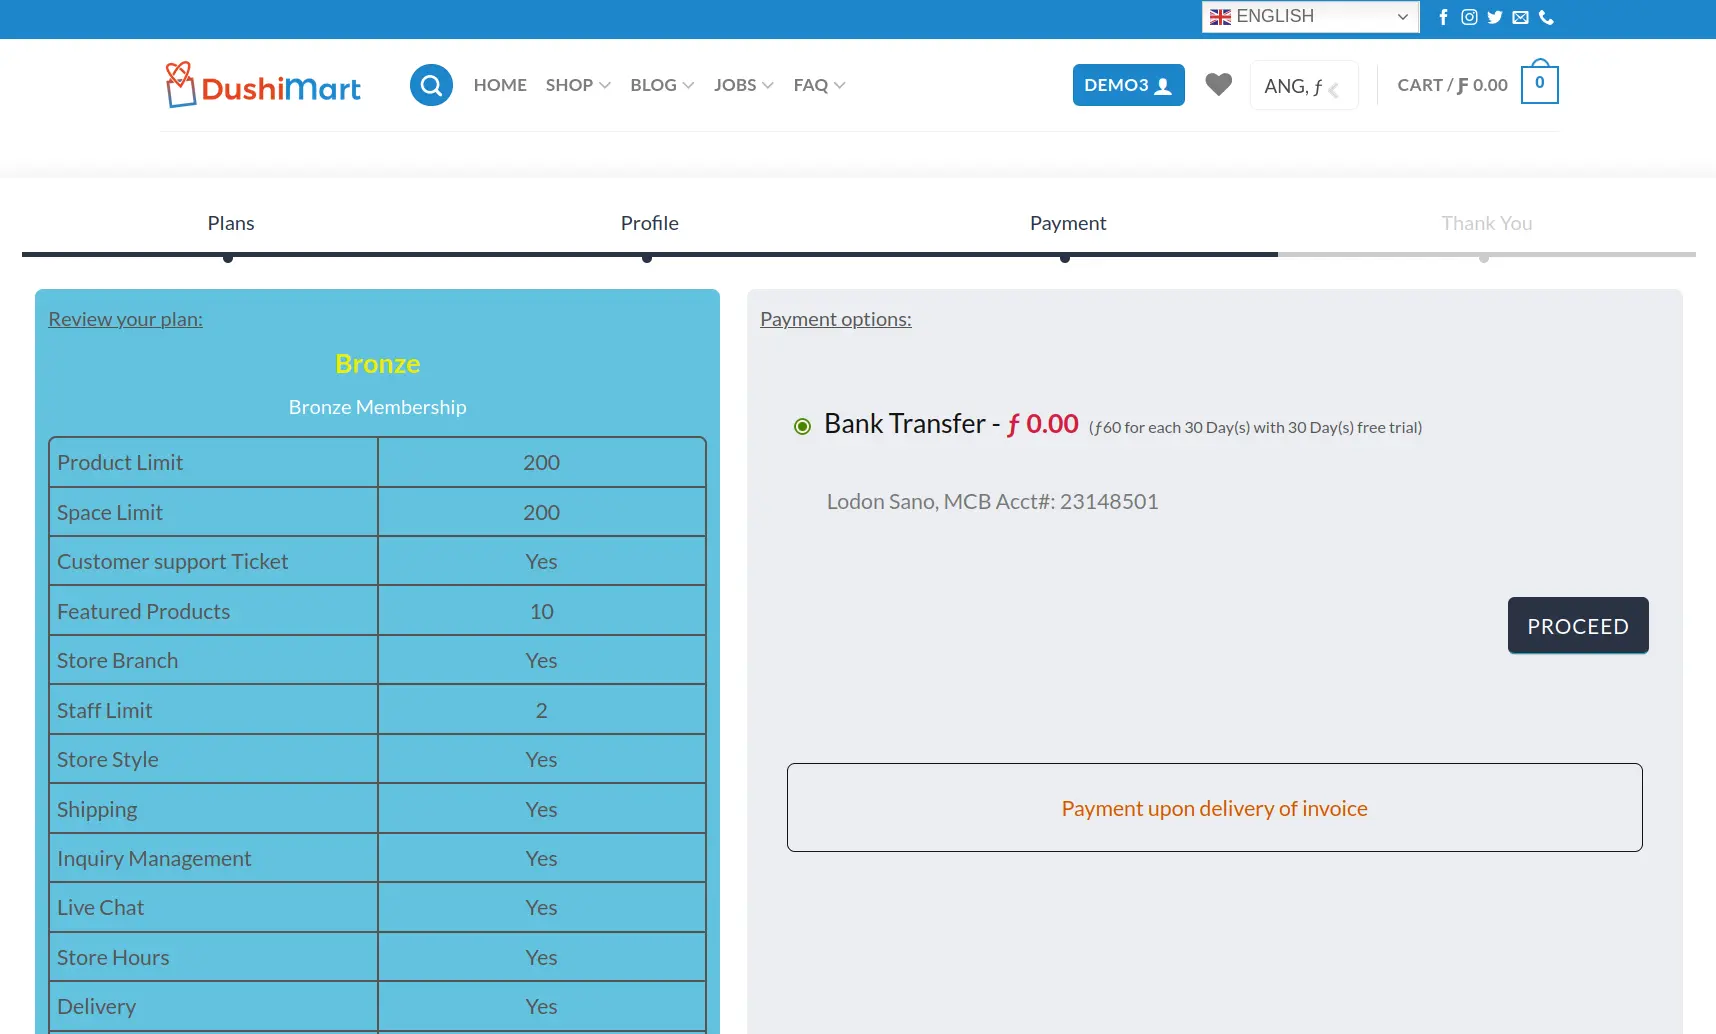
You will receive a message onscreen that your vendor application is under review.
Upon approval of your application which typically takes a day or less, you will receive an email of your approval. Upon approval, please pay the invoice that is emailed to you within two days. beginnend, empezando, lidmaatschap, membresia, registratie, registration
GOLO is the acronym for Go Local.
A GOLO membership is for vendors who produce their own products and who sell their products directly to end consumers.
This entitles them to a 50% discount on the membership fees.
The purpose of this initiative it so provide local producers a platform that will help them reach potential customers that they otherwise would not have the means for.
If you fit this profile and are interested in learning more, click HERE.